Pole barn roofing question

   / Pole barn roofing question #41  
Thanks, that's kinda what I was thinking too. I'm talking with another contractor this morning and requested 26 gauge. My understanding, there's not much price difference. I'm just still torn about having spread out screws holding the panels down or using the clamp down style with screws only on the edge. Seems to me, it would be worlds better to have screws every 1 foot instead of spread 2 feet apart. Your thoughts?

Morton buildings put our pole barn up last year. I live close to Knoxville. All the siding and roofing is 19 ga. material. All the screws are put on the 'high rib' section of the metal, nothing in the flat areas. Less chance of leaks as all the water flows in the flat section. Morton has a special screw gun that allows them to put those screws on the high rib...if you don't have that adapter its tough to get the screw started and torqued right. The high ribs are spaced at 12" on center. You want to avoid putting to many screws in the flat areas...more chance of a leak.
 
   / Pole barn roofing question
  • Thread Starter
#42  
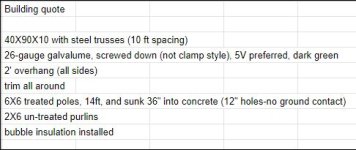
Would you guys mind looking over my shoulder and see if I'm missing anything below? I've requested bids from several pole barn builders and received one for $15,500. This is what I asked for (see below). Do you see anything glaring that I missed? I'm just looking for a pole barn structure, steel trusses with roof-only. Thanks for your input.

barn specs.jpg
 
   / Pole barn roofing question #43  
The quote doesn't mention sides, roof pitch, or purlin spacing. Are you going to do doors and windows yourself?
 
   / Pole barn roofing question
  • Thread Starter
#44  
The quote doesn't mention sides, roof pitch, or purlin spacing. Are you going to do doors and windows yourself?

I'm doing sides/doors/windows myself (hey, I gotta have some fun out of it). Thanks for the other items. Guess in my ignorance I assumed that pitch and # of purlins was pretty much standard among manufacturers. I'll ask them to clarify it. Thank you.
 
   / Pole barn roofing question #45  
Why 5v? And I wouldn't use bubble wrap. I have one barn that I used the double foil bubble wrap on and its lasted. That was 2004. All the ones I've used the white/foil bubble wrap on it all deteriorated. Insulation I use now has fiberglass in it. 6' wide rolls
 
   / Pole barn roofing question
  • Thread Starter
#46  
Why 5v? And I wouldn't use bubble wrap. I have one barn that I used the double foil bubble wrap on and its lasted. That was 2004. All the ones I've used the white/foil bubble wrap on it all deteriorated. Insulation I use now has fiberglass in it. 6' wide rolls

I like the look of 5v. Main thing, I'm not wanting whatever that clamp-down stuff (whatever it's called). 5v seemed to be a good-looking standard. Is there something better you'd recommend? Also, on the insulation, got any links? Most of what I've been seeing around here (other venues) is bubble wrap. Let me ask, can you start with bubble and change out or add-to it with something else later on?
 
   / Pole barn roofing question #47  
I like the look of 5v. Main thing, I'm not want whatever that clamp-down stuff (whatever it's called). 5v seemed to be a good-looking standard. Is there something better you'd recommend? Also, on the insulation, got any links? Most of what I've been seeing around here (other venues) is bubble wrap. Let me ask, can you start with bubble and change out or add-to it with something else later on?

5V (24" coverage ) is more expensive than Rib Panels (36" coverage) you also will get more oil canning on 5v if you do not use heavier gauge 26 or 24
 
   / Pole barn roofing question #48  
You seem to be leaning more toward having a contractor do it, but I know how these things go. You might bounce back and forth a few times before pulling a trigger. Let me just give a few tips I learned while building my pole barn.

1. Treated Wood poles are delivered moist. As they dry out, they twist/bend/warp to whatever degree they are allowed to. If you concrete them into the ground, leave them free-standing and come back a month later to install the roof, you'll find that your (hand-picked, straight-as-an-arrow) poles have bent, sometimes to a bafflingly extreme degree, and the tops are now off by as much as a foot or more. And they might have twisted as much as 10-20 degrees from bottom to top. Don't bring home your poles until you're ready to build them into some kind of structure that will keep them straight upright and aligned. If I had it to do over again, I would probably build wall sections laying on the ground and then lift the walls up and drop into the holes, then pour cement.

2. Building a pole barn all by yourself, especially if you've never done anything like it, is very time-intensive. If your time is worth anything at all, it probably makes more sense to pay someone with a crew and machinery to do the job. This was the hardest thing for me to swallow. I set out alone to save money and found that it just wasn't worth it. If I were retired with nothing better to do it would be a different story. I did get the job done, but not at any measurable savings.

3. 29ga material should be considered consumable. Use it to build your storage shed for dog food or something, but not for anything you expect to last. 26ga is the thinnest you should consider.

4. Welding steel lattice trusses is NOT a time or money saving venture. I was so proud of the truss design I made myself in CAD. I had my chest puffed out as I spent $500 in steel to build them. After 12 hours I had one of them 75% welded up. I had to throw in the towel. I absorbed that $500 loss (plus the $1,200 worth of lost time) and went out and bought the $900 worth of trusses I should have started with. That potential $400 savings turned into a $1,700 lesson; I hope to pass the savings on to you.

5. 2x4 wood purlins spanning 10ft is a recipe for disaster. I have 2x4 steel purlins spanning 8ft on 48" centers and I think I'm on the ragged edge of what you can get away with. This is an area with no snow, but high wind.

6. Speaking of wind, not sure what your area is like. Hurricanes? Tornadoes? If you experience any kind of high winds, ever, design around the assumption that there's a giant in the sky who wants to rip the roof off your structure as soon as you're done building it (or during construction). Trusses should be through-bolted to poles. Poles should be not merely cemented into the ground, but anchored into the cement. As cement cools/warms it shrinks/expands. It can shrink away from a wood pole to the point that the wood pole can be lifted out of the cement by hand. I drilled several beefy lag screws into the bottoms of my poles on all sides before cementing into the holes. Walls provide bracing against wind. Since you won't have walls (at least at first) you won't have that bracing. Using 6x6 will help but that giant in the sky is pretty determined. Mine doesn't have walls on all sides either, and I used tensioned wire rope cross-cabling on the sides to add wind resistance. Also in the roof. Nothing that could potentially experience any wind forces should be fastened with nails (IMHO); I used deck screws for everything. Using nails just invites the giant to a buffet of carnage.

7. The edges of the steel roof panels are very weak until they're fastened to something (like the next roof panel). As you're installing the roof, Dont step or put your weight anywhere near the unfastened/unsupported edge of the panel. It will buckle and deliver you to the ground with haste. You'll have injured yourself and wasted a panel. It's easy to forget this, especially when positioning and fastening the next panel. You look down and dont see an unsupported/ unfastened edge; you see 3 more feet of real estate. Until you get those two panels screwed together, what you're actually looking at is a strip of death zone.
8. Observe industry-recommended roof pitch for your area and the roofing product you're using. Minimum roof pitch for r-panel is 1:12. And that's what I used. But if I lived in an area that got snow, I would need to use a steeper pitch. USE THE SEAL STRIP BETWEEN PANELS.
 
Last edited:
   / Pole barn roofing question
  • Thread Starter
#49  
You seem to be leaning more toward having a contractor do it, but I know how these things go. You might bounce back and forth a few times before pulling a trigger. Let me just give a few tips I learned while building my pole barn.

1. Treated Wood poles are delivered moist. As they dry out, they twist/bend/warp to whatever degree they are allowed to. If you concrete them into the ground, leave them free-standing and come back a month later to install the roof, you'll find that your (hand-picked, straight-as-an-arrow) poles have bent, sometimes to a bafflingly extreme degree, and the tops are now off by as much as a foot or more. And they might have twisted as much as 10-20 degrees from bottom to top. Don't bring home your poles until you're ready to build them into some kind of structure that will keep them straight upright and aligned. If I had it to do over again, I would probably build wall sections laying on the ground and then lift the walls up and drop into the holes, then pour cement.

2. Building a pole barn all by yourself, especially if you've never done anything like it, is very time-intensive. If your time is worth anything at all, it probably makes more sense to pay someone with a crew and machinery to do the job. This was the hardest thing for me to swallow. I set out alone to save money and found that it just wasn't worth it. If I were retired with nothing better to do it would be a different story. I did get the job done, but not at any measurable savings.

3. 29ga material should be considered consumable. Use it to build your storage shed for dog food or something, but not for anything you expect to last. 26ga is the thinnest you should consider.

4. Welding steel lattice trusses is NOT a time or money saving venture. I was so proud of the truss design I made myself in CAD. I had my chest puffed out as I spent $500 in steel to build them. After 12 hours I had one of them 75% welded up. I had to throw in the towel. I absorbed that $500 loss (plus the $1,200 worth of lost time) and went out and bought the $900 worth of trusses I should have started with. That potential $400 savings turned into a $1,700 lesson; I hope to pass the savings on to you.

5. 2x4 wood purlins spanning 10ft is a recipe for disaster. I have 2x4 steel purlins spanning 8ft on 48" centers and I think I'm on the ragged edge of what you can get away with. This is an area with no snow, but high wind.

6. Speaking of wind, not sure what your area is like. Hurricanes? Tornadoes? If you experience any kind of high winds, ever, design around the assumption that there's a giant in the sky who wants to rip the roof off your structure as soon as you're done building it (or during construction). Trusses should be through-bolted to poles. Poles should be not merely cemented into the ground, but anchored into the cement. As cement cools/warms it shrinks/expands. It can shrink away from a wood pole to the point that the wood pole can be lifted out of the cement by hand. I drilled several beefy lag screws into the bottoms of my poles on all sides before cementing into the holes. Walls provide bracing against wind. Since you won't have walls (at least at first) you won't have that bracing. Using 6x6 will help but that giant in the sky is pretty determined. Mine doesn't have walls on all sides either, and I used tensioned wire rope cross-cabling on the sides to add wind resistance. Also in the roof. Nothing that could potentially experience any wind forces should be fastened with nails (IMHO); I used deck screws for everything. Using nails just invites the giant to a buffet of carnage.

7. The edges of the steel roof panels are very weak until they're fastened to something (like the next roof panel). As you're installing the roof, Dont step or put your weight anywhere near the unfastened/unsupported edge of the panel. It will buckle and deliver you to the ground with haste. You'll have injured yourself and wasted a panel. It's easy to forget this, especially when positioning and fastening the next panel. You look down and dont see an unsupported/ unfastened edge; you see 3 more feet of real estate. Until you get those two panels screwed together, what you're actually looking at is a strip of death zone.

Thanks for such detailed input. I think at this point I've pretty firmly decided against going solo. I have 2 builders I'm considering. I'm just going over details to make sure I haven't missed anything then will request a formal quote from the winner, sign, then move forward. I'm intending to let them put the roof up and will come in and wall up 1 side and 1 end. Will likely be looking at getting this first phase in place by June then finish closing in by the end of the year.
 
   / Pole barn roofing question #50  
Summertown Metals

This is from a middle Tennessee builder of pole barns and upon reading some of this it seems 29 ga. is suggested for residential and 26 ga. for commercial. I recall once upon a time thinner gauge can be used if it has a higher tensile strength.

I would have the builder do it all. You would be surprised at how fast they can throw a building up compared to the average DIYer.
 

Tractor & Equipment Auctions

2012 Nissan Rogue (A50324)
2012 Nissan Rogue...
Case IH 3408 8 Row Corn Head (A52349)
Case IH 3408 8 Row...
1997 JOHN DEERE 544G WHEEL LOADER (A52472)
1997 JOHN DEERE...
2003 Lincoln LS (A50324)
2003 Lincoln LS...
2014 Dynapac CC4200 Tandem Vibratory Roller (A52748)
2014 Dynapac...
2024 BRAZOS  53FT ALUMINUM STEP DECK (A52472)
2024 BRAZOS 53FT...
 
Top