The next few days are not going to be fun

   / The next few days are not going to be fun #31  
When we lived in Glennallen, AK - watched the engineers test many solutions to get around frost heave. Each of those "pylons" were sunk into permafrost and had to have an acceptable, working solution. The final two solutions - wrap the steel poles in multiple layers of a heavy plastic like plastic drop cloths. This is a method used by the power & telephone company. The ground simply slides up/down the pole on the layers of plastic and the pole is never jacked out of the ground.

The final solution - a system of thermal collectors atop each post. It transfers heat to an antifreeze solution that circulates thru heat exchangers in the lower( below ground ) part of the pole. I could never figure how this system would work on an overcast day @ -30F. But this system works and does its job well.
 
Last edited:
   / The next few days are not going to be fun #32  
Counting in the provided picture... that's 8 quality PALLETS!

Whatcha gunna do with them?

:)
 
   / The next few days are not going to be fun #33  
We've never dug down below the frostline for fence posts set in concrete. That would be 4' for a 4' post here. We just don't do it. We dig 2' for a 4' post. 3' for a 6' post and 4' for an 8' post. We use an inverted V shaped hole that is wider at the bottom than it is at the top.

What seems to happen with frost heave on fence posts with a V-shaped blob of concrete that is wider at the top than it is at the bottom, is the frost lifts the post and concrete, the dirt settles in the voids all the way down the sides of the V, and the post is a little higher each year. If it's wider at the bottom, there's an extremely smaller footprint for the frost to lift. Think about it.

A cylinder that's 8" in diameter by 24" deep is around 180 square inches of surface area on the sides of the cylinder, if it's a V-shaped tapered hole, plus the bottom of the cylinder. Say 6" at the bottom. 3x3x3.14= 28.26.

So, about 180 + about 28 = about 200 square inches for the frost to grip.

Now make that hole an inverted V shape. 8" at the bottom and 6" at the top.

4x4x3.14 = 50.24 square inches for the frost to grip on the bottom of the hole.

So you have about 200 square inches of frost grippable surface VS about 50 square inches of frost grippable surface. That's about 4 times the surface area.

It won't grip the side of the slope very well on an inverted V shape.

Also, an inverted V-shaped hole that's wider at the bottom puts more mass around the post lower, which helps keep the posts from tipping or pulling out once the dirt is filled back on them.

So there you go. Hope that helps some folks.

The last time that I poured I cut the bottoms from 5 gallon buckets and put them upside down, using them as forms as you suggest. They also make forms for the purpose but they are way beyond my budget. (About 55$/per, the last time that I priced them.)My comments were based on just digging a hole and dumping concrete in. As I mentioned earlier, on larger construction such as pipelines I've seen them put down heavy plastic, pour, then wrap the plastic around the form; frost has nothing to catch on. Putting Styrofoam or a board over the pour also can help... frost goes down but it doesn't go sideways. A friend told of just putting a 5 gallon pail around each post. the bucket will go up and down rather than the concrete.
 
   / The next few days are not going to be fun
  • Thread Starter
#34  
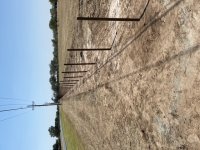
Actually it is nine pallets. We are building a pipe fence around five acres adjacent to our house that we purchased.

We are using 2-3/8 oilfield pipe. Drilling 9 holes 36 deep for each post with posts spaced 8 apart. The fence will have a pile top tail and then the 50 livestock panels welded on for the fence. Each post is set with two 80 lb bags of quickcrete.

I have about a half mile of fence I built exactly like this ten years ago with zero issues. I actually pulled a small section of it out this week and busted the concrete off around the post and it was still shiny metal with the factory paint ID numbers on it. No frost heave here to worry about.

Today we set 64 posts.

34F2C025-999A-4A1C-8211-5027099EB140.jpeg

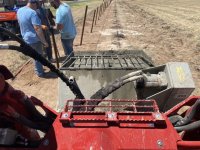
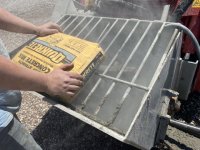
When we built the original fence we used a harbor freight emend mixer. Mixed one bag at a time, dumped it in a five gallon bucket, and then dumped it in the hole. Now we have a mixer that mounts on the skid steer. We can put 16 bags in it, enough for eight posts, and it has a chute where we can just drive to each post and dump the concrete in.

1F773C6C-3CD1-4B66-B068-80EC88AE9BB3.jpeg

6F75B066-6658-41C0-94F2-56C408884607.jpeg
 
   / The next few days are not going to be fun #35  
That's gonna look real nice. :thumbsup:
 
   / The next few days are not going to be fun
  • Thread Starter
#36  
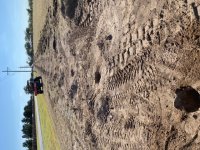
I had never tried it before today but I marked all the post hole locations with my GPS. I took a reading on each of the corner posts and then calculated the length and divided it to find the number of posts without exceeding 8? The posts are actually something like 7.96 apart. I then built a file with the coordinates of each fence post and marked their locations on the ground to drill the holes.

We stretched a wire between the corners when setting the posts to ensure they were straight but I was pleased at how well it worked. All of the posts fell in the holes and 90% of them were dead center.

70DAC21C-AB6E-47D4-B3DD-DB32C19DE04D.jpeg
 
   / The next few days are not going to be fun #37  
The easiest way to keep fence posts from heaving in the frost, is to stop pouring cement 6" from the top. Then, cover the rest with dirt. I was taught this by a fence installer when I was a kid.

With wood posts, I prefer to pack a sand/gravel mix like #304 around them rather than use concrete. You may have to go deeper if the fence is high, and the ground gets real wet. But, wood posts will last longer without the cement.

End posts, and gate posts may need to be cemented in real well, and extra deep, depending on the soil, and drainage.
 
   / The next few days are not going to be fun #38  
I had never tried it before today but I marked all the post hole locations with my GPS. I took a reading on each of the corner posts and then calculated the length and divided it to find the number of posts without exceeding 8? The posts are actually something like 7.96 apart. I then built a file with the coordinates of each fence post and marked their locations on the ground to drill the holes.

We stretched a wire between the corners when setting the posts to ensure they were straight but I was pleased at how well it worked. All of the posts fell in the holes and 90% of them were dead center.

View attachment 665282

Interesting that your GPS was that accurate for each post.
 
   / The next few days are not going to be fun
  • Thread Starter
#40  
It is a centimeter level accuracy unit. Not something recreational grade.
 

Tractor & Equipment Auctions

Wovlerine Quick Attach Bale Squeeze (A50515)
Wovlerine Quick...
2011 Ford F-550 Iowa 1015 3,200LB Crane Mechanics Truck (A51692)
2011 Ford F-550...
1998 Kenworth Tandem Grain Truck (A50514)
1998 Kenworth...
2005 Sterling Single Axle Dump (A47384)
2005 Sterling...
Bale Ring (A50515)
Bale Ring (A50515)
2016 Ford E-350 Enclosed Service Van (A50323)
2016 Ford E-350...
 
Top