Did I Make a Mistake?

   / Did I Make a Mistake? #141  
Yesterday afternoon I did receive calls from the parts person at the dealership. Provided an update in regards to the tank and other parts on order. Hopefully the tank will arrive soon. I did ask that they reach out to Mahindra in regards to the failure rate concerning this fuel tank design. Mahindra was elusive and wouldn't directly answer the question - leaves a lot to be desired (don't even get me started in regards to Mahindra's customer service line). If Mahindra won't answer a simple question to help quantify mounting options - I believe this will be the last Mahindra product I purchase. I plan on mounting the tank with straps and to not use their design of mounting the tank with bolts to the rear of the tractor in an effort to try to prevent future occurrences. If they don't request to take possession of the original cracked tank I plan on plastic welding it for a backup should I need a replacement. Yesterday I created a case with the EPA in regards to this issue so now two Governmental agencies have the information. Not sure what good it will do to help push Mahindra to redesign this mess however it's worth a try.

-Chris

Many years ago, I created a case with the Consumer Product Safety Commission with regard to a 200 HP Johnson outboard.
The case pushed OMC to take corrective action, for me at least.
 
   / Did I Make a Mistake?
  • Thread Starter
#142  
Quick update...dealership was successful at obtaining a new tank. They shipped it and I received it this evening. The dealership has really gone to lengths working with their Mahindra rep to locate a tank and get it in my hands. I’ll start to work out the details of how I’ll mount the tank in an effort to prevent future issues.

-Chris
 
   / Did I Make a Mistake? #143  
Quick update...dealership was successful at obtaining a new tank. They shipped it and I received it this evening. The dealership has really gone to lengths working with their Mahindra rep to locate a tank and get it in my hands. I’ll start to work out the details of how I’ll mount the tank in an effort to prevent future issues.

-Chris

Very nice news !
 
   / Did I Make a Mistake? #144  
Terrific news. Keep us updated on your fuel tank mounting method. Some future Mahindra owners may benefit.
 
   / Did I Make a Mistake?
  • Thread Starter
#145  
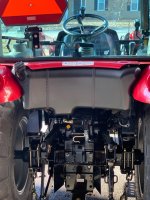
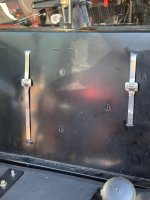
So a quick update - after careful consideration I decided to not attach the tank to a mounting bracket. After measuring and reviewing the area it simply didn't make much sense. It would have caused the tank to set out 1/2" to 1" from the back wall of the tractor cab which would have caused alignment issues with the upper metal cover. I decided to mount the tank to the back wall of the tractor using straps. You may be asking - why not use the bolts and simply bolt it back into place. The bolts is what caused the issue in the first place - every single tank mount insert cracked the tank. I didn't want to chance another cracked tank. So on to the install; I used stainless steel bands, heat shrink and stainless steel securing clamps. I mounted the tank to get an idea of how long to cut the heat shrink and stainless steel bands. The heat shrink is used to cover the stainless steel bands on the outside of the tractor. I wanted something that wasn't readily noticeable and provide some limited protection to the tank thus the black heat shrink. At the same time I also marked the back wall of the tractor as to where I would cut slits for the stainless steel bands ingress into the cab. Once I had marked the back wall (measured and triple checked) I cut four small slits in the back of the tractor cab using an air die grinder. I then fed the straps through the heat shrink (marked the bands as to where the heat shrink should rest as to not have too much heat shrink). I then fed the bands through slits and around the tank. I went inside the cab and used the banding tool to tighten the straps. The clips were the hardest part as the clips are designed for a pole (round structure). I had to use pliers to bend the ends of the clips to hold the straps in place (didn't want to hammer on the tractor back wall as to prevent damage). Note: use something under the clips when bending the ends to prevent paint damage - I used thick cardboard. I finished the project by applying a little clear silicone to the band area inside the cad to prevent water infiltration via wicking action from the bands. Overall I'm pleased with the look and functionality - shouldn't have any fuel tank issues in the future (I hope). And BTW - remove the operators seat as you'll need the added space for banding functions.

IMG950552.jpgIMG950551.jpg
 
   / Did I Make a Mistake? #148  
So a quick update - after careful consideration I decided to not attach the tank to a mounting bracket. After measuring and reviewing the area it simply didn't make much sense. It would have caused the tank to set out 1/2" to 1" from the back wall of the tractor cab which would have caused alignment issues with the upper metal cover. I decided to mount the tank to the back wall of the tractor using straps. You may be asking - why not use the bolts and simply bolt it back into place. The bolts is what caused the issue in the first place - every single tank mount insert cracked the tank. I didn't want to chance another cracked tank. So on to the install; I used stainless steel bands, heat shrink and stainless steel securing clamps. I mounted the tank to get an idea of how long to cut the heat shrink and stainless steel bands. The heat shrink is used to cover the stainless steel bands on the outside of the tractor. I wanted something that wasn't readily noticeable and provide some limited protection to the tank thus the black heat shrink. At the same time I also marked the back wall of the tractor as to where I would cut slits for the stainless steel bands ingress into the cab. Once I had marked the back wall (measured and triple checked) I cut four small slits in the back of the tractor cab using an air die grinder. I then fed the straps through the heat shrink (marked the bands as to where the heat shrink should rest as to not have too much heat shrink). I then fed the bands through slits and around the tank. I went inside the cab and used the banding tool to tighten the straps. The clips were the hardest part as the clips are designed for a pole (round structure). I had to use pliers to bend the ends of the clips to hold the straps in place (didn't want to hammer on the tractor back wall as to prevent damage). Note: use something under the clips when bending the ends to prevent paint damage - I used thick cardboard. I finished the project by applying a little clear silicone to the band area inside the cad to prevent water infiltration via wicking action from the bands. Overall I'm pleased with the look and functionality - shouldn't have any fuel tank issues in the future (I hope). And BTW - remove the operators seat as you'll need the added space for banding functions.

View attachment 686063View attachment 686064

EXCELLENT......looks very professional!
 
   / Did I Make a Mistake?
  • Thread Starter
#149  
Wow! Nicely done, looks great!

Thank you..simply put some thought into the project and take the time to do a reasonable job.

-Chris
 
   / Did I Make a Mistake? #150  
Looks good but I do have a question. Are the straps the only thing holding up the tank or is there something else under it?
 

Tractor & Equipment Auctions

2017 Ford Focus SEL Sedan (A48082)
2017 Ford Focus...
2016 Dodge Charger Sedan (A48082)
2016 Dodge Charger...
2015 FREIGHTLINER CASCADIA TANDEM AXLE DAY CAB (A51219)
2015 FREIGHTLINER...
2019 Chevrolet Tahoe SUV (A48082)
2019 Chevrolet...
2014 FREIGHTLINER CASCADIA (A50854)
2014 FREIGHTLINER...
2022 ELITE 102" X 40' GOOSENECK TRAILER (A50459)
2022 ELITE 102" X...
 
Top