Having trouble installing/removing & adjusting rear blade on 3 pt.

   / Having trouble installing/removing & adjusting rear blade on 3 pt. #1  

In.the.Piñons

Gold Member
Joined
Aug 14, 2024
Messages
259
Tractor
21' Kubota M5-111
First let me say I'm new to tractors, so I might be doing something stupid, but I'm having a great deal of trouble removing/adjusting the rear blade I bought for my tractor.

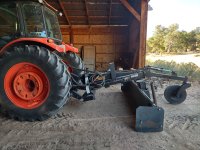
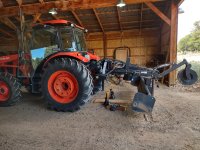
Right now it's on the 3pt, but it's not adjusted right. When raising the 3pt it doesn't start picking up the blade off the ground until the 3pt is hitch has already raised 1/2 way. So when hitch is raised as high as it goes, the blade is only off the ground about 6-8 inches and the boom is sloping down towards the ground at about a 15 deg angle (just eye balling it)

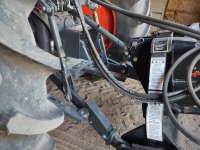
So I believe I have to shorten the top link on the 3pt. I was able to shorten it up a little, but then the back of the blade/3pt suddenly gave way and dropped about 8 inches (blade was resting on the ground). From then on I couldn't seem to get tension off the top link to adjust it or to remove the pin to take the blade off the 3pt.

As it stands right now, I can't even get enough tension off the the top link to remove it.

Here are some pics showing the 3pt and blade in the lowered and raised position.
 

Attachments

  • 3pt lowered # 1.jpg
    3pt lowered # 1.jpg
    6.1 MB · Views: 345
  • 3pt lowered # 2.jpg
    3pt lowered # 2.jpg
    7.2 MB · Views: 267
  • 3pt raised #1.jpg
    3pt raised #1.jpg
    6.8 MB · Views: 246
  • 3pt raised #2.jpg
    3pt raised #2.jpg
    5.8 MB · Views: 264
   / Having trouble installing/removing & adjusting rear blade on 3 pt. #2  
The "tips" of your lower arms are angled down. You are loosing considerable implement height off the ground because of this.

In any case - 6" to 8" should be enough ground clearance for most any implement.
 
   / Having trouble installing/removing & adjusting rear blade on 3 pt. #3  
For starters, I would try using the higher toplink mount on the blade (assuming that's what I'm looking at).
Adjust the toplink so that the blade frame is parallel to the ground in the lowered position. There will be some point in the lifting height where the toplink will loosen up allowing removal or adjustment.
 
   / Having trouble installing/removing & adjusting rear blade on 3 pt.
  • Thread Starter
#4  
For starters, I would try using the higher toplink mount on the blade (assuming that's what I'm looking at).
Adjust the toplink so that the blade frame is parallel to the ground in the lowered position. There will be some point in the lifting height where the toplink will loosen up allowing removal or adjustment.

I spent about 1/2 an hour this morning trying to find a point where the toplink would loosed up. I could find no where in the range of motion of the 3pt that unloaded the top link.

I had no trouble finding that point when I first installed the blade, but like I said, it shifted when I was adjusting it and now it's seemingly under tension the whole time.

I even tried lowing the boom back onto it's stand so I could remove the toplink pin, but it's bound up in that position too. Even tapping on it with a steel mallet, I can't get the pin to budge... not that I would try to remove it that way, I did it just to see how much tension was on the pin.
 
   / Having trouble installing/removing & adjusting rear blade on 3 pt.
  • Thread Starter
#5  
The "tips" of your lower arms are angled down. You are loosing considerable implement height off the ground because of this.

In any case - 6" to 8" should be enough ground clearance for most any implement.

Trouble is I can't remove or adjust the top link
 
   / Having trouble installing/removing & adjusting rear blade on 3 pt. #6  
I kinda see what I think happened; and the top link at the impliment, kinda went past zero, and hyper extended, so to speed; or it's past top dead center...

So, first, I think it's going to be easier to remove the top link to tractor pin. I know the top link is tight, but you should be able to rotate the adjusting thread enough to get the tractor side out with a drift (a spare pin works well, with a 3# hammer).

If that works, then removing the 3nd of the impliment should be easiy enough. then, I'm 90% sure you need to be in the top hole, and move the other pin into the hole you have the bottom od the top link in.
 
   / Having trouble installing/removing & adjusting rear blade on 3 pt. #7  
It also looks like (if I'm looking at the pictures right), you can raise everything, and put a jack stand (or a piece of fire wood, or whatever, but something sturdy) under the rear cutting edge, gently set the blade down on it, very slowly, and at the point the top link is in "neutral", it can be removed. at this point, the weight is on your lower lift arms, and you're blocking.
 
   / Having trouble installing/removing & adjusting rear blade on 3 pt.
  • Thread Starter
#8  
I got it out! I think Paul described the problem with it going past top dead center so to speak.

Basically, when I lowered the blade, the 3pt didn't settle low enough to take pressure off the pin. So I just lowered the tail wheel to apply a rotational force such that it forced the 3pt to lower further. Paul's idea to lower the blade onto a board would have also worked to apply the needed rotational force.

The top hole on the blade is a cat 3 and my 3pt is a cat 2, so I need to buy some sort of reducer. But I did just place the cat 2 pin through the top hole to test the action once I shortened the top link. Now it works much better and the blade starts to raise as soon as the 3pt does. Yay!

Thanks for the help guys!
 
   / Having trouble installing/removing & adjusting rear blade on 3 pt. #9  
I've had the same problem. My solution - move the lower arms to a half-way position. Half way between full up - full down. Lower the tail wheel and use hydraulic pressure on the tail wheel to raise the blade. There will be a point where there is no pressure on the top link.

Sorry I did not mention this previously.

You should be able to get a Cat 2- Cat 3 spacer at your tractor dealer.

And thanks for the feedback.
 
   / Having trouble installing/removing & adjusting rear blade on 3 pt. #10  
That category 2 hitch is designed for light above ground implements to connect to the top hole on the tractor, middle pin for below ground implements and heavy above ground implements, bottom hole for heavy below ground implements.
Matter of fact, my owners manual says to never use the bottom hole position.
Set your position control so the lower arms will stop level with the ground. Don't use draft control or it will try to counteract the blade wheel adjustment when grading for level. (Draft control is for below ground work)
Also, the middle and lower hole on tractor will provide more implement lift with same length top link.
 
Last edited:
   / Having trouble installing/removing & adjusting rear blade on 3 pt.
  • Thread Starter
#11  
That category 2 hitch is designed for light above ground implements to connect to the top hole on the tractor, middle pin for below ground implements and heavy above ground implements, bottom hole for heavy below ground implements.
Matter of fact, my owners manual says to never use the bottom hole position.
Set your position control so the lower arms will stop level with the ground. Don't use draft control or it will try to counteract the blade wheel adjustment when grading for level. (Draft control is for below ground work)

"That category 2 hitch is designed for light above ground implements to connect to the top hole on the tractor, middle pin for below ground implements and heavy above ground implements, bottom hole for heavy below ground implements."

The blade is about 1800+ lbs, so I assume that it's current position in the middle hole is correct (heavy above ground implement)?

"Set your position control so the lower arms will stop level with the ground"

How I do that? My tractor just has a lever to control position with no way to set a stop.

"Don't use draft control or it will try to counteract the blade wheel adjustment when grading for level. (Draft control is for below ground work)"

Do I just set the draft control to it's minimum position to turn it off?

Thanks!
 
   / Having trouble installing/removing & adjusting rear blade on 3 pt. #12  
Not that this has anything to do with your current issue, but your float feature slots in the side links should have the pin locked down at the bottom when you are trying to cut grade. You would only use the lower clevis float feature with your blade when doing a final smoothing pass, typically using the back side of the blade.

Good luck with your new blade. :)
 
   / Having trouble installing/removing & adjusting rear blade on 3 pt.
  • Thread Starter
#13  
Not that this has anything to do with your current issue, but your float feature slots in the side links should have the pin locked down at the bottom when you are trying to cut grade. You would only use the lower clevis float feature with your blade when doing a final smoothing pass, typically using the back side of the blade.

Good luck with your new blade. :)

I didn't know that, thanks for pointing it out!
 
   / Having trouble installing/removing & adjusting rear blade on 3 pt. #14  
T-B-N ARCHIVE:

 
   / Having trouble installing/removing & adjusting rear blade on 3 pt. #15  
"That category 2 hitch is designed for light above ground implements to connect to the top hole on the tractor, middle pin for below ground implements and heavy above ground implements, bottom hole for heavy below ground implements."

The blade is about 1800+ lbs, so I assume that it's current position in the middle hole is correct (heavy above ground implement)?

"Set your position control so the lower arms will stop level with the ground"

How I do that? My tractor just has a lever to control position with no way to set a stop.

"Don't use draft control or it will try to counteract the blade wheel adjustment when grading for level. (Draft control is for below ground work)"

Do I just set the draft control to it's minimum position to turn it off?

Thanks!
Draft control should be set to full up, but not in constant pumping position. The position control will then do its job; BUT, I've never seen a modern tractor without an adjustable stop on both position and draft controls.
This link might better explain: 3-Point Hitch - Please explain draft and position control interaction
 
Last edited:
   / Having trouble installing/removing & adjusting rear blade on 3 pt. #16  
For starters, I would try using the higher toplink mount on the blade (assuming that's what I'm looking at).
Adjust the toplink so that the blade frame is parallel to the ground in the lowered position. There will be some point in the lifting height where the toplink will loosen up allowing removal or adjustment.
correct.
 
   / Having trouble installing/removing & adjusting rear blade on 3 pt. #17  
Can you post some pics of the back of the blade? Especially the angle mechanism and how everything attaches to the top beam. I don't understand why the side plates on the beam aren't parallel to the top beam.
 
   / Having trouble installing/removing & adjusting rear blade on 3 pt. #18  
Often when there are two top link holes on the implement, the bottom one is for a quick hitch hook and the top hole is for a top link.

Because of the hitch geometry, the lower the top link pin is to the lower link pins, the more tendency for the rear of the implement to go down as the implement is lifted.

See dimension "B" for category 2.


3-point specs.jpg

Looking at this diagram below, with the top link too low on the implement, you can see how the top link moves rearward as it lifts, causing the rear of the implement to go down as the front raises.

Top-link-too-low.jpg


Having the gauge wheel on the rear of your blade makes your system even more sensitive to this problem.

Bruce
 
Last edited:
   / Having trouble installing/removing & adjusting rear blade on 3 pt. #19  
I've had similar issues with a few of my implements. My solution was to get a hydraulic top link. It greatly simplifies the effort required to swap attachments.

If you don't have a third set of remotes to control it, you can always add a diverter on one of the others.
 
   / Having trouble installing/removing & adjusting rear blade on 3 pt. #20  
My tractor has two position holes in the lift arms in addition to the top link hole positions. When I bought my rear blade, I had to use the lower position hole on the lift arms and the center hole on the top link to get the lift I desired.


Tractor & Equipment Auctions

Kubota B2301 (A53317)
2012 UNVERFERTH 13-INCH REAR SPACERS FOR 10 BOLT HUB (A55315)
2012 UNVERFERTH...
JCB 3CX 14HFCA BACKHOE (A60429)
JCB 3CX 14HFCA...
2009 Hyundai Sonata Sedan (A59231)
2009 Hyundai...
2015 CHEVROLET 2500 HD CREW CAB FLATBED TRUCK (A60430)
2015 CHEVROLET...
2013 Ford F-450 4x4 Crew Cab Little Beaver LS300 Drill Rig Truck (A59230)
2013 Ford F-450...
 
Top