MinnesotaDaveChalmers
Platinum Member
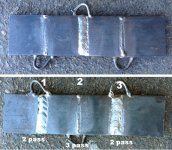
Sodo - looks like you dialed it in pretty darn good for your machine.
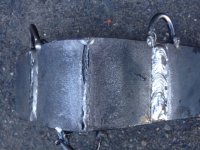
Were you able to get the knife edge to fully melt or did a straight line remain?
The very short version:
Voltage sets the arc length and resulting bead profile.
Wire feed speed sets the welding amperage and penetration.
It's all about the proper balance of voltage to wire feed speed.
For example, I was building some gates for a customer this weekend out of his old galvanized fence pipe, the recommended setting had a little too much voltage so it would try and blow out the thin edge of the t-joints.
Dropping to the next recommended setting down fixed the voltage issue, increasing my wire feed speed a little gave me the penetration needed.
(the recommended settings on my machine are for an input voltage of 230 volts AC, my electrical service provides 244 volts AC - so they tend to be a little hot - normally just turning down my WFS fixes the problem on thicker metal)
From Miller:
1. Material thickness determines amperage. As a guideline, each 0.001 inch of material thickness requires 1 amp: 0.125 in. = 125 amps.
2. Select proper wire size, according to amperage. Since you don't want to change wire, select one for your most commonly used thicknesses.
* 30-130 A: .023-in.
* 40-145 A: 0.030 in.
* 50-180 A: 0.035 in.
* 75-250 A: 0.045 in.
3. Set the voltage. Voltage determines height and width of bead. If no chart, manual or specifications are available for setting the correct voltage, you can try this: while one person welds on scrap metal, an assistant turns down the voltage until the arc starts stubbing into the work piece. Then, start welding again and have an assistant increase the voltage until the arc becomes unstable and sloppy. A voltage midway between these two points provides a good starting point.
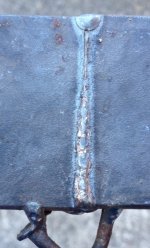
There is a relationship between arc voltage and arc length. A short arc decreases voltage and yields a narrow, "ropey" bead. A longer arc (more voltage) produces a flatter, wider bead. Too much arc length produces a very flat bead and a possibility of an undercut.
4. Set the wire feed speed. Wire speed controls amperage, as well as the amount of weld penetration. A speed that's too high can lead to burn-through. If a manual or weld specification sheet is not available, use the multipliers in the following chart to find a good starting point for wire feed speed. For example, for 0.030-in. wire, multiply by 2 in. per amp to find the wire feed speed in inches per minute (IPM).


Were you able to get the knife edge to fully melt or did a straight line remain?
As I understand it, reducing wire speed makes the joint 'hotter' as well as increasing voltage.
The very short version:
Voltage sets the arc length and resulting bead profile.
Wire feed speed sets the welding amperage and penetration.
It's all about the proper balance of voltage to wire feed speed.
For example, I was building some gates for a customer this weekend out of his old galvanized fence pipe, the recommended setting had a little too much voltage so it would try and blow out the thin edge of the t-joints.
Dropping to the next recommended setting down fixed the voltage issue, increasing my wire feed speed a little gave me the penetration needed.
(the recommended settings on my machine are for an input voltage of 230 volts AC, my electrical service provides 244 volts AC - so they tend to be a little hot - normally just turning down my WFS fixes the problem on thicker metal)
From Miller:
1. Material thickness determines amperage. As a guideline, each 0.001 inch of material thickness requires 1 amp: 0.125 in. = 125 amps.
2. Select proper wire size, according to amperage. Since you don't want to change wire, select one for your most commonly used thicknesses.
* 30-130 A: .023-in.
* 40-145 A: 0.030 in.
* 50-180 A: 0.035 in.
* 75-250 A: 0.045 in.
3. Set the voltage. Voltage determines height and width of bead. If no chart, manual or specifications are available for setting the correct voltage, you can try this: while one person welds on scrap metal, an assistant turns down the voltage until the arc starts stubbing into the work piece. Then, start welding again and have an assistant increase the voltage until the arc becomes unstable and sloppy. A voltage midway between these two points provides a good starting point.
There is a relationship between arc voltage and arc length. A short arc decreases voltage and yields a narrow, "ropey" bead. A longer arc (more voltage) produces a flatter, wider bead. Too much arc length produces a very flat bead and a possibility of an undercut.
4. Set the wire feed speed. Wire speed controls amperage, as well as the amount of weld penetration. A speed that's too high can lead to burn-through. If a manual or weld specification sheet is not available, use the multipliers in the following chart to find a good starting point for wire feed speed. For example, for 0.030-in. wire, multiply by 2 in. per amp to find the wire feed speed in inches per minute (IPM).
")