2305 Power Beyond kit install

   / 2305 Power Beyond kit install #1  

C-Range

Advertiser
Joined
Mar 20, 2009
Messages
393
Location
MA
Tractor
Various
I just installed a Power Beyond kit, JD p/n LVB24981, on my 2305 and thought I'd just mention that it was a real b*tch to add! Anyone buying a new machine with any possibility of adding a backhoe later ought to get this put in at time of machine purchase. This had been advised by my salesman but I opted to wait till/if the day came to add a backhoe.

So now here I am getting a used 260 backhoe this weekend. The only thing I need to add is the Power Beyond. The seller doesn't want to remove it from his 2305, understandably.

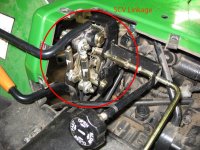
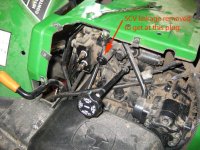
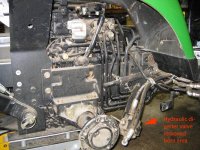
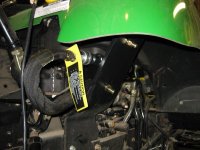
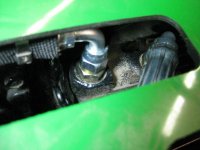
I had to remove all of the SCV linkage and bracketry to get at one of the plugs that has to be temporarily removed. Talk about a mouse nest of mechanical components and microscopic clips! To make matters worse, I also have the hydraulic diverter kit which was right in my way and had to be unbolted.

This is not a job for someone lacking on tools and mechanical aptitude, especially since the installation instructions are vague and simplistic at best. Of course now that I've done it once, I'd be fine doing it again but wanted to warn/prepare anyone else doing it for the first time.
 

Attachments

  • IMG_1187.jpg
    IMG_1187.jpg
    85.6 KB · Views: 2,723
  • IMG_1197a.jpg
    IMG_1197a.jpg
    138.8 KB · Views: 5,909
  • IMG_1190a.jpg
    IMG_1190a.jpg
    140.2 KB · Views: 2,316
  • IMG_1191a.jpg
    IMG_1191a.jpg
    137.6 KB · Views: 2,994
  • IMG_1196.jpg
    IMG_1196.jpg
    66.7 KB · Views: 2,941
   / 2305 Power Beyond kit install #2  
Ensoll

Which of the power beyond hoses is the tank return? The one fixed to the bracket or the lonf flex hose?
 
   / 2305 Power Beyond kit install
  • Thread Starter
#3  
I have no real idea. The kit just tells you what to put where (barely). All I can tell you is that the long canvas jacketted hose goes in the more rearward port and the short unjacketted hose goes in the more forward port, of the two ports being used.

See this photo of that part of the install. The front of the tractor is to the right in this picture. It's pretty easy.

Strange point, though; the jacketted hose is actually a little too tall and presses up against the cowl. I'm a little concerned about it and will be looking at another tractor tomorrow to compare and make sure I didn't do something nom nom.
 

Attachments

  • IMG_1193.jpg
    IMG_1193.jpg
    49.2 KB · Views: 1,379
   / 2305 Power Beyond kit install #4  
Just to comment that these tractors should come with a power beyond as standard equip. I ended up adding the kit to my JD 790 recently and it was not as bad a job as you had, but it was still a hassle. Once done, you see how simple and inexpensive this would be if done as part of the tractor's initial assembly.

I don't get it. I guess it's true that the majority of owners never would use the feature.
 
   / 2305 Power Beyond kit install
  • Thread Starter
#5  
One reason it wouldn't be standard equipment is because the looped hose protrudes from the back of the tractor. I could see it getting snagged by people who have no use for it otherwise (no backhoe).
 
   / 2305 Power Beyond kit install #6  
I was able to install powerbeyond on mine without removing the linkage or valve... I used 1/4" drive hex screwdriver bit with a 1/4" boxend wrench to remove the plug.
Chris
 
   / 2305 Power Beyond kit install
  • Thread Starter
#7  
Yeah, I considered doing that but the kind fellow at the dealership where I bought the kit warned me more than once that those plugs were in there TIGHT, and they were. I didn't want to take the chance of stripping the hex socket with less-than-perfect leverage angles.

I also didn't know how far the pipe plug would have to go into the hole before engaging with it's threads. If it was far in and I dropped it into the case, well, I'd just have to hang myself. Surprisingly, that pipe plug was an inch thread, not metric as a side note.

If I did the job again, actually, I would probably do what you did. Still I'd want to have just the right bits of tooling. I guess it'd be a 6mm hex bit 1/4" ratchet drive with a variety of extensions available and a 1/4" breaker bar, top quality. You get one shot at doing it right.
 
   / 2305 Power Beyond kit install #8  
Just thought you all might want to know. The tank/sump return line on the 2305 power beyond is the long flexible line. Fixed connector is pressure. I made up a pressure gauge tester to verify.
 
   / 2305 Power Beyond kit install #9  
Strange point, though; the jacketted hose is actually a little too tall and presses up against the cowl. I'm a little concerned about it and will be looking at another tractor tomorrow to compare and make sure I didn't do something nom nom.

Yep, this is how they are from the factory (at least my 08 model was). I complained...

The dealer (who I can't say enough good things about):
1. Had a new power beyond line made with at STREET 90 instead of the sweep 90 that is factory. It now clears the fender set thus not distorting my plastic.

2. Replaced the complete fender set (it was distorted). The fender set resting on the elbow in question "formed" the plastic over time and it didn't recover when the elbow was replaced.

3. Installed the new 2nd generation super duper backhoe seat when they did the above mentioned work. The new seat is wonderful!

4. Fixed the mower deck lift stop to get 1/4in adjustments like the manual states I should have.

I also made a change to the power beyond hose guide. This needed a bit of "adjustment" in order to make the hose (the hoop) not bind on the 3PT assembly at 3PT full lift.

It is also important regarding the how the 3PT arms are put on. When put on one way they will hit the backhoe subframe. Installed "ends flipped" then they will JUST clear the backhoe frame.

Best regards,
Sean
 
   / 2305 Power Beyond kit install
  • Thread Starter
#10  
I did get a chance to look at another 2305, the one I got my backhoe from. Apparently, when the Power Beyond kit was installed on that tractor, they cut some of the cowl/fender/whatever away to get a wrench in there. Amusingly, they didn't relieve it where the hydraulic line touches but it weakened the area so it could flex a little easier. I'm probably going to just cut mine away a bit to relieve it. No big deal.
 
 
Top