A "Shovel Ready" project!

/ A "Shovel Ready" project! #1  

k0ua

Epic Contributor
Joined
Jun 28, 2009
Messages
30,638
Location
Branson, Mo.
Tractor
Kioti DK35se Hydrostat
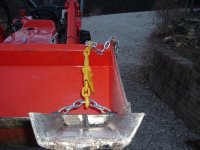
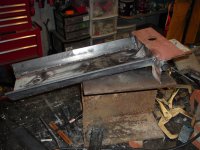
I am in the process of building a "shovel" for the bucket of my Kubota L3400.

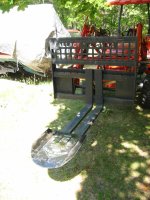
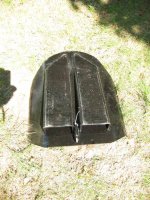
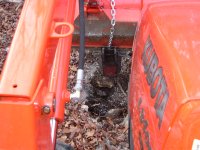
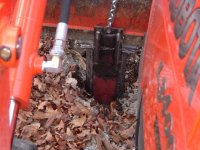
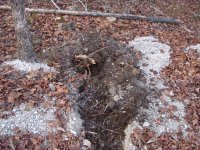
It will be a chain on 18 inch long and just under 9 inch wide shovel for digging holes, and small trenches, for transplanting flowers etc. It might be useful for grubbing out smaller rocks in the lawn or other things I haven't though of yet.

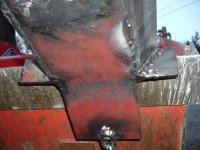
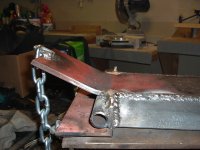
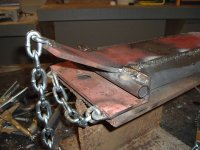
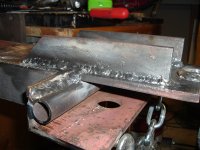
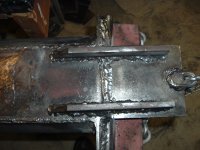
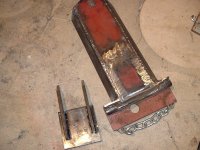
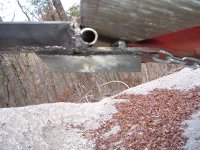
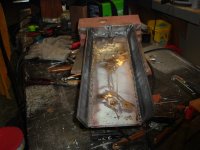
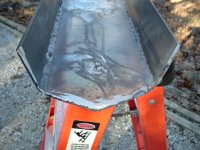
The material for the main floor of the shovel is some scrap pieces I found on the property when we moved here, I butt welded 2 of them together, the angle iron is also found scrap, the wings are the only thing I bought, they are 2 inchx1/4 x18. The scrap "floor" appears to be 3/8 thick, and some kind of construction steel, as was the angle. The project is not finished yet, still need to weld on the chain, I was out of chain (didn't think I would get this far this weekend). The fit on the lip of the bucket is very tight and stable as is without chains or anything holding it on. The 3/4 pipe goes under the bucket lip and the angle iron piece is over the lip, and the main floor extends under the bucket several inches. I will put on the chains and use a small chain binder to secure the 2 chains. Time will tell how well it works, and how well it holds up, stay tuned for the finish up and testing, maybe next weekend. Oh, please don't comment on the "quality" of my welds, it might hurt my feelings :laughing::laughing::laughing: just kidding.
James K0UA
 

Attachments

  • sidefab.jpg
    sidefab.jpg
    479.4 KB · Views: 2,466
  • frontfab.jpg
    frontfab.jpg
    470.3 KB · Views: 2,151
  • After the cut before sharpeining.jpg
    After the cut before sharpeining.jpg
    486.7 KB · Views: 2,137
  • sharpened end.jpg
    sharpened end.jpg
    480 KB · Views: 2,666
/ A "Shovel Ready" project! #2  
Oh, please don't comment on the "quality" of my welds, it might hurt my feelings :laughing::laughing::laughing: just kidding.
James K0UA
Those are some REALLY, REALLY BAD WELDS. Nah. I'm just kidding there at least better than my welds. Actually they look pretty good. Sometimes my welds are pretty and sometimes they look like **** :)

Heck when I was welding the pivot point for my backhoe, I had to do it twice since the first welds didn't hold. I took the clamp off and set the boom and bucket down and it fell off. :laughing: I was like oh **** NO, NO. But the second time around I got it welded and it stayed in place. I even used the press to see if the welds would hold and they did.

Anyway nice project. Hope it works out great for you.

Chad
 
/ A "Shovel Ready" project! #3  
Here are some photos of a fork mounted commercially available version.
 

Attachments

  • IMG_0077smallfile.jpg
    IMG_0077smallfile.jpg
    80.1 KB · Views: 1,626
  • IMG_0106smallfile.jpg
    IMG_0106smallfile.jpg
    79.9 KB · Views: 1,931
  • IMG_0111smallfile.jpg
    IMG_0111smallfile.jpg
    123.5 KB · Views: 1,659
  • IMG_0104smallfile.jpg
    IMG_0104smallfile.jpg
    115.9 KB · Views: 1,503
/ A "Shovel Ready" project!
  • Thread Starter
#4  
Thanks for the comments, Yes the quickspade was my inspiration, but I have about $6 in this one, still have to buy the chain, maybe another $8 to go in chain and some paint.. I am getting a little better at welding, need about another 50 lbs of rods burnt to get better..:) I dont think the welds will break, but they could be prettier, some of the guys on here can really weld, unfortunatly I am not one of them:laughing:
James K0UA
 
/ A "Shovel Ready" project!
  • Thread Starter
#6  
Maybe so Island, thanks for the kind words, but when I see the work of Shield Arc, and others here, well I get a little green with envy. But I got the impression, that maybe Shield Arc, has burnt a couple more rods than I have:laughing::laughing: I am getting a little better, but it is a slow process.:) I have had fun building this, and hope to finish it up this weekend, and maybe get to try it out.
James K0UA
 
/ A "Shovel Ready" project! #7  
Looks like something I need to build for myself. Thanks for sharing.
 
/ A "Shovel Ready" project!
  • Thread Starter
#8  
Hey Crusty, I was just over looking at that toothbar and trencher you built last summer,, and thinking the same thing! about them:laughing::laughing:
James K0UA
 
/ A "Shovel Ready" project! #9  
You guys keep coming up with ideas for things that I need! This is a good project. The fork-mounted spade is another good idea but I don't think I could do that with my bucket-mounted forks due to the amount of flex in the bottom of the bucket where the forks attach. Maybe since I would be pushing forward instead of lifting, it might work...

I'm still stoked on Crusty's home made tooth bar, I'm going to price some metal tonight and see what I can do. If I post pics of the project I will of course give Crusty full credit for the idea!

Keep on making stuff guys, I really enjoy seeing your projects on here.
 
/ A "Shovel Ready" project!
  • Thread Starter
#10  
OK bad news and good news on the Shovel project. Finished it up this eve, except for paint, though I would try it first before painting, that was a good idea, I was digging along fine, when I hit a small root, and bent the underside of the "floor" that was contacting the bottom of the bucket, like an aluminum candy wrapper. Was curling at the time, and it bent fast!. Bad news it is bent, good news is all the welds held perfectly!:thumbsup: The floor material is the scrap 3/8 thick construction steel I found. and welded 2 pieces together, which are down in the middle of the shovel area, and un-affected by this. I am thinking if I can get that large of a chunk hot enough with my #3 welding tip or maybe the cutting tip of bending it back (you can see the stress where the old red paint was and then popped off), and then getting a piece of angle iron to weld on the bottom starting about where the underside chain fastens on then extending at least half way down the shovel floor then the nose of the angle iron chopped into about a 30 degree angle as it meets the dirt. I am open to suggestions. I have my own ideas on how to fix this and carry on, but I would like to hear from others as well. Did I say that all the welds held perfectly?:laughing::laughing:
James K0UA
 

Attachments

  • DSCF0376.JPG
    DSCF0376.JPG
    477.2 KB · Views: 1,456
  • DSCF0377.JPG
    DSCF0377.JPG
    470.3 KB · Views: 1,376
  • DSCF0378.JPG
    DSCF0378.JPG
    470.2 KB · Views: 1,566
  • DSCF0379.JPG
    DSCF0379.JPG
    466.7 KB · Views: 1,298
  • DSCF0380.JPG
    DSCF0380.JPG
    472.4 KB · Views: 1,361
/ A "Shovel Ready" project! #11  
OK bad news and good news on the Shovel project. Finished it up this eve, except for paint, though I would try it first before painting, that was a good idea, I was digging along fine, when I hit a small root, and bent the underside of the "floor" that was contacting the bottom of the bucket, like an aluminum candy wrapper. Was curling at the time, and it bent fast!. Bad news it is bent, good news is all the welds held perfectly!:thumbsup: The floor material is the scrap 3/8 thick construction steel I found. and welded 2 pieces together, which are down in the middle of the shovel area, and un-affected by this. I am thinking if I can get that large of a chunk hot enough with my #3 welding tip or maybe the cutting tip of bending it back (you can see the stress where the old red paint was and then popped off), and then getting a piece of angle iron to weld on the bottom starting about where the underside chain fastens on then extending at least half way down the shovel floor then the nose of the angle iron chopped into about a 30 degree angle as it meets the dirt. I am open to suggestions. I have my own ideas on how to fix this and carry on, but I would like to hear from others as well. Did I say that all the welds held perfectly?:laughing::laughing:
James K0UA

It will have to be a really thick piece of angle. I would get 2 pieces of 1/2" x 2" plate long enough to reach from the chain to the center of the bucket and weld them vertically evenly spaced apart under the shovel. Bevel the shovel ends at a 45 to 60degree. This will allow dirt to pass by them but give considerable strength to the bucket. I doubt you will bend them due to the thickness of the shovel plate and the flat bars together. There are probably other simpler ways to achieve the same strength.
 
/ A "Shovel Ready" project!
  • Thread Starter
#12  
Yes, setting here watching TV and thinking about it, I came to the same conclusion, that some vertical strap welded to the bottom ( If I can get it bent back straight!) would strengthen it a bunch. Something else would have to give before it would bend again. I didn't think the 3/8 x 5 inch would bend so easy but it sure did. Hey this has been a good thinking and learning project, I shall carry on.:thumbsup: Thanks for you input.
James K0UA
 
/ A "Shovel Ready" project! #13  
Yep, I thought I recognized them welds= gorilla welds, big and ugly but strong.

Hope it don't bend your bucket instead if reinforced too much.
 
/ A "Shovel Ready" project! #14  
on the "quality" of my welds, it might hurt my feelings
If it holds, who gives a rats butt what it looks like. That's what the grinders are for. :thumbsup:

Awesome job Koua.
 
/ A "Shovel Ready" project! #15  
Another option would be to put a vertical post up from the top back of your shovel bucket for the binder to hook to. It could go all the way to the main bucket top edge. The leverage would keep the shovel & the bucket bottom aligned. Your connection geometry is inherently weak, even if you reinforce the bottom plate you'll probably just break the chain next. MikeD74T
 
/ A "Shovel Ready" project!
  • Thread Starter
#16  
Ok here is what I am thinking, instead of trying to heat up and bend back the shovel bottom rear 5 inches that it bent, I have decided to chop it off and try to bevel it good, and weld in another piece of metal. Then put in the vertical strips of plate. I dont think there is a lot of stress on the chain, due to the way this thing wedges on the bucket lip. I believe the chain just mainly holds it tightly wedged, and doesnt have a lot of stress on it. The real stress is on the large bucket lip connection point. I am hoping:eek: that the main relief valve will relieve before any damage is done to the main bucket. I don't know why I didnt think to put the vertical reinforcing plate on to begin with, I was worried more about the 18 inch front section bending more than the 5 inch rear section. but the lever point is the bucket lip edge, and the 18 inch section is reinforced by the side wing sections and the small 45 degree triangle section I put in the middle. Of course the 5 inch rear section would bend like a pretzel if something has to give, It is so easy to see now. The curl function can probably generate well over a thousand pounds of force, let alone any forward movement. so there could be a lot of stress there.. This has turned into a real thinking project!
James K0UA
 
/ A "Shovel Ready" project! #17  
If it bent that heavy of steel on the first try are you worried that once you make it strong enough the next weakest point is the loader bucket itself?

MarkV
 
/ A "Shovel Ready" project!
  • Thread Starter
#18  
Yeah a little, but the bucket lip is pretty thick and strong looking. There is a commercial version of this, and their combo version chains on to the bucket lip, instead of going on forks. I saw a video of this on you-tube and this seemed to work pretty well. Their shovel weighs over 80 lbs. So it must have a lot of pretty thick steel in it.
James K0UA
 
/ A "Shovel Ready" project!
  • Thread Starter
#19  
Ok. old metal cut off, new rear floor pan beveled and welded on, and new vertical stiffening bar stock welded on. Root pass on the bevel with 1/8 6011 and cap passes with 7018 3/32.. all else with the 7018 . Learned a few things. its hard to weld with vertical things sticking up in your way, when your rod gets short:laughing: Um. reposition rod in holder solved most of that. I am getting better at aligning, marking and welding things into place. Not good mind you, but better! I dont think the underside piece of metal will bend this time, Nor do I think the welds will break, We shall see. I havent put it on the tractor yet. It is pretty cold here today. maybe above freezing and a 20 MPH wind. here are some pix, and also the bandsaw that made it possible. and the handle I added to the bandsaw to move it around with which Grizzly seemed to forget.
I am going to have to get something to eat.. I worked thru and missed lunch, I am tired and hungry.
James K0UA
 

Attachments

  • DSCF0384.JPG
    DSCF0384.JPG
    473.7 KB · Views: 745
  • DSCF0383.JPG
    DSCF0383.JPG
    477.2 KB · Views: 695
  • DSCF0382.JPG
    DSCF0382.JPG
    480.8 KB · Views: 751
  • DSCF0381.JPG
    DSCF0381.JPG
    485.6 KB · Views: 841
  • DSCF0385.JPG
    DSCF0385.JPG
    474.1 KB · Views: 691
  • DSCF0386.JPG
    DSCF0386.JPG
    454.8 KB · Views: 684
  • DSCF0387.JPG
    DSCF0387.JPG
    450.9 KB · Views: 583
/ A "Shovel Ready" project!
  • Thread Starter
#20  
Ok, some success this time, the shovel's first victim is speared on it:), it was easy to pick it up by stabbing it with the shovel. Then went to play in the dirt and rocks. It dug well and fast, I did have to tighten the chain tho, as it loosened up. I think the reason was because the piece of 3/4 pipe is already starting to egg out, I should have used 1 inch round bar stock. And when the pipe finally collapses, I will cut it out and weld in a piece of 1 inch. The trench is about 9 or 10 inches deep and 9 inches wide, all I could do as there is bedrock past the 10 inch depth here, As it was I cut several good roots and several pieces of limestone rock came up. No bending on the shovel, other than the pressure on the 3/4 piece of pipe as the fulcrum. and no bending or damage of any kind to the bucket. The rear pry point as you can see is now been moved by the addition of the 1/2 inch rebar up closer to stay on the "meaty" portion of the bucket. It is at least 3/4 of an inch of good Japanese steel here. There is no real pressure on the chain, it just holds thing on, all the prying action is occurring on the bucket lip. I don't think I will have much use for the shovel until spring planting time, as it is supposed to be about 12 degrees here Sunday, and maybe some snow and ice. So I have learned some things here, improved my fab skills some, and had fun, and perhaps made a useful tool:thumbsup:
James K0UA
 

Attachments

  • DSCF0391.JPG
    DSCF0391.JPG
    487.2 KB · Views: 853
  • DSCF0390.JPG
    DSCF0390.JPG
    473.6 KB · Views: 705
  • DSCF0389.JPG
    DSCF0389.JPG
    465 KB · Views: 901
  • DSCF0388.JPG
    DSCF0388.JPG
    478.1 KB · Views: 1,134
  • DSCF0392.JPG
    DSCF0392.JPG
    493.8 KB · Views: 775
  • DSCF0393.JPG
    DSCF0393.JPG
    501.6 KB · Views: 629
  • DSCF0394.JPG
    DSCF0394.JPG
    492 KB · Views: 681

Marketplace Items

2016 Ford Explorer AWD SUV (A61569)
2016 Ford Explorer...
2024 CATERPILLAR 255 SKID STEER (A52709)
2024 CATERPILLAR...
King Kutter II Tiller for sale.
King Kutter II...
23" QUICK ATTACH EXCAVATOR BUCKET (A60429)
23" QUICK ATTACH...
Heavy Duty Booster Cables (A59230)
Heavy Duty Booster...
2010 Ford Mustang Sedan (A61569)
2010 Ford Mustang...
 
Top