Apollo, Where Did You Get the Mini Tach??

   / Apollo, Where Did You Get the Mini Tach?? #11  
This shows the two red connectors by the piece of electrical tape. Those connectors are attached to the tiny tach power and ground wires. I then pushed these connectors into the plug coming from the key assembly. The power went into the red wire with a white stripe and the ground went into the solid black wire.
 

Attachments

  • 520094-127-2721_IMG.JPG
    520094-127-2721_IMG.JPG
    93.2 KB · Views: 137
   / Apollo, Where Did You Get the Mini Tach?? #12  
The wire was then run into the engine bay by using the throttle cable hole and grommet.
 

Attachments

  • 520096-127-2719_IMG.JPG
    520096-127-2719_IMG.JPG
    61.6 KB · Views: 123
   / Apollo, Where Did You Get the Mini Tach?? #13  
I ran it along the throttle wire and electrical taped it on. The white wire on the bottom is a ground i connected to a bolt on the side. The red transducer wire ran acrossed the motor to the fuel line.
 

Attachments

  • 520100-127-2713_IMG.JPG
    520100-127-2713_IMG.JPG
    68.7 KB · Views: 125
   / Apollo, Where Did You Get the Mini Tach?? #14  
And last but not least the 6mm transducer attached to the front cylinder fuel line.

The paint didnt match exactly for the grey but hey!!! Its a tractor !!!!!!!!!!!!

Hope this helped, any other questions or photos just let me know.
 

Attachments

  • 520103-127-2714_IMG.JPG
    520103-127-2714_IMG.JPG
    86.5 KB · Views: 138
   / Apollo, Where Did You Get the Mini Tach?? #15  
"Apollo, did you take the cowl off to drill the grommet hole or just punch it through in place?

THKS.
Ron "


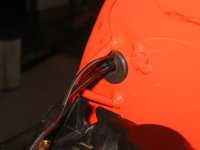
I took the lower part off and loosened the upper along with removing the steering wheel so i could move it a little but i did not remove the upper part. I built the bracket so the tach would sit flush with the edge of the dash. When drilling the hole if you place it here you have to be careful not to punch it thru the top and bottom part of that dash area.

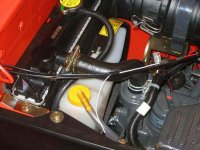
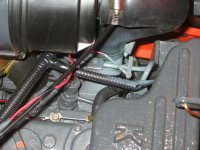
Another thing I need to mention is the "NEW" hood release mechanism. While i was rutting around under the dash I noticed that the release mechanism hits against the temp gauge assembly and wires under the dash. This wont be a problem when new but if you dont take care to fix this eventually i could see it leading to the wires wearing thru or the plastic temp gauge housing breaking. I went underneath and rerouted all the wires and also moved the temp gauge assembly slightly to keep it from hitting.

This was a poor design. From what i can see the hood release lever moves to far back when pushed causing it to hit these things. The best fix would be to add some washers to the release rod itself under the dash where the two cotter pins are to keep it from swinging back so far. I tried to do this but couldnt find a easy way to get that rod out with the cotter pins without doing some major disassembling. I plan to watch it in the future to see if everything still stays ok.
 

Tractor & Equipment Auctions

2012 FORD F-550 SUPER DUTY XLT SERVICE TRUCK (A51406)
2012 FORD F-550...
2022 BOBCAT T595 SKID STEER (A51242)
2022 BOBCAT T595...
2012 INTERNATIONAL DURASTAR 4400 4X2 SERVICE TRUCK (A51406)
2012 INTERNATIONAL...
2011 International WorkStar 7400 Chassis Truck, VIN # 1HTWGAAR6BJ325793 (A51572)
2011 International...
Westendorf Gravity Wagon (A50514)
Westendorf Gravity...
2017 Ford F-150 4x4 Crew Cab Pickup Truck (A50323)
2017 Ford F-150...
 
Top