Attaching wedge to beam: Best method??

   / Attaching wedge to beam: Best method??
  • Thread Starter
#31  
I was actually looking at muddstopper's adjustable wedge. Seems like a simple way to get 2-4-6 options.

I do like they way that you've got your wedge and cyl mount tied into the beam. You already having asked the question saves me from even having to consider it. :thumbsup:

I didnt see that you quoted mudstopper.:mur:

Lack of sleep when I posted that i guess. :laughing: Was out all night and day Plowing the white stuff we got.
 
   / Attaching wedge to beam: Best method?? #32  
You got snow? I'm at a record low of clearing my lane twice so far this season. I'm usually up to 10-12 by now.

I'm hoping we get beat on for the rest of the winter. I gambled and didn't take my snow contract this year and the way its looking I'd have made out quite nicely with so few hrs behind the wheel
 
   / Attaching wedge to beam: Best method??
  • Thread Starter
#33  
Yep, Got 3-4" in columbus (where I plow).

This is the 3rd plowable even of the season. Once back in november, then 1/6 and 1/26.

Last year I was out 6 times for the season.

Usually end up with 1-2 plows before the new year. Then 3-5 jan-march.

Alot of times it snows, we just dont get enough to go play. Or if its warmer (near freezing) they will pre-salt burn most of it off. Cheaper than paying alot of plow trucks
 
   / Attaching wedge to beam: Best method?? #34  
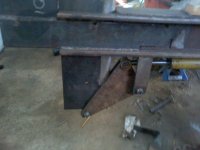
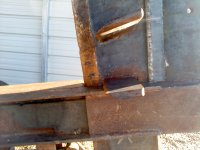
these are all the pics I have uploaded of the wedge. You asked what I would do different, well I did make one change. If you look at the wedge support, I welded a guide to the support for the wedge to slide up and down in. I figured this would help keep the blade lined up with its backbone. What it did was become a catch for every little splinter that slid by it. Slivers of wood would get wedged between the blade and the guides and keep it stuck all the time. I removed those guides and welded them to the blade, Now the splinters cant get wedged and no more stuck blade. As for the 2-4-6 way split. The blade will raise 12inces. The bottom wings sits at the top of the hbeam so that the top wing acts as a 4way. I can raise the wedge up 6 inches and now have a 6 way, or I can raise it 12 inches and slide a 12 log under the wings for a 2way split. The bottom wing in fully raised postion will be in the center of a 24in dia round and require resplitting the bottom two halves, but most wood I just center the blade for 6 even splits and dont have to any resplits. My processor will have a 12way blade and function pretty much the same as my current 6way. With wedge at bottom lift, 12in and under round will pass thru the center circle for a 4way split. Depending on the size of the round I should be able to center up on up to a 27in dia round and have 12 even size splits. Anything over 27in wont pass thru the saw frame so it wont make it to the wedge.
 

Attachments

  • 1229111335.jpg
    1229111335.jpg
    744.8 KB · Views: 271
  • 1229111331.jpg
    1229111331.jpg
    867.5 KB · Views: 261
  • 0131141616.jpg
    0131141616.jpg
    722.8 KB · Views: 232
   / Attaching wedge to beam: Best method?? #35  
Thanks mud, very helpful. Especially that first pic. I had noticed that about the side guides being on the back and you confirmed what I thought. With it a truly floating wedge, it would be easy enough to swap it out for an 8 or 12 way if the logs were big enough to need it and avoid the resplits.
 
   / Attaching wedge to beam: Best method?? #36  
Mine is 32 years of good service now. The beam was made up of two layers of mobile home frame welded together top and bottom, On this I laid a 5/8" x 6" plate which was securely welded to the beam. A pie shaped piece of 5/8" hot rolled was laid on the plate and securely welded. this triangle was small enough to clear the toe of the weld. the wedge was formed by two 10" tall x 1/4" plates arranged to make a wedge shape, one was longer, and lapped past the other. These were welded to each other and the beam inside and out. A series of pie shaped 1/4" were added inside the wedge horizontal. It was capped with top and back, ground smooth. The lap by at the cutting edge was cut to shape with acetylene torch, and ground to a sharp edge.
 

Tractor & Equipment Auctions

Zero Turn Mower (A48082)
Zero Turn Mower...
2025 Kivel 48in Forks and Frame Skid Steer Attachment (A50322)
2025 Kivel 48in...
71066 (A49346)
71066 (A49346)
2018 John Deere XUV560E 4x4 Gator Utility Cart (A50322)
2018 John Deere...
2012 Porsche Panamera Hatchback (A50324)
2012 Porsche...
2023 CATERPILLAR 299D3 SKID STEER (A51242)
2023 CATERPILLAR...
 
Top