B3030 ROPS light project

   / B3030 ROPS light project #1  

bandit67

Veteran Member
Joined
May 27, 2004
Messages
1,610
Location
Lake Hartwell, SC
Tractor
2012 B3000 HSDCC 2020 Z251 Zero Turn
OK, here's another ROPS light project. I figured since I can never get enough pics of TBNers projects, I may as well add some of my own.

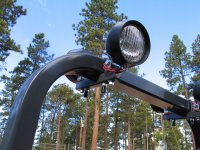
I started out with 4 of those HF 55w halogen vehicle work lights that I got on sale for $6.99 each. I figure I can always replace them down the road with something more expensive if they don't last, but a buddy has a pair on his dog box for his sled dogs, and they've held up for 3 years of fall and winter driving, mag chloride, salt, etc.

First order of business was to come up with as clean a mounting bracket design as possible, without welding anything, as I do not yet have any welding equipment. After looking at lots of pics, staring at raw materials at various hardware stores, etc., I came up with a design.

I bought a 3' section of 1" square steel welding tube at Lowe's (HD has the same stuff), then picked up two 3"x4" square "U" bolts at our local Ace Hardware, as they had a better selection than HD or Lowe's did. I also got some square plastic furniture leg caps from the hardware store, as Lowe's & HD didn't stock the caps for the 1" tubes (they stock caps for 3/4" & 1 1/4" square tube). And some 3/8" round vinyl endcaps to cover the ends of the "U" bolts. I primed and painted the square tube and most of the "U" bolts, except for the threaded ends, as screwing the nuts on would strip most of the paint off anyway, and finished with Rustoleum's matching grey spray enamel. I have a can each of Kubota Orange and Grey, but am saving those for touchups on the tractor itself.

I just ordered a pair of L48 light switches from my dealer (Brady Barlow). The switch idea came from Stef, a fellow TBNer. They are the only weather proof switches that will fit on the B3030 dash panel, since I want a separate switch for the front pair and the rear pair. And, it'll look factory. They ran about $30 more than any of the lighted weatherproof marine switches I found online, which were cheaper than any that I could get locally, but again, 2 switches wouldn't fit neatly on the dash panel.

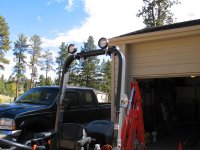
Brackets are done and lights are mounted. Wiring, complete with relays, will begin once the switches arrive. Since I'll be travelling on some dirt roads to plow out some neighbors, I plan to also add a 12v accessory plug that I will tap into the existing rear worklight wires, so I can run an LED amber flasher.

Here are some pics of the work in progress:
 

Attachments

  • Worklight Bracket 1.JPG
    Worklight Bracket 1.JPG
    350.2 KB · Views: 975
  • Worklight Bracket 2.JPG
    Worklight Bracket 2.JPG
    283.2 KB · Views: 799
  • Worklight Bracket 3.JPG
    Worklight Bracket 3.JPG
    242.9 KB · Views: 663
  • Worklight Bracket 4.JPG
    Worklight Bracket 4.JPG
    308.5 KB · Views: 827
   / B3030 ROPS light project #2  
Looks good, and there's no reason to think the lamp assy's won't last; 10 years parked in the weather might make the look bad but they will still work. Good idea on the relays; keeps those expensive switches from arcing contacts and melting even though the load is moderate. One trick I use and you might give it a try, get rid of the supplied nuts and lockwashers, and replace with flat washers and locknuts and maybe a nylon washer on the bolt that the lamp swivels L&R on since you can preload the bolt enough where they hold the position, yet you can adjust as needed, if needed without tools.
 
   / B3030 ROPS light project
  • Thread Starter
#3  
I have a package of flat washers I plan to install once all the wiring and setup is complete, and I was planning on putting Locktite on everything, along with using the lock washers. I've had nylon lock nuts unscrew due to vibration in the cold weather in the past, so I don't quite trust them.
 
   / B3030 ROPS light project #4  
Nylocks can dry out, harden and back off like you say; I usually use the crimped interference style locking nuts with the distorted head, they will not back off but the preload adjustment can be tweaked so lamps can be moved a little through the range of adjusment with just one hand, but vibration will not move them. Locktite works well also.

EDIT: do you have the part number handy for the switches you used?
 
   / B3030 ROPS light project #5  
.

I have a suggestion, if you have no overhead clearance issues.

If you reverse the position of the 1" sq tube (put it above the ROPS), you would have less hardware to hit your head against. Just the smooth curve of the u-bolts. The lights would be ~3" higher but that can be a good thing (again, if no clearance issues).

.
 
   / B3030 ROPS light project
  • Thread Starter
#6  
That's how I originally set it up, but decided that the lights would not be as exposed to getting damaged by tree limbs, etc. if they were set a little lower and in front of the ROPS, plus they were really up there with the square bar on top, and didn't look right.

I've climbed on and off the backhoe seat a number of times trying to see if there would be a head-knocker situation. There doesn't appear to be (if I was 6'-2" it might be a problem). I added the vinyl caps to the "U" bolt heads 'just in case'. Of course, final location will ultimately depend on the light beams once I hook up all the wiring.
 
   / B3030 ROPS light project #7  
The switch PN 36919-54222. Just be aware they run 30-35 dollars.
 
   / B3030 ROPS light project
  • Thread Starter
#8  
Already have the switches. You're right, they're not cheap, but they are the only switches I could find that will fit 2 of them in the dash, which is where I want them.

Heck, the relays ran $14 each - probably could have found them online a little cheaper, but we're getting a little to close to snow season, and I need everything ready for the 1st snow - have a lot of plowing to do. Only place I saved on this project was with the HF halogen lights, which can be replaced with expensive lights at a later date if I desire. Based on past experience, after a winter of plowing in the dark and having good lighting front and back, the up-front cost to install them becomes a non-issue.
 
   / B3030 ROPS light project #9  
I have a package of flat washers I plan to install once all the wiring and setup is complete, and I was planning on putting Locktite on everything, along with using the lock washers. I've had nylon lock nuts unscrew due to vibration in the cold weather in the past, so I don't quite trust them.

Very nice job. It looks professional.
Where did you get the plugs for the 1" tubing?
I am inspired.
Thanks C-YA RL
 
   / B3030 ROPS light project
  • Thread Starter
#10  
Found them at the local hardware store, because for some reason, HD didn't have them. They had the plugs for the 3/4" and 1 1/4" square tubes, but no 1" tube plugs. The ones I found are for metal furniture legs.
 
   / B3030 ROPS light project #11  
Found them at the local hardware store, because for some reason, HD didn't have them. They had the plugs for the 3/4" and 1 1/4" square tubes, but no 1" tube plugs. The ones I found are for metal furniture legs.

Thanks. I am constructing a shade canopy for my ROPS and the plugs will help give it that finished look.
C-YA RL
 
   / B3030 ROPS light project
  • Thread Starter
#12  
Finished wiring up the lights today.

The factory Kubota switches turned out pretty nice, too.

I want to head out tonight to see just how much light these 4 lights will throw. Need to check out how bright the switches look at night, too.
 

Attachments

  • Front & Rear Worklight Switches.JPG
    Front & Rear Worklight Switches.JPG
    509.4 KB · Views: 470
  • Front & Rear Worklight Switches 2.JPG
    Front & Rear Worklight Switches 2.JPG
    530.9 KB · Views: 493
   / B3030 ROPS light project #13  
Great project! I am curious about the wiring. Did you use the service manual to decide how to hook in the lights or did you figure it out by looking at the existing wiring? What is the purpose of the relays and where did you get them?

Cheers,

Dennis
 
   / B3030 ROPS light project
  • Thread Starter
#14  
Had to do the wiring on my own. I'm no electrical guru, so I had to tap into some of the TBN members and found a wiring diagram that someone had posted. I also used a lighted tester (invaluable tool when doing something like this) to determine switched power to the headlights (for the lamps in the lighted switches) and key-switched power (for the switches to turn relays on and off) in the wiring behind the dash.

The relays allow you to run power directly from the battery to the lights by allowing the dash mounted switches to turn the power coming out of the relays to the lights, on and off. You only need one 30 amp fuse between the battery and the relays, then no other fuses, if you wire them correctly (since most switches can't handle larger electrical loads).

I wired my lights so that they can only be turned on when the key is turned on, eliminating the possibility that they could drain the battery if the switch was accidentally turned on or if I forgot to turn them off. But I can turn on the worklights without having to turn on the factory dash headlight switch. For example, sometimes when digging with the backhoe during the day, I don't need any tractor lights on, but it would be nice to turn on the rear ROPS lights to see down into the shadows in the hole.

What made things a little more difficult is that I had no wiring diagrams for the Kubota switches, so between taking one of them apart and talking to another TBNer that has used the same ones, I was able to figure it out.

I went in to a local Checker auto parts store to track down a couple of 4-pin relays with a mounting tab. They just had to start opening boxes to find the right one, since most of them are vehicle/application specific. I do plan on taking a few pics of some of the general installation.

By the way, it was quite a project. I spent the better part of two days on the wiring alone. Not 2 full days, but a good number of hours each day. Had to take a bunch of stuff apart, and almost took the seat deck off, but that was going to be a big hassle, so I managed to feed the wires across the top of the tranny from underneath, but it was not a very easy task. I ended up with relays and power running down the right side of the tractor (when sitting in the seat), then across to the left and running under the floor deck from the dash back to the seat deck (following a factory wiring loom), then back across under the seat deck back to the right rear. I realized after running the power wire to the relays that the right side under the floor deck had too many moving parts that could snag the wiring loom, so went through the extra effort of crossing over and then back to keep the wiring away from too many moving parts.
 
   / B3030 ROPS light project #15  
Nice looking job with the lights. Did you leave enough of slack in the wiring so that when you fold the ROPS over the wire is not taught? Also I found that mounting the lights on the underside of the ROPS prevented my lights from getting knocked around when I was using the tractor i.e., cutting under trees and allows me to drive the tractor into my garage without ripping them off.

Very neat work!

Best wishes,
 
   / B3030 ROPS light project
  • Thread Starter
#16  
The lights were wired with the ROPS folded so there's a bit of slack when the ROPS is up. Didn't want to go through all that and end up with the wires being too short to fold the ROPS, especially since it has to be folded to get into the garage.
 
   / B3030 ROPS light project #17  
nice project, it makes a world of difference having the ability to continue working when the sun goes down, especially this time of year. i am curious how you fed the wiring from the lights down the rops, did you run it internally or through flex tube down the rops?
 
   / B3030 ROPS light project
  • Thread Starter
#18  
I ran the wiring down the outside of the ROPS in the new flex tube. Doesn't look as clean, but I didn't really feel like drilling the ROPS - kind of wanted to get it done after spending a couple of days with all the wiring, hookups, etc. The light brackets and light mounting was a day's worth of work earlier in the fall counting fabricating, painting, etc.

I'll probably end up drilling the ROPS in the spring once I get tired of the flex tube look, because I honestly believe that one or 2 small holes in ROPS isn't going to compromise the structural integrity.
 
   / B3030 ROPS light project #19  
I'm in the process of doing this on my B7610, I have all the parts, but don't see any obvious way to open up the dash boad to get at the wiring! Any hints or pics out there?
 
   / B3030 ROPS light project #20  
Just a note for others considering a lighting project. I don't know about all models, but on my L3400, and others too I'm sure, you do have some aux power lines that end back near or under your rear fenders. If you're only driving 1 or 2 lights this may work for you. But in my case and others where you're driving more than 10A you can't use these hook ups for power to the lights. But, they are tied to the ignition so they're switched and make great drivers for your relay(s) w/out having to pull the dash apart to get to switched power.
In my case I simply pulled one of these lines back up to the front and used it to switch my relays that were directly connected to the battery. Made the install much easier than I was expecting.
j
 

Marketplace Items

2016 Ford Explorer AWD SUV (A59231)
2016 Ford Explorer...
500 BBL FRAC TANK (A58214)
500 BBL FRAC TANK...
Kuhn FC400RG (A60462)
iDrive TDS-2010H ProJack M2 Electric Trailer Dolly (A59228)
iDrive TDS-2010H...
2401 (A60432)
2401 (A60432)
SWICT 60" SKID STEER BUCKET (A60430)
SWICT 60" SKID...
 
Top