Back Deck

/ Back Deck
  • Thread Starter
#21  
Dennis I don't know if you are subject to permits and inspections where you are so this may not matter. Where I am after a few decks collapsed with large groups of people on them the inspectors got real picky about using screws on joist hangers. Screws don't have the shear strength that joist hanger nails have so that is their issue. I think there are some screws now that are rated for hangers but I have never used them. Personally I don't think you have a problem but I thought I would mention it in case it applied in your situation.

MarkV

I am using Simpson's "Structural" screws, so I think I'm OK. On one pair of the "toenail" holes in each joist hanger, I'm using the larger #10 x 2.5" galvanized screws. For the rest of the holes, I'm using #9 x 1.5" galvanized screws. On my deck, being so low to the ground, with no posts under it (beam sits right on the piers), I can't imagine there being a substantial lateral load to pull the deck away from the house.

I'm cantilevering a little over a foot out over the beam on the 8 ft wide part, and about 2 ft over the beam on the 12 ft wide part. I believe the screws I'm using will be more than adequate to prevent the josts from pulling up out of the hangers, if it ever got too much load out on the cantilever portion.

Also, I'm not subject to an inspection on the deck here. I got the building permit for it as a part of my house building permit.
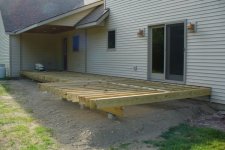
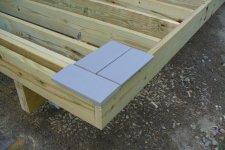
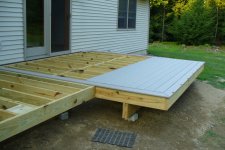
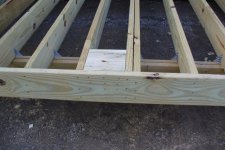
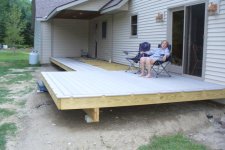
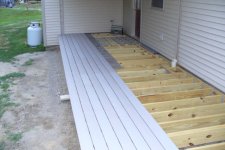
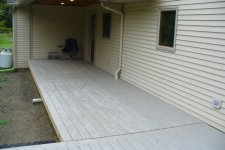
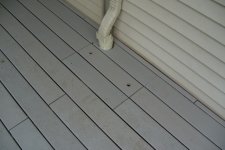
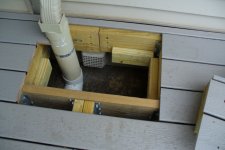
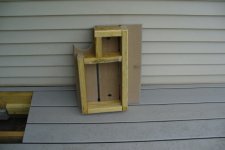
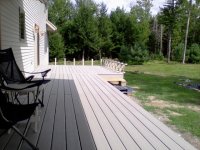
 
/ Back Deck
  • Thread Starter
#22  
If I understand your problem correctly would it not be better to shorten the deck to 40' and patch the 3 inch gap on the house siding than to fix it by extending every piece of decking?

Thanks for the thought. I considered and almost did pick that option. However, it has worked out so I made it on the ledgerboard with a 16' and two 12' pieces.

I did make the beam for the wider section out of 14' lumber. I put it in place uncut, with some excess to trim on each end.

I have it worked out so that I can use two 12' and a 16' piece of decking, as I will run a "picture frame" treatment around the end, which will take up the excess length.

I will most likely need to pick up a 14' piece of 2x8 for the rim joist on the wider section. I haven't bought that one yet, because I thought I would verify my length first.
 
/ Back Deck
  • Thread Starter
#23  
Joists are now done!

I got the last of the joists installed today, and I put bridging/blocking in the wider section. Here are a couple of photos, showing what the deck looks like at this stage.

Next, I have to recheck my calculations of how the decking will come out, in order to determine the lengths to trim my joists in the two sections. I figured this once, but I want to make sure I get it right.

I also need to install the drain pipe for the downspout connection, and frame the hatch for the dryer vent access.

I'll be making the order for the decking either Saturday morning, or early next week.
 

Attachments

  • P1040190.JPG
    P1040190.JPG
    156.8 KB · Views: 278
  • P1040191.JPG
    P1040191.JPG
    148.2 KB · Views: 345
Last edited:
/ Back Deck #24  
Nice project,
is the dryer vent going to be exhausting under the deck? I see you are going to make it accessible,
but it looks like the decking/hatch will totally cover the area above the vent.
just curious, i have a similar situation preventing me from expanding a deck.(or so i thought)
 
/ Back Deck
  • Thread Starter
#25  
Nice project,
is the dryer vent going to be exhausting under the deck? I see you are going to make it accessible,
but it looks like the decking/hatch will totally cover the area above the vent.
just curious, i have a similar situation preventing me from expanding a deck.(or so i thought)
Yes - the dryer vent will exhaust under the deck.

Following advice from one of my DIY books, I will put 2x4 cleats on the framing around my hatch opening (approx 1' x 2'), at an elevation that will allow another 2x4 to rest on top of them. I will make a frame for the hatch cover out of 2x4 and screw decking to it. The hatch will not be hinged. It will just pull out. As the book recommended, I think I will drill a couple of finger holes in the decking to make it easier to pull the hatch cover out.

My scenario is somewhat complicated by the fact that I also plan to run a 4" drain pipe down through one corner of the area that I have boxed out for my hatch. The drain is for a gutter & downspout that I will be having installed. My current idea is that there will be a 4" square notch out of one corner of the hatch cover.

I'll post a photo or two, once I get the drain pipe in and the hatch built.
 
/ Back Deck
  • Thread Starter
#26  
Over the past weekend, we had rain at times and I had a minor health issue going on. Consequently, I didn't make a lot of progress, but the framing is now essentially done. Tomorrow, I place the order for the decking. Tonight's photos should be the last of the bare frame.

The 3rd photo is a hint of what the deck will look like, though my "picture frame" of square edged pieces will have mitered corners. That will hide the raw edges of the decking material.
 

Attachments

  • P1040194.JPG
    P1040194.JPG
    156 KB · Views: 372
  • P1040196.JPG
    P1040196.JPG
    146.9 KB · Views: 377
  • P1040195.JPG
    P1040195.JPG
    150.4 KB · Views: 363
/ Back Deck #27  
Great project Dennis. Coming along nicely. I can't help but wonder every time I see a photo including your overhang roof that must be cantilevered somehow because you don't have a post/header combo on the corner. I've never seen it before cantilevered on a slope like that. Really interesting to me. Nice to not have an obstructed view out the back. Good job.
 
/ Back Deck
  • Thread Starter
#28  
Great project Dennis. Coming along nicely. I can't help but wonder every time I see a photo including your overhang roof that must be cantilevered somehow because you don't have a post/header combo on the corner. I've never seen it before cantilevered on a slope like that. Really interesting to me. Nice to not have an obstructed view out the back. Good job.

That section of the house has roof trusses that cantilever out over the front porch and the back porch/deck as well. There is an "A" shaped section in the center of the trusses that we turned into a storage attic. One of the local truss companies made them for us. I built the front porch 5 years ago. Attached are some photos from 2007 that show the front porch and the front and back of the house.

We got the decking material ordered and delivered today. I worked a bit late and did not get any photos. Maybe tomorrow night.
 

Attachments

  • Image008.jpg
    Image008.jpg
    103.1 KB · Views: 298
  • Image017.jpg
    Image017.jpg
    115.6 KB · Views: 214
  • Image023.jpg
    Image023.jpg
    124.5 KB · Views: 193
/ Back Deck
  • Thread Starter
#29  
Getting some Deck Boards on now!

Finally, I'm getting to the fun part! Today, I covered about 1/3 of the 12' x 12' section with decking. Since my last report, I did some of the fussy work, such as adding blocking where the rail posts are going to go, and framing for the hatch to access the dryer vent.

Also, note the photo showing one of the brackets for my bench/rail that will be on two sides. I have 14 of these brackets. I had to notch the outside board for each of them. I thought about drilling holes at the corners of the notches and cutting them out with my saber saw. On other projects, I have had a hard time getting neat cuts that way. So yesterday, I built a template and cut them with my router.. I got very uniform notches that way. It took a little while, but probably no longer than the other method. I'm pleased with the result.

Today, I had to alter my decking layout a bit from what I had planned. I had done the front porch a few years before with the same decking material and the same kind of hidden fasteners. I used that porch deck as a guide to compute the running width of each board. For whatever reason, my gaps between boards are coming out a bit wider. Enough so that I gained about an inch in 4 ft. Consequently, the corner between the two sections of deck (different widths) did not come out as I had carefully calculated. In order to deal with this, I ran a "divider" board transversely, as shown in the last photo. This will allow the joints to run differently on the 8 ft deck section.

In order to make the above change, I had to add to my framing. Every edge and end of the decking material has to be supported.

On Monday, the gutter installers come. I had hoped to have the deck covered by then, but I may not make that. It looks like I will have to work at least a half day tomorrow at my "part time" retirement job. I would rather work on the deck, but I do have some other responsibilities. Besides, It's good to get a pay check.
 

Attachments

  • P1040198.JPG
    P1040198.JPG
    160.3 KB · Views: 182
  • P1040200.JPG
    P1040200.JPG
    139.1 KB · Views: 178
  • P1040201.JPG
    P1040201.JPG
    112.1 KB · Views: 205
  • P1040202.JPG
    P1040202.JPG
    139.4 KB · Views: 230
  • P1040199.JPG
    P1040199.JPG
    131.7 KB · Views: 236
/ Back Deck
  • Thread Starter
#30  
On Saturday, I got the 12' x 12' section decked. Today, I got 7 courses on the remainder, which is just about 1/3 of the way. My Mrs is enjoying the deck already!

I'm putting screening under the decking in the section that will become the "screened porch." It's under a roof, so the screening shouldn't ****** drainage enough to bother. My 8 year old grandson asked me if I was doing something to keep the bugs from coming up through the cracks in the floor. I had thought of it already, but I was impressed that he thought of that on his own.
 

Attachments

  • P1040206.JPG
    P1040206.JPG
    155.2 KB · Views: 216
  • P1040205.JPG
    P1040205.JPG
    140.5 KB · Views: 219
/ Back Deck
  • Thread Starter
#31  
Deck Boards finished!

Today, I finished the last of the deck boarding.:) 
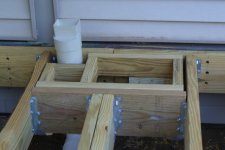
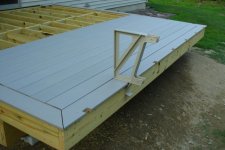
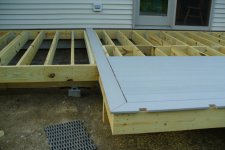
The first photo shows the 8' x 28' portion, which was the last completed. The second photo is a close-up of my hatch, for access to the dryer vent. The third photo shows the opening with the hatch removed. The fourth photo shows the framing of the hatch.

Due to a miscalculation (mentioned in an earlier post), my boarding came out a little different than I had planned when I framed the hatch. It came out usable anyway. It should serve its purpose.
 

Attachments

  • P1040208.JPG
    P1040208.JPG
    132.9 KB · Views: 204
  • P1040209.JPG
    P1040209.JPG
    120.6 KB · Views: 217
  • P1040210.JPG
    P1040210.JPG
    120.3 KB · Views: 227
  • P1040211.JPG
    P1040211.JPG
    93.9 KB · Views: 202
/ Back Deck #32  
DennisFolsom said:
My 8 year old grandson asked me if I was doing something to keep the bugs from coming up through the cracks in the floor. I had thought of it already, but I was impressed that he thought of that on his own.

What are you using to keep the bugs from coming up through the decking and will it affect snow drainage?

Asking because I have a front deck project looming.

Thanks
 
/ Back Deck #33  
Very nice looking deck.It sure is a good feeling to acomplish a project like that.
 
/ Back Deck #34  
Re: Getting some Deck Boards on now!

Finally, I'm getting to the fun part! Today, I covered about 1/3 of the 12' x 12' section with decking. Since my last report, I did some of the fussy work, such as adding blocking where the rail posts are going to go, and framing for the hatch to access the dryer vent.

Also, note the photo showing one of the brackets for my bench/rail that will be on two sides. I have 14 of these brackets. I had to notch the outside board for each of them. I thought about drilling holes at the corners of the notches and cutting them out with my saber saw. On other projects, I have had a hard time getting neat cuts that way. So yesterday, I built a template and cut them with my router.. I got very uniform notches that way. It took a little while, but probably no longer than the other method. I'm pleased with the result.

Today, I had to alter my decking layout a bit from what I had planned. I had done the front porch a few years before with the same decking material and the same kind of hidden fasteners. I used that porch deck as a guide to compute the running width of each board. For whatever reason, my gaps between boards are coming out a bit wider. Enough so that I gained about an inch in 4 ft. Consequently, the corner between the two sections of deck (different widths) did not come out as I had carefully calculated. In order to deal with this, I ran a "divider" board transversely, as shown in the last photo. This will allow the joints to run differently on the 8 ft deck section.

In order to make the above change, I had to add to my framing. Every edge and end of the decking material has to be supported.

On Monday, the gutter installers come. I had hoped to have the deck covered by then, but I may not make that. It looks like I will have to work at least a half day tomorrow at my "part time" retirement job. I would rather work on the deck, but I do have some other responsibilities. Besides, It's good to get a pay check.

What kind of decking board is that?
 
/ Back Deck
  • Thread Starter
#35  
What are you using to keep the bugs from coming up through the decking and will it affect snow drainage?

Asking because I have a front deck project looming.

Thanks

I bought some grey fiberglass screening in a 48" wide roll. I stapled it to the joists with a hammer tacker before laying the deck boards over it. I only put the screening on the section that's under the roof. I will be building a short wall, so my screen "windows" will not extend floor to ceiling. Also, the "screened porch" portion is in the corner between the house and garage, so it's somewhat sheltered from wind and blowing snow. Time will tell how much snow we get in there. If we get much, I'll be shoveling it out through the storm door that will be installed between the screened section and the open section.

The gaps between the deck boards are about 3/16". I think it should drain well enough.
 
/ Back Deck
  • Thread Starter
#36  
Re: Getting some Deck Boards on now!

What kind of decking board is that?

The deck board used to be called Correct Deck CX. It's made in Maine, from 60% hardwood and 40% plastic, with a plastic coating on the top surface. It's supposed to be mildew resistant. I made my front porch out of it 5 years ago. It's on the north side of the house, tucked in between the house and the garage. There's a photo in a previous post in this thread. It gets no sun. It has worn very well, with no mildew, so we decided to use the same stuff for the back deck.

Recently, the company has been acquired by GAF. It is now called DuraLife Siesta Collection, by Integrity Composites, 8 Morin St, Biddeford, ME 04005. The web site is DuraLife Decking

We looked at some other brands and didn't find anything we liked better in the same price range.
 
/ Back Deck
  • Thread Starter
#37  
More Progress

Today, I finished the fascia board and installed the brackets for the Bench/Rail. Next, I need to measure up and order the lumber for the Bench/Rail. I will also have more traditional rail on part of it. Also, I can start the framing for the screen walls. Here's what it looks like now:
 

Attachments

  • 0819121509.jpg
    0819121509.jpg
    186.3 KB · Views: 186
  • 0819121510.jpg
    0819121510.jpg
    168.3 KB · Views: 208
  • 0819121511.jpg
    0819121511.jpg
    177.1 KB · Views: 224
  • 0819121511a.jpg
    0819121511a.jpg
    175.8 KB · Views: 156
Last edited:
/ Back Deck #38  
Re: More Progress

Dennis, Deck looks great! Very nice job... I have an older deck that I must replace the decking. I used treated lumber some 16 yrs ago. A question was asked of me that I will ask you. Did you ever consider running the joist system the other direction, so that you could have continuous decking with no end butts together. Run each deck plank from the house out? I did not and wish I had...Did you ever think about doing that?
Again, real nice job.
 
/ Back Deck
  • Thread Starter
#39  
Re: More Progress

Dennis, Deck looks great! Very nice job... I have an older deck that I must replace the decking. I used treated lumber some 16 yrs ago. A question was asked of me that I will ask you. Did you ever consider running the joist system the other direction, so that you could have continuous decking with no end butts together. Run each deck plank from the house out? I did not and wish I had...Did you ever think about doing that?
Again, real nice job.

I did think about that a little bit. It would also have the advantage that you could more easily put pitch on it, like a lot of the old porches had, for drainage. The thing that stopped me from doing that is that the support system below the joists gets more complex. Instead of one beam under my 8 ft wide section, and one under my 12 ft wide section, I woulld have had several.

If I were going that way, knowing what I know now, I would probably make it freestanding, independent of the house. I would have run two rows of concrete piers, with beams spaning from the inside to the outside of each pair, and joists on top of the beams. It would be more expensive (twice as many piers), and require more work (digging and setting piers).
 
/ Back Deck #40  
Re: More Progress

Dennis, I understand. I just know that having no joints would have been much better with the treated lumber surface I used then. Maybe today with the new materials it isn't as important. My boards swelled, and raised and even popped the heads of the older galvanized deck screws,making boards loose. I guess that was the same thinking we went thru when we were laying it out to and opted to take easier route...in hind site it was a mistake. Yours turned out real nice.
 

Marketplace Items

ELECTRIC GOLF CART (A58214)
ELECTRIC GOLF CART...
1999 Sterling L9513 Tri-Axle Roll Off Truck (A61568)
1999 Sterling...
2019 BOBCAT MT55 WALK BEHIND SKID STEER (A59823)
2019 BOBCAT MT55...
2017 JOHN DEERE 350G LC EXCAVATOR (A62129)
2017 JOHN DEERE...
2011 NORAM POWER SYSTEMS 100KW GENERATOR (A58214)
2011 NORAM POWER...
(12) SKLP SK-LJB-12 Polyethylene Roadbed Protection Pads (A60463)
(12) SKLP...
 
Top