You are using an out of date browser. It may not display this or other websites correctly.
You should upgrade or use an alternative browser.
You should upgrade or use an alternative browser.
Boomer - 3 pt lever sticking
- Thread starter djradz
- Start date
- Views: 4535
More options
Who Replied?
/ Boomer - 3 pt lever sticking
#21
Mosey
Veteran Member
- Joined
- Jan 4, 2002
- Messages
- 1,565
- Location
- Conifer, Colorado
- Tractor
- 2000 New Holland TC29D with 7308 FEL, and top & tilt. 1950 John Deere B. 1940 Farmall A.
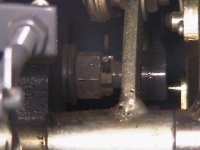
I finally got around to doing this and it sure is smooth now! I didn't take the tire off and don't think it would have helped. The problem is that there just isn't much room to work in there under the fender well. Having dual rear remote hydraulics made it a little worse, since the levers got in the way. It took me about 20 minutes to work the cotter pin out. I didn't put it back in, I put a hitch pin clip in place of it in case I have to adjust it again.
The castle nut takes a 7/8" wrench and I had to move the 3pt lever back, put the wrench on the nut, then move the lever forward to loosen the nut. I loosened it 1/3 of a turn.
I attached a picture of it, side view.
The castle nut takes a 7/8" wrench and I had to move the 3pt lever back, put the wrench on the nut, then move the lever forward to loosen the nut. I loosened it 1/3 of a turn.
I attached a picture of it, side view.
Attachments

Mosey
Veteran Member
- Joined
- Jan 4, 2002
- Messages
- 1,565
- Location
- Conifer, Colorado
- Tractor
- 2000 New Holland TC29D with 7308 FEL, and top & tilt. 1950 John Deere B. 1940 Farmall A.
Cricket
New member
Thanks for the good pics. I have the rear hydrolics in the way also and have been wondering how to do it.
tpaulson
Bronze Member
- Joined
- Oct 2, 2001
- Messages
- 83
- Location
- South Dakota
- Tractor
- 2001 New Holland TC45D, 1953 JD 40 crawler, 1949 JD A, 1993 Lahman skidsteer
Danny
Thanks for the pictures and helpful hints. I have 2 remotes also. I was able to get the castle nut loosen this weekend. The 3pt lever works much better now. Per your idea I used a hitch pin clip also. Much easier to install/remove than the cotter pin.
To remove the cotter pin, I straigten it as much as I could with a needle nose. Then I used the hooked end of a brake spring removal tool to pull/pry the cotter pin out. It seemed to work pretty well.
Mosey
Veteran Member
- Joined
- Jan 4, 2002
- Messages
- 1,565
- Location
- Conifer, Colorado
- Tractor
- 2000 New Holland TC29D with 7308 FEL, and top & tilt. 1950 John Deere B. 1940 Farmall A.
tpaulson - "To remove the cotter pin, I straigten it as much as I could with a needle nose. Then I used the hooked end of a brake spring removal tool to pull/pry the cotter pin out."
That was a great idea! I used a screwdriver and pushed it into the head of the cotter pin from the side and then pryed it out. It's taking me a while to get used to it now, it moves so easy and I'm used to having to push hard so sometimes I go too far. But, once I get used to it I know I'm going to like it much better!
Many thanks to djradz for the original post!
I too didn't think of a brake removal tool, but used a screwriver and needle nose pliers. Did a lot of grading blade work this last weekend and can't imagine not doing it without having the control move smooth and easy. Many thanks to J Inman and others who originally proposed this.
MLB
Silver Member
new method:
I couldn't see the cotter pin due to the remote in the way. couldn't see it from behind either, thought it fell out, so I put the wrench on it and give it a 1/3 turn (by pushing the lever forward while wrench stayed stilll). NOW I can see the cotter pin! It's a bit bent, but intact and in place. And now my lever moves SMOOOOOOOOTH. Total time, 3 minutes?
Wouldn't have done it by choice, but it worked and seems fine. Not going to mess trying to get it out now to replace it.
DVerbarg
Platinum Member
Its been too long since I've been on TBN or my TC40D! I'm recovering from the flu and thought some reading on TBN would be good for recovery /forums/images/graemlins/wink.gif. This thread unfortunately reminded me that I wanted to deal with this years ago and yet never did.
Well, since we are expecting 5-9 inches of snow in the next 24 hrs I thought it might be nice to have a snow blower that dropped smoothly instead of jerking that nearly catapults the contents of the FEL out on the ground.
Doing the fix took roughly 1hr of which 55 minutes was spent running back and forth to the house and or other building to find/borrow tools that would work within that tight area. But it sure works great now! /forums/images/graemlins/grin.gif
Thanks guys for the reminder! (Once it warms up a little I'll try the same on the throttle too)
