Building a 3 PT material collection system

   / Building a 3 PT material collection system #1  

DanMc77

Gold Member
Joined
Feb 3, 2015
Messages
395
Tractor
JD 4600, JD 2210, JD 332
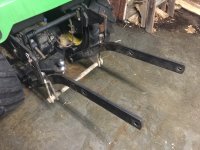
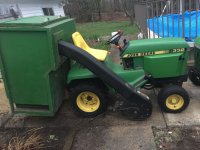
The time has come to get started developing a bagging system for my 2210. This machine came with a triple bagger and power flow, but I have never been a fan of "baggers" because they don't carry all that much and you end up having to lift the bags (I think) in order to dump.

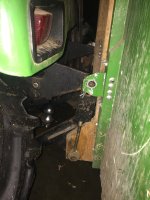
My experience with this began about 25 years ago when I first picked up a JD 318, and then bought the large JD material collection system (MCS) that has a blower integrated into it. Although that was an excellent system to operate, it was positively miserable to mount and dismount from the tractor. It was insanely heavy and mounted so close to the rear of the tractor that you could barely get your hands in there to insert the pins that hold it on. I put that on the tractor once, and when I took it off, it stayed off and was sold. For someone that will put this big JD thing on and never take it off, it would be the best solution. But I need flexibility so the tractor can be used for other tasks, so it has to be super easy to mount/dismount, and it has to be easy to move around in storage.

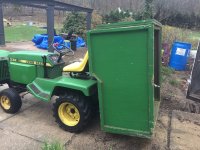
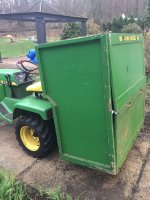
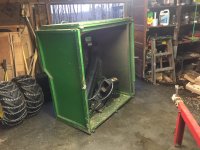
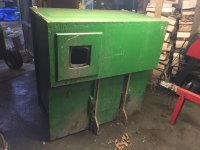
After selling the JD MCS way back, I built a collection box for the 318 that ties into the powerflow chute and is mounted using the mounting bracket that came with the JD hydraulic tiller that I also have. I can mount this custom collection box in less than 5 minutes and it is effortless. The box was built to be sturdy, yet light, so it would be easy to handle. That was designed 20+ years ago and has been used every year since then, needing only minor repairs over all those years. I'll post some pics of that system a little bit later.

After getting the 2210, now I will need to build a new collection box, so the brainstorming is just starting.

The requirements are this:
Quick to mount (3 PT hitch)
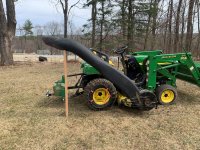
Couples up with the 54C powerflow
About 20 cu ft of material capacity
Quick to remove
Light, so it can be moved around in storage

If anybody here has knowledge of a similar system, by all means pass along a link. I'm starting from scratch at this point.
 
Last edited:
   / Building a 3 PT material collection system
  • Thread Starter
#2  
Now I'll post some pics of this homegrown MCS built 20++ years ago. Someone may argue that this thing is huge and will be bulky on the back of the tractor. This is actually about the same size as the commercial JD MCS that I had previously had. It is definitely big, and it will carry a tremendous amount of material, about 20 cu ft. I typically can tell when it's getting full because it's easy to pop a wheelie with the tractor.

The back door opens from the middle and is held closed by some tooling clamps that were laying around. When fully opened, the door folds neatly on top of the box. The space inside is sufficient to store the chute, the power flow, and the tiller mounting bracket used for carrying this thing on the back. The powerflow chute slips into the opening with a rubber gasket around it so clippings don't get sprayed onto my back. You'll notice the overhang on the input side of the box. That's there because the powerflow chute would not reach the box if the input side was flat, so the bump-out had to be added.

You could argue that unloading the box is a pain. That's one weakness of this design. For years, a rake was used to rake out clippings onto the ground. Later on, I tossed off the rake and stand there and grab armloads at a time and toss it out over the ground. It's a messy job, but isn't that bad if the clippings are dry. I think that's a lot better than having to lift off a heavy bag and then shaking it to get it dumped out.

I'll add a post for the next pics.
 

Attachments

  • MCS2.jpg
    MCS2.jpg
    4.8 MB · Views: 123
  • MCS6.jpg
    MCS6.jpg
    4.7 MB · Views: 129
  • MCS8.jpg
    MCS8.jpg
    4.2 MB · Views: 122
  • MCS7.jpg
    MCS7.jpg
    4.1 MB · Views: 136
Last edited:
   / Building a 3 PT material collection system
  • Thread Starter
#3  
These pics focus on the mounting.

The tiller bracket unbolts from the tiller with 4 bolts. These two arms protrude well into the collection box and actually help a great deal with lining it up while mounting. The bar passing between the arms conveniently have enough space to slip the lower mounting tabs from the collection box. These tabs rest on that bar and create a hinge for lifting up the box and latching it in. The oak lower tabs were originally made out of some 3/4" plywood which broke after a number of years. The oak tabs have screws going through them to keep the grain from splitting. There are two upper posts that act like the upper lift arms on a 3 PT hitch. These posts conveniently have enough space to accept the upper latch tabs that are on the box. Once the lower mounting tabs are set onto the lower bar of the tiller mount, the box can be easily hinged up and the tabs latch onto the upper posts. The original intent was for this to be how the box is used, but those tabs will wiggle off the posts. So a hole was tapped in each post and an aluminum cap was machined as a keeper to prohibit the tabs from slipping off. When this was first built, those latching tabs on the box were made out of some galvanized steel sheet metal. That was the only thing I could find laying around the shop, so I used that, thinking that I would have to replace them with heavier material later. Those tabs have lasted for 20++ years, and I probably have 200 hours on this thing. Looking closely, the hole can be seen to have worn oblong, but it's still working just fine. Those tabs are mounted with rubber spacers so they can be pushed off to the side for latching on and off.
 

Attachments

  • MCS3.jpg
    MCS3.jpg
    4 MB · Views: 84
  • MCS4.jpg
    MCS4.jpg
    3.5 MB · Views: 84
  • MCS5.jpg
    MCS5.jpg
    4.1 MB · Views: 84
Last edited:
   / Building a 3 PT material collection system
  • Thread Starter
#4  
This last pic shows the right side of the tractor with the powerflow and chute visible. The exit port from the collection box is at the bottom. There's a baffle inside that is open at the top to allow airflow to exit. The chute sprays material inside and also diverts everything to the opposite side of the box.

There are castors under the box so when it's in storage, it's easy to slide around on the floor. Unfortunately, because the bottom of the box is so low, those castors tend to get ripped off on certain sloping terrain. It would have been good to have had the bottom a few inches higher so it isn't so easy to scalp the ground.
 

Attachments

  • MCS_final.jpg
    MCS_final.jpg
    4.2 MB · Views: 90
   / Building a 3 PT material collection system
  • Thread Starter
#5  
I thought I would post these pics as background before starting in on this next homebrew collection system. This prior design has exceeded my expectations. It would be nice to be able to include a self-dumping feature in this next one.
 
   / Building a 3 PT material collection system
  • Thread Starter
#6  
Here's a view of the 2210 with the powerflow and chute. The 2x4 that's supporting the chute illustrates about where the entry point of the collection box will need to be. The chute from this powerflow is massive when compared to the chute for the 300 series powerflow.

if the 3 PT attachment points are inside the box, then the arms should be able to be slipped inside an opening, and then pinned inside. One thing that bugs me about 3 pt, is that the arms are tied into place by cross chains in the middle. It would be fast if those arms can be slipped in and then a pin inserted rather than loosening the cross chains to move the arms over fixed pins, which is typical of 3 PT attachments.
 

Attachments

  • 2210_powerflow.jpg
    2210_powerflow.jpg
    4.7 MB · Views: 85
 
Top