Building a Grizzly Screen

   / Building a Grizzly Screen #31  
LeeJohn:

I'd love to see the details on your shaker, especially the part that does the shaking, the gear reduction and all down to the point of the PTO attachment. I'd like to build one with a stand alone engine, not having a spare tractor.

andy
 
   / Building a Grizzly Screen
  • Thread Starter
#33  
LeeJohn:

I'd love to see the details on your shaker, especially the part that does the shaking, the gear reduction and all down to the point of the PTO attachment. I'd like to build one with a stand alone engine, not having a spare tractor.

andy
I would also like to learn more about your shaker, and I also don't have a spare tractor!

We finally have had a few warm days! Tonight I got the first coat of primer on. I painted the bottom side of the rebar, that was a royal pain, so I am done painting the rebar. I figure it's going to be back to bare metal shortly after I use it so it's not worth the effort. I have enough primer for a second coat tomorrow. Hopefully I will have enough to put 2 coats on the bottom. The primer is leftovers from another project, and even better is that I didn't even have to buy it in the first place. So far I only have about $100 invested in the screen, mostly the rebar and some welding wire and tips.

2016-04-14 20.48.55.jpg
 
   / Building a Grizzly Screen
  • Thread Starter
#34  
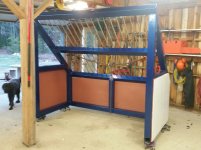
Well I have finished painting and installing the plywood sides and back. All the paint was leftovers, a friend painted his truck blue in my garage about 10 years ago (we will see how that holds up), a little white house paint, and some red barn paint that has turned pink brown (also about 10 years old). If the paint doesn't hold up then at least I didn't have to pay to dispose of it and most likely any paint will get worn off once I start using it. I still need to make the reducing overlay, gotta put some material through first and I have a few other projects that need attention.

2016-04-18 20.42.29.jpg

The real kicker is that the paint isn't even dry and I have already let someone borrow it, I have to drop it off some time this week. I'm looking forward to hearing how well it works :D.

Also the dog is mid haircut, he was getting antsy so we gave up for a while and now he looks creepy.
 
   / Building a Grizzly Screen #35  
It sure looks good, but might not look like that long. You did one thing wrong, I made the same mistake on the 1st one I made. You put the wood on the outside and it well get pushed off when cleaning out. You can clean the back side by pushing it to the side then pick it up. I did some shaking today for about a hour and got about 12 yards of clean stuff.
I think I might have to drop my angle down some. I think I'm losing to much smaller rock that's not getting time to go thru the screen. I'm going to try slowing it down 1st, just have to order a new pulley and belt. Right now the tractor's pto is runing as slow as I can get it.
 
   / Building a Grizzly Screen
  • Thread Starter
#36  
It sure looks good, but might not look like that long. You did one thing wrong, I made the same mistake on the 1st one I made. You put the wood on the outside and it well get pushed off when cleaning out. You can clean the back side by pushing it to the side then pick it up. I did some shaking today for about a hour and got about 12 yards of clean stuff.
I think I might have to drop my angle down some. I think I'm losing to much smaller rock that's not getting time to go thru the screen. I'm going to try slowing it down 1st, just have to order a new pulley and belt. Right now the tractor's pto is runing as slow as I can get it.

I know what you mean about the wood on the outside, the problem is I didn't provide Nailers in the corner so that I could catch both the back and the side at the same time. When I started cutting the plywood to size I noticed this but I was running out of steel. I thought that I might be able to push them off but we will see. The good thing is that they are larger to fit the outside so if it's a problem I should be able to cut them down and move them in. The other reason I didn't try too hard to get them on the inside is I thought the steel would protect the plywood from the bucket edge.
 
   / Building a Grizzly Screen #37  
It looks great.

I think this guy's idea about portability as well as a pseudo-shaker might be a good option if you do it again.

Picking it up and moving it with forks would be optimal. Knocking a stuck load by tapping your bucket would also be good.

Portable grizzly screener - YouTube
 
   / Building a Grizzly Screen
  • Thread Starter
#38  
I have seen his video, I like his design. The next one I do will be a powered shaker (if I make another) to make -1". I still need to make my overlay to reduce it down to 2" +/-. The only reason I didn't add any movement to this one was cost, I have about $100 invested between rebar and welding wire, if I had had springs or leafs in my scrap pile I would have tried something like in that video. I have not put anything through it yet, a friend has it now and should start screening about 20 yards of fill removed from a handicapped access ramp project.
 

Tractor & Equipment Auctions

16in Excavator Bucket (A44391)
16in Excavator...
2022 Chevrolet Silverado 1500 4x4 Crew Cab Pickup Truck (A44572)
2022 Chevrolet...
2023 John Deere HPX615E Gator 4x4 Utility Cart (A44572)
2023 John Deere...
2012 KENWORTH T800 MID-ROOF SLEEPER (INOPERABLE) (A45333)
2012 KENWORTH T800...
2014 UTILITY 53X102 DRY VAN TRAILER (A43004)
2014 UTILITY...
2014 BBA PT-90 T/A Towable Piston Dewatering Pump (A44571)
2014 BBA PT-90 T/A...
 
Top