Building a toolbar for 3pt implements

   / Building a toolbar for 3pt implements #1  

firefighter9208

Platinum Member
Joined
Dec 15, 2006
Messages
826
Location
Springville, Alabama
Tractor
2004 Kubota M4800
Back during the winter I bought a couple JD 71 Flex Planters. They did not come with a toolbar.

I found a used toolbar and bought it from another farmer. The problem is the mounts for the 3pt hitch were exactly at 30". I wanted to mount my planters at 30", but settled on mounting them outside the 3pt mounts. This gave me 36" rows. The problem is the planter was almost planting in my tire tracks (tractor set up on 60" centers).

I decided to build my own toolbar. I called a local steel supplier and order a 6' piece of 2 1/2" (1/4" wall) square tubing. I went to pick it up on Friday and they didn't even have 2 1/2" square tubing in the thickness. I had already paid and after grumbling about driving 50 miles the "guy in the back" told me he had a piece of 2 1/2" cold rolled bar he would give me if I didn't "tell the boss". Well we loaded it up and I was on my way. I also purchased a piece of 1/2" x 6" flat and a piece of 1/2" x 4" flat. $81.00 later I was on my way.

I copied the tollbar that I had purchased (Massey), but made it a lot stronger and so that I could mount my planters on 30" centers or wider and I also can mount one on the center of the toolbar and plant on 60" centers.

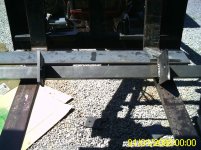
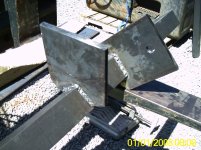
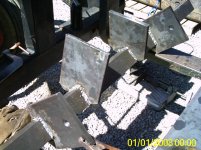
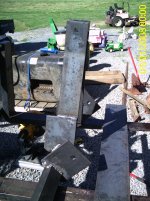
The first picture shows how I notched the 1/2" x 6" and welded it to the bar stock. The fifth picture show how we bent the uprights for the top link mount. The last two pictures are of the finished toolbar minus paint.

I primed it last night, but the pictures I took are kinda blurry. I will post more pictures after I paint it JD Green.

Chris
 

Attachments

  • tool bar 001.jpg
    tool bar 001.jpg
    438.7 KB · Views: 3,384
  • tool bar 003.jpg
    tool bar 003.jpg
    505.9 KB · Views: 1,915
  • tool bar 006.jpg
    tool bar 006.jpg
    410.7 KB · Views: 1,451
  • tool bar 007.jpg
    tool bar 007.jpg
    430.9 KB · Views: 1,295
  • tool bar 008.jpg
    tool bar 008.jpg
    526.7 KB · Views: 1,448
  • tool bar 009.jpg
    tool bar 009.jpg
    502.8 KB · Views: 2,097
  • tool bar 010.jpg
    tool bar 010.jpg
    551.2 KB · Views: 2,394
   / Building a toolbar for 3pt implements #2  
This is a great post firefighter. I also picked up a few 71 planters last summer and am needing to build two tool bars for them. I was looking for ideas on just how to go about it.
 
   / Building a toolbar for 3pt implements
  • Thread Starter
#3  
Let me know if you need any measurements and I'll get them for you. I probably overbuilt this thing, as I do with most things I build.

The toolbar that I purchased from a local farmer had been used with 4 row planters. When I got everything mounted and the planters on the bar one of the planters was not level with the other. I got to looking closely and the bar had a slight bend. That is the main reason for building a "new" toolbar. That and wanting to mount the planters on 30" centers.

Chris
 
   / Building a toolbar for 3pt implements
  • Thread Starter
#4  
Materials List:

2 1/2" square bar -- 60" long

1/2" x 4" flat -- 60" long

1/2" x 6" flat -- 60" long


Cut 4 pieces of 1/2" x 6" x 6" long. I drilled holes with a 7/8" drill bit for the category 1 pins. I first drilled the holes 1/4" then 7/8". The measurements for the holes were 1 1/2" from the end and centered.

I then notched 2 of the pieces with a 2 1/2" x 2" square notch. I mounted these two pieces to the square bar 12 1/2" from center.

I then notched 2 of the pieces with a diamond notch. The are the reinforcement plantes for the top link mount.

I then cut 2 pieces of 1/2" x 4" x 24" flat. I drilled 7/8" holes 1 1/2" and centered from one end. I then took the same end and marked it at 6". I clamped the pieces to the forks on my loader and began to heat them. My neighbor (Jim) preceeded to sit on the other end of the 24" piece as it bent slowly. When we got it bent to our liking (I'll measure for you) we stopped. We then clamped the other piece of 1/2"x4"x24" to the fork beside the first. This way we could get our bends the same.

I used a piece of 2"x2" square tubing cut 2 1/4" long to space between the top of the top link mount.

I used 2 pieces of 2"x2" square tubing 3" long for stand mounts. Notice them on each end of the toolbar. I"ll get better pictures tonight. I took a chain link fence post and cut it in half and welded a piece of 2" x 1/8" flat to the bottom for stands. Drilled holes at the top and bottom.

It took about 4 hours to build.

I'll post one of the pictures from priming the toolbar. Notice I have it suspended from the ceiling with a chain hoist. It is too heavy to pick up by hand.

BTW: That 7/8" bit cost me $35.00 at the local hardware store. I like aprox. 50 miles from Harbor Freight so I had to buy locally. :thumbdown:
Chris
 

Attachments

  • tool bar 017.jpg
    tool bar 017.jpg
    483.5 KB · Views: 2,444
   / Building a toolbar for 3pt implements #5  
Firefighter....that is some great stuff. I was looking to make a single plow that would be off centered to the left, past my rear tires. The reason for this, is that I'm trying to clean out an irrigation ditch but can't get too close due to trees on that side. Wouldn't need to bury it, just about 4" so I can remove grass and other debris growing over it.
Your design could prove beneficial to me...thanks.
 
   / Building a toolbar for 3pt implements
  • Thread Starter
#6  
Hope my design helps. I wasn't able to take pictures last night. I spent until 9:00 spreading fertilize.

Chris
 
   / Building a toolbar for 3pt implements #7  
I hope to start my toolbar Saturday morning. I'll be picking up the steel tomorrow morning. Do you really think 1/2" is needed? I was going to go with 3/8" plate for the part that goes to the top link.
 
   / Building a toolbar for 3pt implements
  • Thread Starter
#8  
3/8" should be sufficient, but I wouldn't go any smaller. I went with the 1/2" for the strength and because they had a piece of 1/2" x 4 in their drop pile. I would definately go with 1/2" on the hook ups for the lift arms. I think 3/8" might bend there. 2 planters with the toolbar will probably weight around 400#. add in 2 bags of corn and you have about 500#.

Also, you need to measure your u bolts. John Deere planter toolbars are actually 2 1/4". I had to do some pretty significant grinding last night on the 2 1/2" to mount the planters. I would try to go with 2 1/2" bar and not tubing. If I had used tubing I would have ground almost through the wall of the tubing to get the bar small enough to mount the planters.

The planters are on the toolbar and mounted to the tractor. I plan to plant about 2 acres of Indian Corn and 1 -1 1/2 acres of white field corn when I get home today.


Chris
 
   / Building a toolbar for 3pt implements #9  
This looks like a very well-built toolbar. I'm new here, and looking for a definition of the difference between a diamond bar and a square bar. Near as I can tell the square bar has a face parallel with the ground (well, flat ground anyway) and the diamond bar is rotated 45 deg so that one of the corners of the square is pointing directly at the ground. Is this correct?

What's the difference in terms of implement usability and availability? Which tools are mounted on a diamond and which on a square?
 
   / Building a toolbar for 3pt implements
  • Thread Starter
#10  
Thanks!!!

I think you are right on the difference between a diamond and square toolbar. I used square tubing on a 45 to make a diamond bar. I'm not sure what other implements fit on a diamond bar. John Deere mounted their early planters on a diamond bar, but later went to a 4"x6" bar for mounting them.
 
   / Building a toolbar for 3pt implements #11  
3/8" should be sufficient, but I wouldn't go any smaller. I went with the 1/2" for the strength and because they had a piece of 1/2" x 4 in their drop pile. I would definately go with 1/2" on the hook ups for the lift arms. I think 3/8" might bend there. 2 planters with the toolbar will probably weight around 400#. add in 2 bags of corn and you have about 500#.

Also, you need to measure your u bolts. John Deere planter toolbars are actually 2 1/4". I had to do some pretty significant grinding last night on the 2 1/2" to mount the planters. I would try to go with 2 1/2" bar and not tubing. If I had used tubing I would have ground almost through the wall of the tubing to get the bar small enough to mount the planters.

The planters are on the toolbar and mounted to the tractor. I plan to plant about 2 acres of Indian Corn and 1 -1 1/2 acres of white field corn when I get home today.


Chris

Chris, I decided to go with 1/2" x 3" and 1/2" x 6" for the hook up bars. I have over 36 feet of 2-1/4" diamond tool bar cut from the old JD 184 fertilizer unit I am taking apart so I am good there. My planters will weigh a little more that yours because I have the front packer wheels.
 
   / Building a toolbar for 3pt implements
  • Thread Starter
#12  
Great that you have the toolbar already. I think the 3" will be fine. I bought 4" because that was in the drop pile.

I planted 10# of Indian Corn in 30" rows yesterday afternoon. I ended up with around 40 rows that are 400 feet long. I also planted about 15#of Mosby's white prolific field corn. I will spray both when I get home today.

I will then start planting about 6-7 acres of Roundup Ready field corn.

I was on the tractor until midnight last night doing final prep work on the ground.

Chris
 
   / Building a toolbar for 3pt implements #13  
...I planted 10# of Indian Corn in 30" rows yesterday afternoon. I ended up with around 40 rows that are 400 feet long. I also planted about 15#of Mosby's white prolific field corn. I will spray both when I get home today...

Chris

I won't be planting any corn until mid May at the earliest. I'll start by planting Trinity and then Peaches & Cream, followed by an Indian Corn. Usually we can't plant sweet corn until late May or early June. What will you be spraying Chris?

Steve
 
   / Building a toolbar for 3pt implements
  • Thread Starter
#14  
Round-up (kills any existing grass and weeds) Simtrol same as Princep (pre-emergent grass) and Atrazine (pre-emergant weed).

I plant in 30" rows. This is the first year I have tried the pre-emergants. I hope they work, because I don't have a way to cultivate the corn in 30" rows.

I will spray my RoundUp Ready corn the same way, but go back and spray again with Roundup when it's about 2' tall.

I was worried about the Mosby's germinating with the pre-emergants. I planted it on Saturday, April 3 and it took 7 days to start coming up. It's about 2" tall now.

Around here we usually plant Silver Queen and field corn as early as possible in April.

The Mosby's has an 85 day to maturity (Rossen Ears). That should put me hauling it to the Farmer's Market around June 28.

I waited 10 days to plant my second planting. Should be ready around June 7. My Third planting will be around the 21st of April. I should start hauling it around June 14.

Chris
 
   / Building a toolbar for 3pt implements #15  
Materials List:

2 1/2" square bar -- 60" long

1/2" x 4" flat -- 60" long

1/2" x 6" flat -- 60" long


Cut 4 pieces of 1/2" x 6" x 6" long. I drilled holes with a 7/8" drill bit for the category 1 pins. I first drilled the holes 1/4" then 7/8". The measurements for the holes were 1 1/2" from the end and centered.

I then notched 2 of the pieces with a 2 1/2" x 2" square notch. I mounted these two pieces to the square bar 12 1/2" from center.

I then notched 2 of the pieces with a diamond notch. The are the reinforcement plantes for the top link mount.

I then cut 2 pieces of 1/2" x 4" x 24" flat. I drilled 7/8" holes 1 1/2" and centered from one end. I then took the same end and marked it at 6". I clamped the pieces to the forks on my loader and began to heat them. My neighbor (Jim) preceeded to sit on the other end of the 24" piece as it bent slowly. When we got it bent to our liking (I'll measure for you) we stopped. We then clamped the other piece of 1/2"x4"x24" to the fork beside the first. This way we could get our bends the same.

I used a piece of 2"x2" square tubing cut 2 1/4" long to space between the top of the top link mount.

I used 2 pieces of 2"x2" square tubing 3" long for stand mounts. Notice them on each end of the toolbar. I"ll get better pictures tonight. I took a chain link fence post and cut it in half and welded a piece of 2" x 1/8" flat to the bottom for stands. Drilled holes at the top and bottom.

It took about 4 hours to build.

I'll post one of the pictures from priming the toolbar. Notice I have it suspended from the ceiling with a chain hoist. It is too heavy to pick up by hand.

BTW: That 7/8" bit cost me $35.00 at the local hardware store. I like aprox. 50 miles from Harbor Freight so I had to buy locally. :thumbdown:
Chris

Firefighter....that is some great stuff. I was looking to make a single plow that would be off centered to the left, past my rear tires. The reason for this, is that I'm trying to clean out an irrigation ditch but can't get too close due to trees on that side. Wouldn't need to bury it, just about 4" so I can remove grass and other debris growing over it.
Your design could prove beneficial to me...thanks.
 

Tractor & Equipment Auctions

WOOD GRABBER FOR MINI EXCAVATOR (A58214)
WOOD GRABBER FOR...
2021 Kubota SVL75-2 Track Loader (A56438)
2021 Kubota...
DRAGON 500 BBL ACID TANK (A58214)
DRAGON 500 BBL...
2020 CATERPILLAR 303.5E2 CR EXCAVATOR (A60429)
2020 CATERPILLAR...
2012 Vermeer V500LEHD Vacuum T/A Towable Trailer (A55973)
2012 Vermeer...
Classic 1969 Massey Ferguson 135, newly rebuilt engine, refurb front end, 3-pt blade.
Classic 1969...
 
Top