Spiker, how did you figure out where to mount the cyl. on the box. Trial and error or math.
Bill
more or less trial and math error

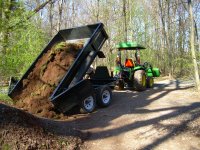
Since I had the cylinder free I wanted to try & make it work. My hydraulics will give me only about 2250 psi (relieved set pressure) and they (my brand of tractor JINMA) can and do pop pumps when too much pressure is backed up I wanted to make sure I could get up the weight when the load was fully down. The cylinder stroke determined where I had to put it to get the angle I thought was good enough for a full dump with the materials I planned on using most of the time. I planned on sand/gravel with occasional dirt. dumping dirt needs about 48 to 50 degrees for it to dump out relatively well. (I found this info back on web when I was getting ready to build it and no longer have the links) a little searching should find it easily enough though.
I raised up the bed to get close to the angle I wanted and then loosely attached the rod end to underside of the bed. (by sliding the hyd cylinder closer to the pivot point and keeping the bottom of the cylinder close to the bottom of the lower frame.) I made up heavy plate brackets for the cylinder side. I swung the hyd cylinder in an arc up to the bed to see where it would attach the best and be low enough to still give me some push UP at the bottom of the stroke. I tack welded it there. I lowered the bed and checked for binding. The cylinder ended up almost flat with the bed fully down and rod fully retracted. I found this angle for the pressure was too great to lift a fully loaded bed of wet sand/gravel. I lowered the hyd cylinder down vertically to be under the frame and slide the cylinder upper rod end up more. which cost some of the angle at dump height. I tacked it all up good and tried it out and found it worked well with shop air sometimes needing a slight push to get it moving. So I welded it up figuring the high pressure would make it move just fine. it worked mostly as long as the thing it not stuffed completely full. I now put a 2x4 between bed and frame when lowering it to keep the retracted angle with more of a vertical push up. this also helps with slightly more angle to shed rain/water out of the bed when setting or when filling with wet material. It will now dump with full load of wet sand & gravel but has slightly more problems with the dirt if it is dirt very damp and sets/bounces much on the trip as it packs into the bed... and will need some digging every now and again to get all the dirt out if moisture is just right I have to dig about 1/3 of the dirt/clay out.
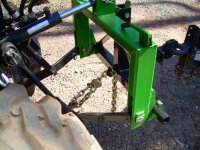
The cylinder is below the lower frame about 2.5" to make inserting the bolt/pin through easier I think I used 3/4" by 4" flat stock to make up the lower mount and they are welded flat/flush to the bottom of 2ea. 2x2x1/4 tubes that support the lower frame hyd cylinder running front to back. they are wide enough to have the cylinder between them and still support it well. the 6" long 4"x3/4" flat plates were butt welded flush to the inner edge of the 2x2x1/4" center tubes. I added small angle brackets under the tubes to keep these plates (flat bar) in plane/90 degrees to the bottom with the inner edge of the 3x3 tube.
Under the bed I did similar using 2x2x1/4" wall sq tube. and added some cross braces to support the inner floor. I think I used 1/2" plate on that end though I cant remember for sure there... (you can see in the un-painted pics the upper mount pretty well. it is 3/4 boxed up 1/2" or 3/8" flat bar I think it is 3" wide with holes punched through to hold upper pin.)
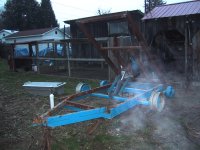
also note you can see there are reinforcing diamond shaped plates over the welds that attach the front trailer tong it was fully welded ground down and then added the plates as extra measure. also added 1/2" round rod/bar to the 2- 5/16" ball hitch to help add some reinforcing to that as well.
the pics are not all that detailed as I think they were shot in 480x640 res. digital camera back then which was pretty good digital camera back then...
If out need some measurements I can trey & remember to get a few next time I'm out to the farm.
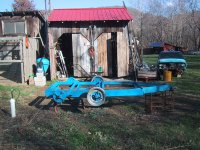
The bed is made with formed double bent top edged and single bent & edge welded & plug welded to the frame. i reinforced the top bends along the sides and tailgate with 2x2/14awg sq tube to make sure the upper sides would not bow out and used 2x2x1/4" for vertical risers from the top frame back corners where the bed dumps through to make sure these didnt bow I reinforced the bottom with some plate inside the lower back square tube. I notched the floor out and welded directly to the under frame and welded back the inned sheet metal bed so nothing would leak/rust through there.
this was a fun project that I built using the 55 ton Iron worker and 220 ton 10' brake and 1/4x10' shear at work
not to mention the welders and notchers eheheh..
Mark
P.S. Just added a couple more pics to the trailer gallery that were alreay on my PC from when it was built, I built this in July/Aug of 2003.