Concrete Questions

   / Concrete Questions #41  
forget the wire in the concrete. Have fibermesh put in the mix and cut in expansion joints and that concrete will last forever.
 
   / Concrete Questions #42  
N80 said:
I designed this thing myself after looking at lots of designs and plans. In some places it is probably 'over engineered' but that's okay.

If you think you might ever need to pull an engine or lift a heavy implement, then having a place from which to suspend a hoist would be helpful.

The engineering would need to acommodate a strong beam near the apex in a central location, with enough support from the posts and braces.

If you have power to the structure, then an electric hoist would be an option. Many prefer a chain hoist for the much finer control it offers in lift increments. I bought both types at Harbor Freight during 50% off sales. I love what a hoist can do and my back loves it even more.
 
   / Concrete Questions #43  
N-80, DIY is not so bad an option if you don't mind grunt work and the job taking longer. There are ways to modify the process to accomodate fewer workers, less skilled workers, less motivated workers, less capable/robust workers.

Where is it carved in stone (poured in concrete?) that you have to have a monolithic pour? You are building the building with or without the floor, right? So the building doesn't depend on the floor for strength. You just want a nicer floor than dirt right?

If the floor is raised above the grade of all surrounding land and the dirt immediately surrounding the building is sloping or can be graded to slope away from the building then you might get by with a gravel floor, if that is satisfactory. Crusher run with fines will pack down really well and you can definitely do it yourself.

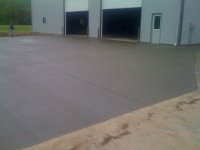
If you want to be able to build a dolly for an implement and put some 5-8 inch Castor wheels under it (cheap from HF) and have it easy to roll and not make tracks or sink in then concrete is far superior to even well packed small gravel with fines.

You need to rethink the process and abandon the "explosion of activity" approach of pouring a monolithic slab. You need to pour and finish the floor in increments no larger than you can handle alone or with available help. I have paved rather large areas with a small cheap electric mixer that could just barely hold (splashed a bit out as it was overfilled) 3 each 60 lb bags of RediCrete and water. Yup, I made concrete in 200 lb batches. HF has a larger electric mixer than the one I have for $200. You should save more $ doing it yourself that the cost of the mixer and if you don't want the mixer, sell it.

Harbor Freight Tools - Quality Tools at the Lowest Prices

This HF mixer costs $199 and does 3 1/2 cubic feet per batch. My mixer does (just barely) 2 1/4 cu ft. I will be buying one of the HF $199 units the next time I go to town as my old mixer was literally blown over in a storm and bent the motor shaft and sprocket (chain drive) a few weeks ago.

If you form with 2x4 lumber you will get a 3 1/2 inch slab thickness which will handle your equipment. You should "bed" the area to be poured with sand and the grass and weeds need to be scraped off along with the top layer of topsoil. With 3 1/2 cuft you can pour 12 square feet 3 1/2 inches thick. 3x4 ft is not hard to screed off by yourself with a board and is trivial with any warm body as a helper.

(A warm body is defined as someone with at least three fingers on one hand that works and knows enough to pick up something when told.)

If it isn't really hot and you aren't tired or slow (or maybe have a warm body or better for a helper) you can probably pour more than one batch at a time. You don't want to get a cold joint where one batch sets up too hard before the next batch is added to it if you choose to pour sections requiring multiple batches. Depending on temps and how fast you work you might be happy to size your sections to take 2-3 batches each and do 24-36 sqft at a time. I recommend making haste slowly untill you get a feel for the process and timing of the concrete initial hardening.

Pouring a batch, screeding it off then pouring a second batch, screeding it off and then going back to finish the first batch and then pouring the third batch and screeding it and then finishing the 2nd batch etc. and you will move right along. If you start to poop out then stop pouring new batches and just finish what you have poured.

Think about it, do you need a mirror finish on the floor? would you be satisfied to screed it off carefully and let it go at that or just make a few swipes with a float and call it done. Concrete finishers get carried away going for super neat. Super neat is slipery when wet and you aren't fully enclosed so precip will get on the floor. I have watched guys finish outdoor work for me and have a virtually flawless mirror finish and then broom it to get a non-slip finish or toss out a bunch of rock salt or water softener pellets and roll them into the surface of the previously perfect surface. After the crete cures you spray the salt with a hose and it goes away leaving a nicely textured surface which would look exactly the same if it hadn't been PERFECT before tossing out the salt.

You can put concrete reinforcing material that looks like fencing in the concrete and it is way better than no steel but rebar is way better, even 1/2 inch rebar on 16-24 inch centers is pretty darned good for your loads. Bird mentioned chairs to get the reinforcing steel off the ground. There are various styles such as bent wire, molded plastic, and little cubes of concrete with wires embedded for securing it to rebar. They all have their place but...

If you put down a sand bed to pour on, the plastic or the concrete cubes are better as the wire will get pushed down by the weight of the rebar (or your weight walking around on the rebar. Don't listen to anyone, self proclaimed pro or otherwise who says just lay the rebar on the ground and after pouring use a hooked piece of rebar to pull it up off the ground and let rocks in the mix get under it. If you have ever demolished old concrete poured that way you see a lot of problems with that method with rebar wasted, doing nothing just laying on the ground not well coverd by the concrete.

Remember to overlap rebar 25 times its diameter. So for 1/2 inch that is a minimum of 12 1/2 inches of overlap and a little extra is better.

There is more than one approach for breaking the job down into manageable sections, here is one I have used:

Split a 2x4 (or whatever size form board you use, lengthwise after drilling holes in it large enough for your rebar to stick through it (with the holes the distance apart you want rebar) on the side of the section to be added onto later (not the outer edge of the floor.) Place the rebar and then reassemble the form board with long deck screws (dry wall type work but break too easy if you are nearly as clumsy as me.) You want the rebar to stick out at least as much as your minimum overlap distance (over a foot for 1/2 inch rebar.) Pour, screed, and finish that section. As soon as the "mud" allows move the form over to be the form on the other side of the next section to be poured. If you haven't put down the rebar for that section do it now, overlap with the previous rebar, tie the rebar overlaps with wire using a pigtail tool.

By leapfrogging along you can do as many or as few sections as you want in a session and you can control the size of a section. This approach will give you cold joints, i.e. the sections will not bond really well. The rebar running between sections will be in shear and will keep the sections from moving vertically independently. For even more rigid connection there are "butterfly joints" and such but if you add some extra rebar, say in 3 ft pieces between the regular rebar this will mechanically tie the sections together better. You can also "paint" the sides of the immediate preceding section with concrete glue but I personally don't think it is required for your project.

It is a little more complication but you can add a board to the side of your movable forms to give the wood a "T" cross section (turn the letter T 90 degrees clockwise mentally to visualize the shape. The board on the side has to be tapered so when pulled away from the just finished section it has "draft" and comes away cleanly without messing up the previous section. Used motor oil or similar can be used as mold release to lube the reusable forms, especially if you opt for the t or + shape. The t shaped form leaves an indentation in the side of the previous section which is filled when you cast the next section. You probably still have a cold joint but the joint is now interlocking.

I just blasted this out stream of consciousness type so could have made an error or omission. Please feel free to ask for details or clarification.

Bottom line is, THINK OUTSIDE THE BOX! Break the BIG job into a series of little jobs that are well within your capability. When you use a shovel you don't try to use one the size of a FEL bucket. You use a smaller one and do more reps.

If you want to get just a little fancier and get a fair deal more strength with only a little more complication and more materials do this:

In your sand bed or undisturbed soil before you pour, dig out little slope sided trenches NS and EW in a grid pattern. You will want to wet your bed (the sand bed!) to the consistency for making sand castles. Then you can make the trenches stay and not collapse so easily. This will give the concrete a waffle shape with thinner flat parts and thicker "beams" running NS and EW. This will make the floor much stronger. You want to put a rebar near the bottom of each little trench. This rebar will be in tension when a load rolls across the floor and add quite a lot of strength. I doesn't need to be tied to the "regular" rebar, just the intersecting rebar in the bottom of the trenches crossing it.

The waffle pattern will add quite a lot of strength for just a little more material. The trenches in the waffle pattern should have sloping sides. The bottoms of the trenches are fine at 5-6 inches in width. Deeper is better but deeper is more material too. Even 4-6 inches deep will add a lot of strength. Don't make the trench walls vertical. Something likek 15 degrees off vertical is good and it is good to not have the transition from trench to flat be a really sharp well defined edge. Brush the edges gently to round them off just a little. Sharp corners are stress risers and exacerbate cracking.

All concrete cracks! Rebar will hold it together and keep the cracks small so they are cosmetic not structural.

I want to move a 35x70 foot steel building (with a 10x12 room sticking out on one side) this year. Competing plans are disassemble and reassemble (very labor intensive) or move it as a unit about 1/4 mile cross country (all on my land.) If it gets a concrete floor for all or part of it in its new location it will be poured as described above as I think it is too expensive to hire the whole thing poured and finished for me and it is too big by far for my ability, enthusiasm, stamina, or sanity to attempt it as a monolithic pour.

I will not be buying Redi-Crete in 60 or 80 lb bags but will buy 94 lb bags of portland cement dump loads of sand and gravel and mix with the HF mixer on sale now for $180 in these parts (check your local store.) To save significant $ I used to go to the big box stores and buy all the broken/ripped bags of everything resembling cement or concrete mix (even stucco) typically a pallet load at a time wrapped in clear plastic. Check with the manager or the guy in charge of the building materials section of the store. I got some fantastic bargains that way. I bought Portland cement (2-3 kinds) post hole concrete with large gravel, regular redi-crete in 60 and 80 lb bags, stucco mix bags of sand etc. Got terrific prices doing both of us a favor.

You can DIY for a lot less than a pro and working at whatever pace you can sustain instead of going crazy with a whole floor "going off" at the same time yoiu don't have to work up a heart attack to git 'er done!

Best of luck to DIY!!!

Pat
 
   / Concrete Questions #44  
Lot's of good information, Pat and the Gang! I have bookmarked this thread to refer to when my time comes to play with cement.

George...Just a thought...I know nothing about cement but have a good back and am willing to learn. I can come up and give you a hand if we plan ahead, get a few tools and a few folks. You are not that far away...Fairfield County? But, we would need someone with experience to guide and yell at us.
 
   / Concrete Questions #45  
N-80, Redbug, and whoever may try to use some of my comments... When I regained consciousness I proofed my post and...

"You want to put a rebar near the bottom of each little trench. This rebar will be in tension when a load rolls across the floor and add quite a lot of strength."

I said near the bottom of the trench but NOT REAL NEAR! Put it an inch and a half or so above the bottom. Top of the form to bottom of the trench dimension adds lots of strength but for the OP's purposes no need to exceed 6 inches.

I said the extra rebar to tie the sections together will be in shear (as is the "regular rebar with rolling loads and such on the floor.) Well it will be in shear when you drive something across the floor. It will also be in tension if any force tries to pull the sections apart laterally.

One additional suggestion: when you run the regular mat of rebar, the grid of NS and EW runs, put a 90 degree bend in the end of the rebar where a run comes to the the last intersecting rebar and tie the bent part to the intersecting rebar. This makes for a stronger connection and increases the holding power of the rebar to hold the slab sections together under stresses.

Another good idea is to NOT mix the mud too wet! There is PLACING concrete and there is POURING concrete. The concrete contractor and his finishers want to pour concrete. The design engineer trying to get the required strength wants you to PLACE the concrete. Without going into a long tech discussion, suffice it to say if you add enough water to make it easy to pour and easy to drag around with a hoe or whatever you have probably added too much water and will get a weaker concrete as a result. A "stiff" mix with less slump will give you much more of the strength you are paying for. You can mix a bit stiff (dry) and if in a reasonable time the mixer hasn't elliminated all the dry material, then you can add just a little more water. It takes very little water to go from too dry to too wet so sneak up on it till you get a feel for it.

Stiff concrete will still probably show a little liquid on the surface (or at least be pretty wet) after it is tamped into place and screed off level with the forms.

Another advantage of doing smaller sections at a time is that you can take your time with the screed process giving your board (2x4 or whatever) lots of sawing motion back and forth for just a small movement forward. This will settel the rocks down from the surface and tend to make the surface pretty wet (both are good things.)

If you don't have walls all the way around you will get precipitation on the floor. You do want a slope on the floor to help shed water. You don't want any concavities that will fill up and be ice skating rinks in the winter. With an open car port sort of building with only a roof and few or no walls I would slope the floor down from the center toward the edge (highest part of the floor near the center of the floor.) I recommend at least having the finished slab an inch above the surrounding grade and 1 1/2 to 2 is not excessive. I would clear the grass and top soil and put gravel a foot or two wide around the slab. You can bring the gravel up to almost the height of the slab and get a smooth transition to roll tires over and not have much trouble from rain water and mud getting on the slab.

About fiber in the cement to replace rebar. I have heard the hype, I have used fiber in cement in place of rebar. Now for some applications I go with fiber in the cement in addition to but never again in place of steel.

There is an additive that I recommend for concrete. It is a water reducer-plasticizer. It has a short pot life so if you have mud delivered by truck the additive is added after they arrive, allowed to mix and then you pour. You can add it to your home mixed concrete. Here is what it does...

It makes dry stiff, low slump concrete flow much better. It acts like it has a lot more water in it. First you mix a batch, ensuring all the ingredients are wetted and no dry stuff is left. It should be pretty stiff now. Then you add the additive and continue to mix. The mix consistency will become as if you added water. It will flow better and be easier to work with by a considerable margin B U T it will still retain the strength of the drier stiff mixture and not be weakened like it would be if extra water were added. The water reducer-plasticizer will make working with PROPERLY MIXED concrete as easy as the slop contractors tend to favor because it is so much easier than doing it right.

Best of luck to all DIY concrete projects!!!

Pat
 
Last edited:
   / Concrete Questions #46  
Well, it ended up only being about 95 yards, but it still sure put a dent in my checkbook! The slab is about 75'X65', but there was also a 60' narrow strip I finished between the barns. I really didn't want to have to mow a 3' strip between the barns anyway. :)

I really don't know about this part, so maybe someone can give their input. About 12 hours after the concrete was poured it began raining lightly; not nearly enough to cause any damage, and has been pretty well raining for the last 2 days since the pour. Most old time concrete guys tell me that I'm lucky as all get out because this will greatly help the proper curing process for the slab. It's 5000 psi anyway, but they say that it will cure out far better due to keeping it wet now. I really don't know. What's the theory on keeping a slab wet for days after it initially cures to where the water doesn't hurt the finish? Does it really help?
 

Attachments

  • 016.JPG
    016.JPG
    253.3 KB · Views: 242
   / Concrete Questions #47  
$10,000 here $10,000 there, pretty soon it starts to add up to real money. As I don't really need a super strong floor, when I move my 35x70 bld I will not put a floor anything like what it has now (about a foot thick) since unlike the previous owner I will not be using it for maintenance of really large dozers.

Nice looking slab. I would have preferred to have the control joints a bit closer together but only time will tell if your's are too far apart.

Pat
 
   / Concrete Questions #48  
patrick_g said:
Nice looking slab. I would have preferred to have the control joints a bit closer together but only time will tell if your's are too far apart.

Pat

I'm no expert on the exact distance needed, but my 1/4 mile long driveway is 12' wide and each joint is at 12'. That seemed to give it a nice look with basically squares, except around the turns. The slab pictured also has 12' squares except where it drops down to meet the existing slab. We didn't think it would look right putting one in there and would end up with a couple of rather small sections with the angles. The only problem I had with my driveway is on the 'wings' where it flared out at the main road. I poured them 12" thick but I still got had. A church with a gravel drive to one side of me has a member who runs a trash truck service and constantly drops loads off and picks them up in an area behind the church. When my driveway was only about 2 weeks old he cut the corner off and crossed the 'wing' on one side of my driveway with loaded tri-axles. That caused that wing to crack immediately all the way back to where I have brick columns and walls at the entrance of my driveway. However, I've not had any further change since then. In other words, it hasn't moved any nor has the crack gotten any worse. I'm hoping the rebar in the wing and the heavy gauge wire mat will hold the slab together.

I guess only time will tell on that as well. Otherwise, it's just been a back breaking ordeal for me to crawl around on my hands and knees filling each joint with caulk to prevent any water from getting under the slabs. I ended up buying an electric caulk gun and have gone through case after case of the caulk and still am not finished! But, I'm told that it's really important in an outside area to keep water from seeping into cracks in the control joints. It makes sense, but it also gives me headaches standing on my head for hours at a time. :(
 
   / Concrete Questions #49  
I understand your desire for an aesthetically proportioned result but concrete tends to shrink while it is curing and typically (but of course not totally predictably) tends to crack every so many feet depending on several factors including but not limited to thickness, PSI rating, reinforcing steel size and spacing, any admixtures, slump, and on and on. Control joints need to be located at a lesser spacing than the "natural" distance between cracks, WHATEVER THAT IS.

I assume you are using an elastomeric caulk intended for caulking exterior concrete with foam plastic backers forced into the space before caulking. It is a PITA to have to do a lot of that stand on your head work (and in your case, unfortunately, a pain in the brain as well.) Have you ever seen the knee pad scooter thingy? It has padded recesses for your knees and is on caster wheels. There are also mechanic's seats and gardener's seats on wheels that might make that work (and other jobs too) less of a pain.

You are doing the right thing. Sealing all potential water entry locations will certainly add to the life of your flat work. Freezing water can sure ruin a lot of $ invested in concrete.

Pat
 
   / Concrete Questions #50  
First I admit I have not read every post in this thread but have been scanning it the last few days. WHY do people purposefully put control cracks (joints) in concrete???? Ok, so the concrete doesn't crack but you just put a joint in the concrete and now have a huge crack that looks bad in my opinion. Here is the situation. My last garage (2 car) had a control joint down the center of the 2 bays. I HATED to sweep the garage and the joints would collect crap. We have since moved and now live in the country thank God. My new garage (which is probably much older than the one in town) does not have any control joints. It does have a fairly straight hairline crack down the center. It is barely noticeable and I sweep right over it. What is wrong with small cracks or am I missing something with the huge control joints?? Thanks and hope I can learn something.
 

Tractor & Equipment Auctions

2025 Kivel 48in Forks and Frame Skid Steer Attachment (A51691)
2025 Kivel 48in...
2016 FORD F450 CREW CAB SERVICE TRUCK (A52576)
2016 FORD F450...
2012 Nissan Rogue (A50324)
2012 Nissan Rogue...
CATERPILLAR 308E2 CR EXCAVATOR (A50458)
CATERPILLAR 308E2...
2019 Energreen EVO 40 Robotic Tracked Flail Mower (A52748)
2019 Energreen EVO...
2015 FORD F-550 SUPER DUTY (A52472)
2015 FORD F-550...
 
Top