OP
BukitCase
Elite Member
- Joined
- Feb 17, 2012
- Messages
- 2,756
- Location
- Albany OR
- Tractor
- Case 580B, Long 460, Allis-Chalmers 160
You're welcome; sorry the first explanation sucked 
Weldingtipsandtricks - my dad taught me 60+ years ago I should always try to learn from somebody who knows MORE than me (at least, about what I wuz learning) - and as a "hobby" welder doing mostly mild steel (so far) I doubt if Jody's ever NOT gonna pass that test
Somehow I don't think most of the OTHER "hobby" welders are in your shoes - after seeing how stiff and "un-cooperative" .035 S6 wire is, I'd think .062 S10(0) would be like tryin' to thread a needle with 1/2" rebar
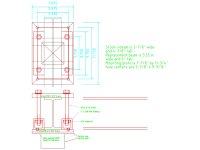
Well, I'm slowly gettin' stuff out of the way so I'll have enough room under the red roof to set up the HF crane - got the stock I-beam's mount plates dimensioned, gonna spend the rest of this wet/windy/crappy day drawing up my "slip coupler" design for the heavier/longer I-beam. Then I'll fab up one of the new mounts for each end of the crane (NOT the in-the-container-bridge crane) -
The way I'm doing the new beam mounts, they'll be able to lock down ANYWHERE along the I beam - the stock ones have plates welded to the I beam with 4 holes that bolt onto each post top (with another 4 hole plate welded on the posts) -
Once that's done, I'll be able to set the uprights at any distance apart, up to total length of the (12 foot) beam, and LOCK 'em in place.
When I get that far, there WILL be pics here in the "crane thread", AKA the "container weld shop" thread :laughing: ...Steve
Oh, just a reminder - if I DON'T set the portable crane up NOW, there's a 450 pound BOX smack in the middle of where I need to fab the "porch roof" next - with the crane assembled with a longer I beam, it can STRADDLE that area completely out of the way...
Weldingtipsandtricks - my dad taught me 60+ years ago I should always try to learn from somebody who knows MORE than me (at least, about what I wuz learning) - and as a "hobby" welder doing mostly mild steel (so far) I doubt if Jody's ever NOT gonna pass that test
Somehow I don't think most of the OTHER "hobby" welders are in your shoes - after seeing how stiff and "un-cooperative" .035 S6 wire is, I'd think .062 S10(0) would be like tryin' to thread a needle with 1/2" rebar
Well, I'm slowly gettin' stuff out of the way so I'll have enough room under the red roof to set up the HF crane - got the stock I-beam's mount plates dimensioned, gonna spend the rest of this wet/windy/crappy day drawing up my "slip coupler" design for the heavier/longer I-beam. Then I'll fab up one of the new mounts for each end of the crane (NOT the in-the-container-bridge crane) -
The way I'm doing the new beam mounts, they'll be able to lock down ANYWHERE along the I beam - the stock ones have plates welded to the I beam with 4 holes that bolt onto each post top (with another 4 hole plate welded on the posts) -
Once that's done, I'll be able to set the uprights at any distance apart, up to total length of the (12 foot) beam, and LOCK 'em in place.
When I get that far, there WILL be pics here in the "crane thread", AKA the "container weld shop" thread :laughing: ...Steve
Oh, just a reminder - if I DON'T set the portable crane up NOW, there's a 450 pound BOX smack in the middle of where I need to fab the "porch roof" next - with the crane assembled with a longer I beam, it can STRADDLE that area completely out of the way...