You are using an out of date browser. It may not display this or other websites correctly.
You should upgrade or use an alternative browser.
You should upgrade or use an alternative browser.
Creating a Workshop & Home
- Thread starter EddieWalker
- Start date
- Views: 86432
More options
Who Replied?
/ Creating a Workshop & Home
#181
RobS
Super Member
It's looking great EddieWalker, you're an inspiration (as well as that girlfriend of yours). Keep the pics coming, I'm having a blast following your progress /forums/images/graemlins/smile.gif
tcb
Member
she is definately a keeper, just make sure you make it up to her. however the true test is when it is time to hang insulation. be a jentleman, remember what she has done so far, give her your credit card and send her shopping. my wife of 16 years has helped me do the insulation on two houses now and after the second one i figured that was no way to treat a lady.
OP
EddieWalker
Epic Contributor
Thanks for the kind words.
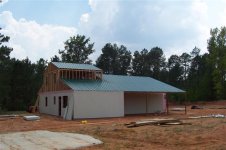
We did a little of the other side last night, so it wasn't so bad this morning. We both woke up a little sore, me from hauling the panals on my head and shoulder, her from bending over and standing on an angle all day. Plus all the damage done by the heat and humidity.
We did a little of the other side last night, so it wasn't so bad this morning. We both woke up a little sore, me from hauling the panals on my head and shoulder, her from bending over and standing on an angle all day. Plus all the damage done by the heat and humidity.
Attachments
OP
EddieWalker
Epic Contributor
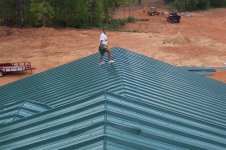
Here she is again, "Super Girlfriend"!!!!!!!!!!!
We finished up the remaining panals fairly quickly today. The previous day was the hard one. I wanted to do the heavy stuff first because I knew how week I'd be as this went on.
By the time we got to the roof peaks, I could only carry two at a time.
We finished up the remaining panals fairly quickly today. The previous day was the hard one. I wanted to do the heavy stuff first because I knew how week I'd be as this went on.
By the time we got to the roof peaks, I could only carry two at a time.
Attachments

OP
EddieWalker
Epic Contributor
This is my latest favorite photo. She really worked hard, and the finished product is better then we'd hoped for.
Of course, this is her first time roofing, and she had no idea what to expect. Don't know if I'll get her on top of a roof again, especially on a 95 degree day with 60 percent humidity.
Of course, this is her first time roofing, and she had no idea what to expect. Don't know if I'll get her on top of a roof again, especially on a 95 degree day with 60 percent humidity.
Attachments
OP
EddieWalker
Epic Contributor

OP
EddieWalker
Epic Contributor
OP
EddieWalker
Epic Contributor
OP
EddieWalker
Epic Contributor
So a funny thing happened to me on the way home. hahaha
I was on my little tractor, bringing my tools back, when something hit me on the back. I figured it was a bug of some kind, but didn't think twice until my girlfriend freaked out.
This of course caused me to freak out also. I thought it was either a monster spider or a red legged wasp. Both are things that terrify me.
This turned out to be something new that I'm afraid of. Don't know what it is, or if it's dangerous, but I do know I don't want it crawling on my back!!!!!!!
Anybody know what it is???
Eddie
Attachments

Nat
Platinum Member
Eddie, I put the Galvalume(sp) on my shop a few weeks back, it took me 2 days and it is only 24 X 40. I was working by myself, had to stand the sheets up and then climb up and pull them up, then place/hold, and screw them in by myself. I am impressed with your progress. There are a lot of screws to put in. I have plenty of 5/16 nut drivers for my battery drills, but the screws were 1/4" hex head. I went to Lowes and picked up the first 1/4" screw chuck I saw. It would run in around 100 screws then it would start to round out. I would go down and use the recip saw and cut 1/8 or so off the chuck and then go back up and run another 100 or so and do it again. After the third time there was no chuck left. I went home and the next morning I got a good DeWalt chuck from home. I couldn't believe the difference, the magnet would hold the screw and all I had to do was put the screw in the chuck then point the screw at the metal and it would stay in till the screw was started. It took 1/2 the work out of it.
How many nicks and cuts did ya'll have by the time all the screws were in? I had 3 cuts and 1 mashed finger from screwing thru 4 layers on the ridgecap. Keep up the posts, Later, Nat
How many nicks and cuts did ya'll have by the time all the screws were in? I had 3 cuts and 1 mashed finger from screwing thru 4 layers on the ridgecap. Keep up the posts, Later, Nat
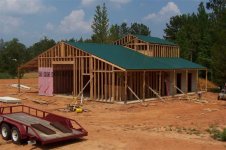
Dont know about the bug, and afraid to guess. Please tell us that is not a fence post it is setting on, but really a twig taken REAL closeup. Project looks great under roof. As for the girlfriend, after this much work I really think you have a winner. I dont care for heights either, but would learn to love it for the project you guys have done. You obviously have some great help and your talent is unmatched.
tcb
Member
i am begining to see a pattern here. girl working on roof, boy taking pictures of girl. you guys have it made in texas. in alabama it works the other way. /forums/images/graemlins/grin.gif /forums/images/graemlins/grin.gif
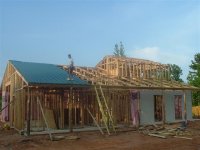
the place really looks good, top notch framing.
tim
the place really looks good, top notch framing.
tim
jinman
Rest in Peace
- Joined
- Feb 23, 2001
- Messages
- 21,059
- Location
- Texas - Wise County - Sunset
- Tractor
- NHTC45D, NH LB75B, Ford Jubilee
</font><font color="blue" class="small">( This turned out to be something new that I'm afraid of. Don't know what it is, or if it's dangerous, but I do know I don't want it crawling on my back!!!!!!! )</font>
Eddie, do you have any cottonwood trees on your place? That sure looks like a cottonwood borer to me. It's a little far west for them, but they are probably found in east Texas. They can get up to 1-1/2 inches long. I don't know that I've ever seen one around here, but I wouldn't be surprised with all the cottonwoods I have growing beside creeks.
BTW: I haven't had much time to check in, but your progress is looking terrific. I can't wait to see it finished.
OP
EddieWalker
Epic Contributor
Jim,
Thanks, you nailed it!!!!!!!
I've never seen one before, and didn't have a clue what it was, or where to look. I did a google search for cottonwood borer and it came right up.
Heres what they said about it at http://www.gpnc.org/cwoodborer.htm
Common Name:
Cottonwood Borer
Scientific Name:
Plectrodera scalator
Omigosh!! value:
Very high
The cottonwood borer is a member of the long-horned beetle family, the Cerambycidae. It is the largest member of that family found on the Great Plains and is indeed one of the largest insects found in North America - up to 40mm long and 12mm wide. During the summertime, we often get phone calls from startled people who have found one and are wondering whether the Martians have invaded!
As adults, and as larvae, these insects depend on the cottonwood for their livelihood. The species will also use willows and poplars, but the cottonwood is the tree it prefers. Like all beetles, the adults have chewing mouthparts. They use their large mandibles to eat the leaf stems and new twigs of the tree while they are active during the summer. After mating, the female will chew small pits near the base of the tree and lay her eggs in them. The larvae burrow into the tree and may take two years to mature in cooler climates. Their first year is spent feeding on the roots of the tree and the second burrowing through the heartwood near ground level. They pupate for about 3 weeks during April-June before emerging to complete their life cycle. The puparium is located in a root below ground level. After completing metamorphosis, the adults chew their way out and then dig they way up to the ground surface. Consequently, they don't leave visible emergence holes on the tree.
Nat
Platinum Member
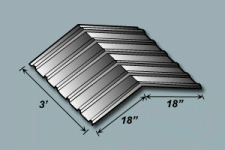
Eddie, I was looking back at this thread and noticed the ridge cap on the shop. I have never seen ridge cap like that. Is it preformed for each specific pitch, or do you bend it more for a steeper pitch. My ridge cap is a piece of metal that is 20" wide and 10' long with a bend in the 20" side. You simply flatten it for a shollow pitch and bend it more for a steeper pitch. The ridge cap on your's looks a lot better. On first glance it looked like you used 2 pieces to make the length, but I new from seeing your work that you wouldn't do that. It was then I noticed it was the cap. Latter, Nat
OP
EddieWalker
Epic Contributor
Nat,
I bought my material from Mueller. There website is www. muellerinc.com and this photo if from there.
They screw on just like the panals. I had the roof panals cut about six inches short so I could adjust to fit.
I've never seen a building perfectly square, and this one isn't either. It's close, but I still need some fudging room.
In order to line up the roof panals on the other side, we brought up a ridge cap and set it in place. Then we lined up the roof panal so it would square up with the panals on each side and the peak. If not, you can have a nasty twist.
Even with lining them up real good, there are a few that need an extra screw to keep everything flush. After awhile, they have a tendancy to ride up on each other.
Mueller bends them to any angle you want. I'm at a 4:12 pitch, so that's what it came in.
I had a few options for the peak and chose closing it up. I will vent from the sides.
Eddie
Attachments
MF1455v
Platinum Member
Eddie, I used the same ridge cap from Mueller about 2 years ago on my carport. They sure make for a clean look and no need for the gasket material. I have asked for them at other places and always get a "what are you talking about" look. /forums/images/graemlins/confused.gif I wonder if its a Mueller specific product?
Sure is looking good. Keep the pictures coming.
James
Sure is looking good. Keep the pictures coming.
James
OP
EddieWalker
Epic Contributor

OP
EddieWalker
Epic Contributor
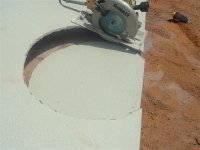
The vent is centered, but due to some creative framing, my panals didnt' line up on center. Not that it's important.
I'm using the diamond blade that was reckomended to me by my supplier to cut with. For the circle, I just plunged the blade in all the way around.
From a distance it looks round, but up close it has dozens of short, straight sides.
This will be covered in the end with a cap that comes with the vent.