Creating a Workshop & Home

/ Creating a Workshop & Home
  • Thread Starter
#341  
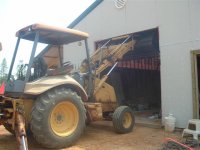
I had started posting the pics of installing the roll up door when a storm hit and nocked out my sattelitte internet. This was a pretty good sized storm, so it wasn't unexpeceted. Just one of those thangs. /forums/images/graemlins/grin.gif

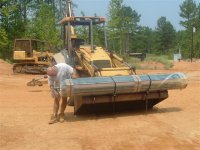
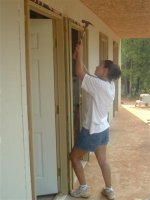
After unloading the door from my trailer, I needed it 'ON TOP' of my FEL. Steph and I were able to lift it there, then I straped it in place.

Next I had to install the chain drive gears and attachments.
 

Attachments

  • 723191-Workshop 440 (Small).jpg
    723191-Workshop 440 (Small).jpg
    65.2 KB · Views: 537
/ Creating a Workshop & Home
  • Thread Starter
#342  
The opening is ten feet wide, exactly. The door is 12 feet wide from tip to tip. Getting it in on the FEL is a bit tricky, but not too bad. I just come in at an angle, then keep adjusting until I'm centered again. Took about 30 to 40 little adjustments to get in position. /forums/images/graemlins/laugh.gif

I think they call this seat time. /forums/images/graemlins/grin.gif

Anyway, as you can tell, I'm totally blind as to where the brackets are and how everything lines up from the seat of the tractor. Steph has to give me directions from inside.
 

Attachments

  • 723193-Workshop 443 (Small).jpg
    723193-Workshop 443 (Small).jpg
    47.8 KB · Views: 504
/ Creating a Workshop & Home
  • Thread Starter
#343  
THis pic gives you a better idea of what I can see from the seat. Not much.

It's in position now, just need to get it from the top of the bucket to the brackets.
 

Attachments

  • 723194-Workshop 446 (Small).jpg
    723194-Workshop 446 (Small).jpg
    49.9 KB · Views: 448
/ Creating a Workshop & Home
  • Thread Starter
#344  
One thing I remember about the other roll up door I put in was cutting the straps to unroll it. Things happend faster than I could control and just by luck I didn't get hurt or destroy the door.

This time I aproached it with more caution. I got a piece of rope and tied it around the door as shown in the picture.

Then I took a piece of wood and tightened up the rope like a tournaquet to hold it in place while I cut the strap. Remember, I'm on a ladder doing this.

After the strap was cut, I was able to slowly unwind the rope until it was partially unrolled to the point I could line it up with the tracks.

This solved allot of problems and really made things easier!!!
 

Attachments

  • 723198-Workshop 453 (Small).jpg
    723198-Workshop 453 (Small).jpg
    45.1 KB · Views: 460
/ Creating a Workshop & Home
  • Thread Starter
#345  
I still need to trim it out, but this pic gives you a good idea of what it looks like. We got it up just in time too. Those clouds are the beginning of a serious thunder storm that droped up to three inches of rain is some places around here last night. I lost power several times and the news was full of power lined going down along with trees falling on houses. Big storm, but the workshop is now weathertite!!!
 

Attachments

  • 723207-Workshop 455 (Small).jpg
    723207-Workshop 455 (Small).jpg
    47.9 KB · Views: 492
/ Creating a Workshop & Home
  • Thread Starter
#346  
In between helping me with the roll up door, Steph trimmed out the bathroom doors.

She learned to use the chop saw a few months ago when she was helping with the framing, but working a hammer is still a challange for her. /forums/images/graemlins/crazy.gif /forums/images/graemlins/wink.gif /forums/images/graemlins/smile.gif

Getting it to hit the nail everytime is just part of the challange, keeping the nail strait so it doesn't bend is the worse part. But she never quits and she always gets the job done.

I'm very proud of her!!!
 

Attachments

  • 723209-Workshop 433 (Small).jpg
    723209-Workshop 433 (Small).jpg
    31.1 KB · Views: 518
/ Creating a Workshop & Home #347  
Thanks Eddie. I am going to give Muellers a call tomorrow to see if they will ship to Michigan or if they know of a company in my area that sells the same brands. I see that they also sell some metal roofing accessories that none of the local Michigan suppliers sell.
It took four guys and the cab of their pick-up truck to get my 10x10 roll-up mounted. They did something wrong and had to take it down and re-hang it. The door is dark brown and is facing South, you would not believe how hot the door gets from the sun shinning on it. I had them install the double foiled bubble wrap insulation, that helps in the Summer and helps a little with keeping in the heat in the Winter.
Farwell
 
/ Creating a Workshop & Home
  • Thread Starter
#348  
Until I get the gutters on, I have a problem with rain splashing off the ground and getting in through the doors. With the trim installed all we need to do is get them caulked.

We didn't quite finish before the storm hit, but we did get the bottoms done. The rest will be real quick to finish up when things dry out.

In this pic, you can see how thick Steph put the first beed on. She' has absolutely no experience with building, so everything she does is for the first time. I give he basic instructions, but I'm also a big believer in hands on and allowing her to make mistakes to better understand how things work.

She is smarter than I am, and as a result, she picks up on things much faster than I did. It's amazing to see how quickly she understands everything I throw at her. /forums/images/graemlins/smile.gif
 

Attachments

  • 723216-Workshop 454 (Small).jpg
    723216-Workshop 454 (Small).jpg
    33.2 KB · Views: 552
/ Creating a Workshop & Home #349  
I see an air powered nailgun in her future.

Great work Eddie and Steph, you folks make a great team. (Eddie, that means you got one super lady there)
 
/ Creating a Workshop & Home #350  
Eddie,
Think a smaller hammer may be a little easier for her. The one in the photo looks pretty serious especially for trim work. A 12 ounce Estwing instead of a 20 ounce could do the trick.
Farwell
 
/ Creating a Workshop & Home #351  
Eddie-

One more question about the weather: Are you guys expected to get a boatload of rain from the hurricane? Do you need to do any special preparation for the storm or is the place (other than rain gutters) weatherproof? Did you build your place with storms like this in mind (i.e. do you ever have to endure high winds/horizontal rains there)?

Nice work by the way. You and your significant other are tops!

Bonehead
 
/ Creating a Workshop & Home #352  
Man is that impressive Mr. Eddie. You and Stephanie have a lot to be proud of.

I will second the vote for nailguns, or even just a palm nailer. It sure makes some of that work go better.

My hat is off sir.
 
/ Creating a Workshop & Home
  • Thread Starter
#353  
/forums/images/graemlins/smile.gif /forums/images/graemlins/smile.gif /forums/images/graemlins/smile.gif /forums/images/graemlins/smile.gif You guys kill me!! Getting her a nail gun would be cheap, what she keeps telling me she wants is a plasma cutter !!!!

We spent a good part of the day today cleaning up and organizing the workshop. She's all excited about the best room in the house and can't wait to get it all set up so she can start doing some projects /forums/images/graemlins/laugh.gif /forums/images/graemlins/laugh.gif /forums/images/graemlins/laugh.gif

But before that, I put some Home Depot gutters on the bathroom side of the building. Now that it's sealed up, I want to cut down on the splashing.
 

Attachments

  • 723618-Workshop 456 (Small).jpg
    723618-Workshop 456 (Small).jpg
    53 KB · Views: 573
/ Creating a Workshop & Home
  • Thread Starter
#354  
Here I am fitting the downspout. I wanted it to come back to the wall and then exit out the side. This way it wont distract from my cedar posts.
 

Attachments

  • 723621-Workshop 460 (Small).jpg
    723621-Workshop 460 (Small).jpg
    38.4 KB · Views: 512
/ Creating a Workshop & Home #355  
That appears to be aluminum? On our place in the country, I had the continuous aluminum gutters installed, but the only ones I've done myself were the vinyl. It really is looking like a nice place. I noticed in previous posts that your living space is exactly the same square footage as this mobile home we're now in. /forums/images/graemlins/laugh.gif
 
/ Creating a Workshop & Home
  • Thread Starter
#356  
Four months ago I had a deadline to be out of the Container Barn I'd built and sold. The deadline was August 31 was my last day, then I had to be out. The buyer is a nice guy and I'm sure he would have let me stay a few days longer, but it was important to me to meet my deadline.

The water was turned on Monday, August the 29th. That was my last hurdle to jump in order to move in. The next morning I arrived to find this on the kitchen floor.
 

Attachments

  • 727695-Workshop 462 (Small).jpg
    727695-Workshop 462 (Small).jpg
    29.3 KB · Views: 534
/ Creating a Workshop & Home
  • Thread Starter
#357  
Along with packing and moving all my stuff here, I now have to fix a water leak. This is above the master bedroom, and is the line to the ice maker in the kitchen.

I didn't figure out if it was a bad glue job or there was somehow a pinhole in the line. It's looks like it's coming out from the bottom of the pipe, just before the fitting.

Either way, I cut it out and replaced it.
 

Attachments

  • 727697-Workshop 463 (Small).jpg
    727697-Workshop 463 (Small).jpg
    36.4 KB · Views: 480
/ Creating a Workshop & Home
  • Thread Starter
#358  
I also had to put the water heater in. I started another thread on water heaters and after getting some great advice and learning a bit about water heaters, I chose the Whirlpool Lifetime Warantee model. Not so much for the watantee, but because of the added featurs in their best water heater. Two stainless steel element, extra insulation, smart controls and two 5,500 watt elements compared to 4,500 ones in all the others.

Of course, nothing goes in without it's problems. When I had it all installed and turned on the water, I went to the bathroom to open the hot water lines to bleed out the air and came back to find the water heater leaking.

The water was coming out of the top of the tank!!

I called Whirlpool and told them what was happeing, and without asking me what model of type of water heater I had, he told me the annoid needed to be removed and resealed. The socket size I needed was 1 1/16 inch.

Obviously this is such a common problem that he knew exactly what it was. Anyway, I pulled it out, cleaned the threads and wraped teflon tape around them. Put it back in and problem solved!!

Here it is in all it's glory. The platform is large enough for three water heaters along with the plumbing stubed out for the time it happens.
 

Attachments

  • 727703-Workshop 466 (Small).jpg
    727703-Workshop 466 (Small).jpg
    34.1 KB · Views: 508
/ Creating a Workshop & Home #359  
Eddie,
I have done my own plumbing for the past 35 years or so and have yet to tackle a big job with out finding at least one copper fitting that was a cold sweat or forgotten. When any major plumbing modifications are done by me from now on I will put in a bunch of isolation ball valves so I can shut down the troubled area and keep water flowing to the rest of the building. I also try to avoid in the wall plumbing where possible.
Hope you caught the leak before any real damage was done.
Farwell
 
/ Creating a Workshop & Home
  • Thread Starter
#360  
Not only am I moving furniture, clothing and personal item, tools and equipment, I also had to move my collection of hunting trophies.

I put OSB on one wall, and hung all my heads on that wall.

If you're offended by dead animals or taxidermy work, then dont' look at the next two posts.
 

Attachments

  • 727708-Workshop 468 (Small).jpg
    727708-Workshop 468 (Small).jpg
    85.9 KB · Views: 518

Marketplace Items

CAT 930M (A58214)
CAT 930M (A58214)
2020 DRAGON ESP 150BBL ALUMINUM (A60736)
2020 DRAGON ESP...
V.E. ENTERPRISES 500 BBL FRAC TANK (A58214)
V.E. ENTERPRISES...
New/Unused Quick Attach Pallet Forks (A61166)
New/Unused Quick...
207269 (A52708)
207269 (A52708)
2023 Wolverine 72in. Bucket (A61567)
2023 Wolverine...
 
Top