Creating a Workshop & Home

/ Creating a Workshop & Home
  • Thread Starter
#261  
Thanks for the ideas.

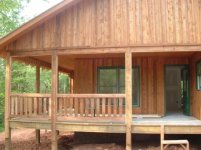
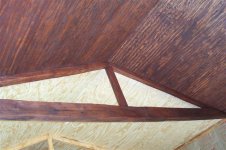
The hardie trim pieces look real nice, almost too nice, if that makes sence. I really want to get a rustic look, and in my mind I'm not seeing it with the hardi trim.

Rough Cedar might be a good choice. I'll price it and see how it compairs to preasure treated.

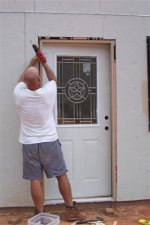
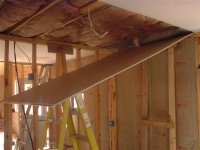
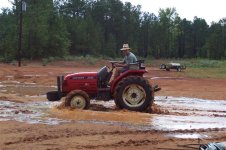
In this picture I'm putting in the front door. Steph is great at taking pictures of me while I'm doing things that make me look busy. /forums/images/graemlins/wink.gif
 

Attachments

  • 709051-Workshop 344 (Small).jpg
    709051-Workshop 344 (Small).jpg
    39.9 KB · Views: 551
/ Creating a Workshop & Home
  • Thread Starter
#262  
The front door has a star in it. This is Texas after all!!!

Lowes has if for $338 and my supplier gave it to me for $308.

It will be painted a dark red a with the building being a tan with dark brown trim.
 

Attachments

  • 709052-Workshop 347 (Small).jpg
    709052-Workshop 347 (Small).jpg
    23.2 KB · Views: 486
/ Creating a Workshop & Home
  • Thread Starter
#263  
Steph has taken over installing the insulation. She's such a trooper that she just sticks with it until it's done. She's extremely miticulous with great attention to detail. No way we're losing any cold air through these walls. /forums/images/graemlins/grin.gif /forums/images/graemlins/grin.gif
 

Attachments

  • 709053-Workshop 352 (Small).jpg
    709053-Workshop 352 (Small).jpg
    36.6 KB · Views: 516
/ Creating a Workshop & Home
  • Thread Starter
#264  
The upstair toilet needed to make a quick turn to fit in my floor joists. This is one of those things I worry from the planning stage all the way until I actually do it. Luckily it wasn't too bad.
 

Attachments

  • 709055-Workshop 354 (Small).jpg
    709055-Workshop 354 (Small).jpg
    42.9 KB · Views: 471
/ Creating a Workshop & Home
  • Thread Starter
#265  
How many 2 inch fittings does it take to drain the clothes washer? Probably less then I ended up using. /forums/images/graemlins/confused.gif

This was supposed to be a simple washer drain, but now it looks like an instrument from Blue Man Group /forums/images/graemlins/shocked.gif
 

Attachments

  • 709058-Workshop 355 (Small).jpg
    709058-Workshop 355 (Small).jpg
    35 KB · Views: 488
/ Creating a Workshop & Home
  • Thread Starter
#266  
I have to be living in this place Sep 1. All I need is power, water and a bathroom. For this reason, I'm concentrating on the upstairs bathroom. This one will get vinyl floors compared to tile in the downstairs one.

Green sheetrock is now in.
 

Attachments

  • 709060-Workshop 358 (Small).jpg
    709060-Workshop 358 (Small).jpg
    13.5 KB · Views: 479
/ Creating a Workshop & Home
  • Thread Starter
#267  
While I was sanding the walls, Steph took this picture. It's really not that bad in there, but the flash seems to have caught every dust particle and maginified them!!!!!!!!!!
 

Attachments

  • 709065-Workshop 324 (Small).jpg
    709065-Workshop 324 (Small).jpg
    22.7 KB · Views: 495
/ Creating a Workshop & Home #268  
Eddie; I like to use cedar for trim when I can. In your case, use the thikness that looks good to you. Then, whateverX4 for the side jambs and sill, and a ?X6 for the head jamb. Find the center of the head jamb, then measure down about 1-2" on each end from the top. Strike a line between the marks on the ends and the top edge center, cut the wedge shaped pieces out. I'd use the rough side out on the cedar too. I've done this alot on buildings with verticle siding, it might look good on yours too. Just make sure that your sill is the width of the window, your side jambs over the ends of the sill to the top of the window, and your head jamb the width of the window plus the side jambs plus an inch or so to extend slightly past the side jambs on each side. /forums/images/graemlins/smile.gif

Lookin good BTW, you 2 wanna comeup when your done and finnish mine? /forums/images/graemlins/grin.gif
 
/ Creating a Workshop & Home #269  
Eddie I used cedar siding on the new house we moved into last week. It is rustic and fits the style house I wanted. The boards I used were kiln dried 3/4 x 7 1/2 sanded 3 sides rough on the 4th. I used the rough side out as you can see in this pic, then stained it with Olympic Natural Cedartone stain, supposed to last 15 years. One thing to point out is that I was so sick of cedar by the time I got all the siding done I didn't think I would ever want to see a cedar board again
 

Attachments

  • 709265-new house 041.jpg
    709265-new house 041.jpg
    85.7 KB · Views: 461
/ Creating a Workshop & Home
  • Thread Starter
#270  
I'm still hanging sheetrock. Working alone on it adds to how slow I am, along with finishing off the little details that have to be done before I can put the sheets up. Things like ceiling fans in the bathrooms, boxing out the AC vents in the closets because I used 2x8's for floor joists and they aren't large enough for the ducts, along with tying down my plumbing and electrical lines plus all the other little details that come up when I look real close to a wall or ceiling just before I install a sheet.

For those who have never installed sheetrock on ceiling alone, there are two basic methods. Rent a tool that holds the sheets flat and you lift it into possition or using 2x4's and a ladder. The lift is easier, faster and better, but it costs $100 for a day. I had 12 full sheets total to put on the ceilings and the rest are cut, smaller pieces. No way I'm spending another $8.33 a sheet for the lift. /forums/images/graemlins/frown.gif

OK, so I'm cheap, but this is how I did it for those who are interested. First I connect two 2x4's together with a top and middle to form an H with a top.

Then I put it agains the wall, position my ladder to hold the sheet and put it into place.
 

Attachments

  • 714394-Workshop 360 (Small).jpg
    714394-Workshop 360 (Small).jpg
    45.9 KB · Views: 502
/ Creating a Workshop & Home
  • Thread Starter
#271  
Then I use another 2x4 with a board across the top that forms a T to hold it tight while I screw it in. I like to use screws for ceilings and nails for walls.
 

Attachments

  • 714401-Workshop 361 (Small).jpg
    714401-Workshop 361 (Small).jpg
    38.3 KB · Views: 479
/ Creating a Workshop & Home
  • Thread Starter
#272  
Here's the AC duct in the master bedroom closet. It's just one of the delays that add to the time of everything. Closets are an added pain to do anyways, and this is just a bonus.
 

Attachments

  • 714404-Workshop 363 (Small).jpg
    714404-Workshop 363 (Small).jpg
    32.3 KB · Views: 432
/ Creating a Workshop & Home
  • Thread Starter
#273  
We have planned to stain the ceiling and beams from the very beginning, but never new what color we'd use. It took 7 samples to find the one we liked. Red Oak by Minwax.

Here's Steph getting started on it.
 

Attachments

  • 714407-Workshop 375 (Small).jpg
    714407-Workshop 375 (Small).jpg
    49.3 KB · Views: 496
/ Creating a Workshop & Home #274  
Wow Eddie, $100 a day seems high for a lift. I rented one for my basement and wouldn't do without again. Seems like I got the whole weekend for maybe $40? I used it for the ceilings and the upper walls. So much faster...

Are you using a Roto-Zip for the cutouts? Another huge timesaver I discovered in my last couple of drywall projects. And of course, a drywall screwgun. Be like the pros and lock the trigger on, saves time and wear/tear on the drill motor.

And that's where my basement workshop sits right now. I'm counting on taping/mudding tips back from you for the fall when I resume my work /forums/images/graemlins/smile.gif
 
/ Creating a Workshop & Home
  • Thread Starter
#275  
Here's a good picture to show what the ceilings will look like when she finishes. The Red Oak brings both the oak beams and the pine ceiling together nicely.
 

Attachments

  • 714414-Workshop 380 (Small).jpg
    714414-Workshop 380 (Small).jpg
    52.7 KB · Views: 511
/ Creating a Workshop & Home
  • Thread Starter
#276  
Rob,

I've tried the drill being on full time and adding the screws, but I've never gotten confortable with it and keep coming back to using my cordless drill. I had a neighbor who hangs sheetrock profesionally and learned quite a bit from him, but he mostly did commercial on metal studs. He also liked nails over screws when working on wood.

Eddie
 
/ Creating a Workshop & Home
  • Thread Starter
#277  
We were working along, having a good time when Mother Nature decided to show up. It was a nice day out, a few clouds, with no rain in the forcast that morning.

Then in about 15 minutes everything changed. It got windy out, then really windy and all of a sudden it's raining at what we later learned was 2 inches an hour along with nickel sized hail.
 

Attachments

  • 714421-Workshop 385 (Small).jpg
    714421-Workshop 385 (Small).jpg
    41.1 KB · Views: 490
/ Creating a Workshop & Home #278  
Maybe it is just my screwgun (Milwaukee) but as soon as I got away from the trigger I could hold the thing in a much better grip to push straight down the axis of the screw. Sort of wrap my palm around the rear of the motor.

Stain looks fantastic, nice work /forums/images/graemlins/smile.gif
 
/ Creating a Workshop & Home
  • Thread Starter
#279  
We waited about five minutes too long to move our cars. I have 4 wheel drive and decent tires, but Steph has a 2 wheel drive Explorer. I barely made it back, and that was driving sideways on either side of my roads. No control except forward most of the time.

She was stuck where she parked. We waited a few hours and cought a break in the rain to pull her out. I figured worse case scenerio she could take my truck to work is it came to that.

The little Century was able to pull her out without any problems at all. Here is a picture of what we had to go through to get to higher ground.

This spot will have to be fixed before too long, but first I need to get the house done, then I can worry about drainage problems.

Eddie
 

Attachments

  • 714424-Workshop 382 (Small).jpg
    714424-Workshop 382 (Small).jpg
    60.5 KB · Views: 567
/ Creating a Workshop & Home #280  
Hey Eddie, the stain really ties all the wood together and looks great. I really love those beams you cut, just the right amount of 'rustic ?' look..........

On another note I was a little dissapointed in your choice of tow vehicles, I thought for sure you would have used the 'Trench filler' /forums/images/graemlins/grin.gif

When you moving in? And where's the fireplace /forums/images/graemlins/frown.gif
 

Marketplace Items

2012 INTERNATIONAL LF687 T/A 6X4 MID ROOF SLEEPER TRUCK TRACTOR (A59906)
2012 INTERNATIONAL...
2017 Load Trail 3.5 Ton T/A Equipment Tilt Trailer (A61568)
2017 Load Trail...
2017 Gravely Pro-Turn 460 60in Zero Turn Commercial Mower (A60352)
2017 Gravely...
2020 VOLVO 760 TANDEM AXLE SLEEPER (A57880)
2020 VOLVO 760...
SKID STEER ATTACHMENT PACKER (A58214)
SKID STEER...
1999 TRANSCRAFT FLAT BED 48FT TRAILER (A59905)
1999 TRANSCRAFT...
 
Top