Creating an Entrance

   / Creating an Entrance
  • Thread Starter
#131  
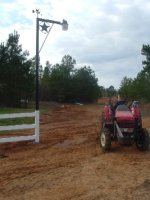
I started drilling the holes for the next run of fence when I hit a hard spot. It was so hard, I couldn't get past six inches deep. This was a new experience for me since I've had the post hole digger.

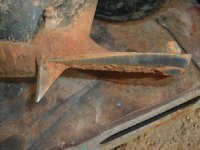
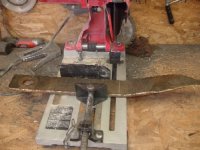
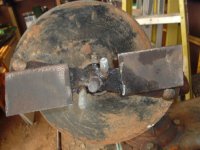
I checked the edge and realized it was all wore out.
 

Attachments

  • 594681-sign 004.jpg
    594681-sign 004.jpg
    50.8 KB · Views: 625
   / Creating an Entrance
  • Thread Starter
#132  
My first thought was to re-grind the edge on it, but after looking at it, and the amount of wear, I changed my mind.

I just bought some new blades for my shredder, and have the old ones lying around. I thought the steel used in them must be pretty strong. At least stronger then what was on there and definiatley stonger then any other scrap I have.
 

Attachments

  • 594689-sign 010.jpg
    594689-sign 010.jpg
    52.8 KB · Views: 540
   / Creating an Entrance
  • Thread Starter
#133  
The tip was worn round and not very long. I thought a hardened bolt would work better. Then I thought, if one would work better, then three will be even better!!!!!
 

Attachments

  • 594694-sign 012.jpg
    594694-sign 012.jpg
    46 KB · Views: 548
   / Creating an Entrance
  • Thread Starter
#134  
I was debating about adding some more bolts onto the cutting edge as teeth. I figured it was something I can still do if I need to, but not today.
 

Attachments

  • 594700-sign 013.jpg
    594700-sign 013.jpg
    46.7 KB · Views: 496
   / Creating an Entrance
  • Thread Starter
#135  
Now that I can drill holes again, it was pretty good going putting in some more fence.

Over the summer, I put power to this general location, but didn't know exactly where I wanted the lights at the time. I burried the line in conduit with some flags so I could find it.

The trench is from finding the line and running it to the lights.
 
   / Creating an Entrance
  • Thread Starter
#136  
This is the second street light. When the cement dries, I'll put both lights on, install the weathervanes and touch up the paint.
 

Attachments

  • 594714-sign 015.jpg
    594714-sign 015.jpg
    45.6 KB · Views: 531
   / Creating an Entrance
  • Thread Starter
#137  
I installed the lights and weathervanes today.
 

Attachments

  • 595606-Street Light 017.jpg
    595606-Street Light 017.jpg
    43.2 KB · Views: 515
   / Creating an Entrance
  • Thread Starter
#138  
Here's a closer view of the finished light.
 

Attachments

  • 595608-Street Light 013.jpg
    595608-Street Light 013.jpg
    32 KB · Views: 529
   / Creating an Entrance
  • Thread Starter
#139  
It even works!!!!!!!!!!
 

Attachments

  • 595609-Street Light 019.jpg
    595609-Street Light 019.jpg
    40.1 KB · Views: 558
   / Creating an Entrance #140  
It looks very nice, Eddie, and also very unique. Have you seen the flag holders with the star? I'm attaching a picture of one on my deck. I think you'll see the similarity to your lamp pole and weathervane design.
 

Attachments

  • 595790-FlagHolder.JPG
    595790-FlagHolder.JPG
    34.8 KB · Views: 492

Tractor & Equipment Auctions

X-CEL GOOSENECK TRAILER (A54756)
X-CEL GOOSENECK...
2014 Ford F-150 (A55973)
2014 Ford F-150...
2015 Ford Taurus Sedan (A56859)
2015 Ford Taurus...
16ft T/A Flatbed Trailer (A55758)
16ft T/A Flatbed...
JOHN DEERE 644K WHEEL LOADER (A58214)
JOHN DEERE 644K...
2011 Chevrolet Traverse 1LT SUV (A55758)
2011 Chevrolet...
 
Top