Deck Project Confusion

/ Deck Project Confusion #1  

Temp97

Bronze Member
Joined
Jul 10, 2006
Messages
89
Location
Western New York
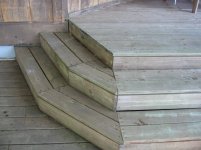
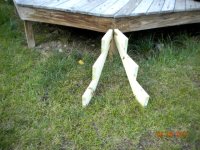
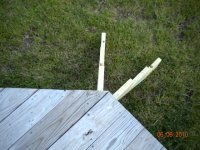
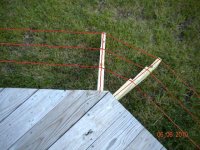
Ok, I've put a few decks in but never did one with the an angled corner where the steps go. The stairs will rap all the way around the deck but my concern is the placement of the stringers. In the pics you can see the two I set up but if you run the step boards to where they meet at the angle, there is nothing to nail to? My thought is to run another stringer down the middle and notch the top (V groove) so it will fit snug to the deck face plate then the step boards will have something to be nailed to. Any ideas, searching the internet only shows finished steps.
 

Attachments

  • DSCN1698.JPG
    DSCN1698.JPG
    87 KB · Views: 364
  • DSCN1697.JPG
    DSCN1697.JPG
    79 KB · Views: 197
/ Deck Project Confusion #2  
I have seen this handled three ways

One is my favorite, which is who cares. The deflection in a 2X6 will be unnoticeable.

Problem is I have noticed deflection a couple of times.

The second and third are cutting riser pieces of 2X6 to act as "posts" on the bottom and second step. There should not be any deflection on the top most step as it looks to short.

Or I have seen guys cut up another stair riser to fit...

Carl
 
/ Deck Project Confusion #3  
If your not going to put risers then you'll need to cut a stringer for the middle. If your going to use risers then the treads will not flex with a verticle riser under each tread. Each tread and riser form basically a 90 deg angle.
 
/ Deck Project Confusion #4  
My preferred solution is attached. Not a bad idea to double the stringers, stronger than trying to land both treads on the same stringer.
 

Attachments

  • DSCN1697b.jpg
    DSCN1697b.jpg
    78.1 KB · Views: 289
/ Deck Project Confusion #6  
Where the step boards meet at the angle you could put a short piece of step board under the two and attach both steps to it.
 
/ Deck Project Confusion #7  
My preferred solution is attached. Not a bad idea to double the stringers, stronger than trying to land both treads on the same stringer.

I did this about 10 years ago. I think rus_geek has described what I did, but I will have to look when I get home to know for sure. Not sure I have a picture of it on my PC.
 
/ Deck Project Confusion #8  
go ahead and get all corner stringers set it place square to the deck band, then take a 2x4 stand it up to were it will be flat agains the to stringers at the riser, then take 2 x 10 long enough to reach from one corner stringer to the other lay it flat on top of the same treads being sure to push it against the 2x4,
reach under and scribe with a pencil against both stringers onto the the board , this angle should be a 22.5* ....... OK now next you will need a length of board long enough to reach from the far corner stringer on to the ones you are working with, get this board even at the front of the same step pull it on past the where you would imagine the corner would meet and scribe a mark on top of the 2 x10 , you will do this from the other direction as well,
once you have these marks you now can cut a pattern and have this to use for each corner to tie the stringers together, all you will have to do is measure the inside of step and use the patern to make the smaller ones and the larger ones, when you have all these cut you should nail/screw them in even with the steps, this will provide solid area to attach the decking and riser to,....... I'll try to scetch out what i'm trying to say.;)
 
Last edited:
/ Deck Project Confusion
  • Thread Starter
#9  
I like your idea but I'm trying to stay away from short pieces between those 2 points. I'm trying to have the steps fan out as it gets closer to the ground. What program did you draw those lines with. If I figure it out I may be able to use it to describe what I'm talking about.
 
/ Deck Project Confusion #10  
My doodle was just mspaint, installed on every Windows machine I've seen :)
 
/ Deck Project Confusion #11  
I like your idea but I'm trying to stay away from short pieces between those 2 points. I'm trying to have the steps fan out as it gets closer to the ground. What program did you draw those lines with. If I figure it out I may be able to use it to describe what I'm talking about.

Perhaps I am not clear on the way I have try to explain, :cool:
this has nothing to do with the finish look of the steps, this is to tie the frame work of the steps together to allow you to have something to nail/screw the decking to at the point where the step boards will meet together at the 22.5 * point, trust me as I have built many steps this way and this is the method I use, think of this as bridging them together in the corners, this 2 x10 I speak of does not to attached to the top of the step as would the tread, the 2 x 10 is to go down to the inside flush/even with each step, then your finish decking or tread board will lay over this 2x10... the 2 x 10 is to provide bridging and a solid way of securing the finish deck boards to.
 
Last edited:
/ Deck Project Confusion #12  
I did mine just like deepindirt and I've not had any problems in the 8 years the steps have been up.
 
/ Deck Project Confusion
  • Thread Starter
#13  
DeepNDirt, Got it. The brain cells are starting to bump into each other now. That seems like a good solid way to do it. Thanks
 
/ Deck Project Confusion #14  
deepndirt, I like your setup, Temp, by using this method, you can scribe center line marks and use as reference points so all your cuts line up.

I use the same program as deepndirt uses. version 2.0
 

Attachments

  • pencil.jpg
    pencil.jpg
    5.1 KB · Views: 120
/ Deck Project Confusion #15  
Perhaps I am not clear on the way I have try to explain, :cool:
this has nothing to do with the finish look of the steps, this is to tie the frame work of the steps together to allow you to have something to nail/screw the decking to at the point where the step boards will meet together at the 22.5 * point, trust me as I have built many steps this way and this is the method I use, think of this as bridging them together in the corners, this 2 x10 I speak of does not to attached to the top of the step as would the tread, the 2 x 10 is to go down to the inside flush/even with each step, then your finish decking or tread board will lay over this 2x10... the 2 x 10 is to provide bridging and a solid way of securing the finish deck boards to.

Yep
That's what I was suggesting.
You explained it much better.
 
/ Deck Project Confusion #16  
I think you probably have the info that you need, but here are a couple of pictures of what I did 10 years ago. It has worked well. Top and bottom shots.
 

Attachments

  • Garden_June 027.jpg
    Garden_June 027.jpg
    493.8 KB · Views: 134
  • Garden_June 028.jpg
    Garden_June 028.jpg
    620.1 KB · Views: 138
/ Deck Project Confusion #17  
I was looking through some old pictures I had on my laptop and found a couple smaller steps system similar to what you are doing, these steps got cement poured under them and up to the bottom skirt when the sidewalks was poured..... and also I found a picture of a deck I built a few years back to show just for kicks the odd thing about this deck was the owner wanted copper balusters .. yes these are 3/4 copper tubbing that I had to cut to length and drill each hole and epoxy them in place. :D
 
Last edited:

Marketplace Items

2017 Ford F-250 Pickup Truck (A61568)
2017 Ford F-250...
2020 Ford Transit 350HD Cargo Van (A61568)
2020 Ford Transit...
Tree Boom Skid Steer Attachment (A61567)
Tree Boom Skid...
2017 Freightliner M2 106 AWD Terex Hi-Ranger 5TC-55 55ft Insulated Material Handling Bucket Truck (A60460)
2017 Freightliner...
New/Unused Quick Attach Bale Spear (A57454)
New/Unused Quick...
SULLIVAN PATEK AIR COMPRESSOR (A58214)
SULLIVAN PATEK AIR...
 
Top