Disc harrow conversion

   / Disc harrow conversion #1  

Chilly807

Elite Member
Joined
Sep 13, 2009
Messages
3,272
Location
Nova Scotia
Tractor
Kubota L3400DT
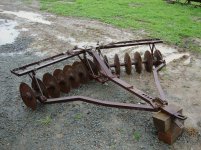
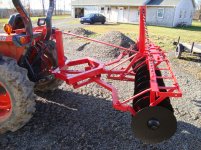
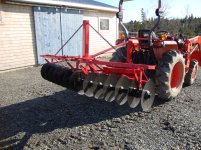
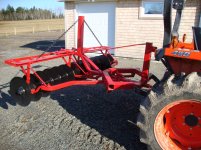
Back in the summer I came by this set of disc harrows. They were originally designed for pull-behind use, which was fine by me except that there was no easy way to transport them.

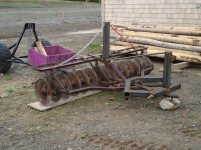
They're about 8 feet wide, the front set is designed to push the soil out, and the rear pulls it back in. The L3400 doesn't have the power to pull both sets, let alone lift them, so I decided to convert the front set to a 3 point lift style and keep the rear set for spare parts. They were built by Massey Harris from what I can see, I would imagine spare parts are right up there with hen's teeth.

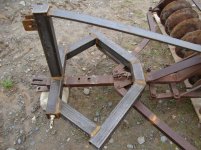
The angle adjusts by moving the side rails fore and aft, the collar that slides on the center rail has slots and a locking pin.

The front frame is designed to give support to the side rails and stiffen everything up.

I decided to shorten the whole thing by about 15 inches, the Kubota wasn't happy about lifting it with all the weight so far back behind the 3 point hitch. It has no problem handling it now.

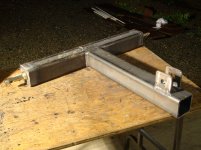
The rear post and chain stays are designed to take any serious bounce loading while it's being transported. I don't foresee any long trips at high speeds, but even a small bump puts a lot of strain on the center section.

The job was delayed a couple of times, testing it will have to wait until next spring when the ground dries a bit.

Sean
 

Attachments

  • DSC01239.jpg
    DSC01239.jpg
    548 KB · Views: 1,369
  • DSC01246.jpg
    DSC01246.jpg
    302.3 KB · Views: 392
  • DSC01268.jpg
    DSC01268.jpg
    466 KB · Views: 765
  • DSC01270.jpg
    DSC01270.jpg
    429.5 KB · Views: 515
  • DSC01355.jpg
    DSC01355.jpg
    481.1 KB · Views: 661
  • DSC01357.jpg
    DSC01357.jpg
    516.2 KB · Views: 797
  • DSC01359.jpg
    DSC01359.jpg
    425.6 KB · Views: 855
   / Disc harrow conversion #3  
Look like you had several problems to solve in the conversion and developed some creative solutions.

Question: As a tandem disc, can you keep from digging a trench as the soil is thrown outward?

If I happen to set my tandem disc a little too slanted down (forward) the rear gangs won't throw back enough dirt and a trench is made. Without a rear set of blades it seems like this would be an even greater issue.
 
   / Disc harrow conversion
  • Thread Starter
#4  
It actually works pretty well, although it's hard to get enough weight on it to dig properly. I plan to remove a disc or two on each side to get more pressure on each disc. If I can shorten it a bit more while I'm at it I may try to add the second gang too.

Sean
 
   / Disc harrow conversion #5  
Nice job. That tray above the discs is where the additional weights go.
 
   / Disc harrow conversion
  • Thread Starter
#6  
Yep, lots of room for weight, my trouble is lifting it with the L3400. If I can shorten the distance between the discs and the hitch I can easily add more weight.

Sean
 
   / Disc harrow conversion #7  
That ridged link from the top link down will give you trouble on rolling terrain. A chain to let the gang float will let it follow the ground will work better or you could make a sliding or folding link like rotary cutters have. You can carry concrete blocks in the bucket between fields to lighten the transport load on the 3PH or just add on pet rocks as you find them going around the field and add them to the pick pile when you are done.
 
   / Disc harrow conversion #8  
Here is a pic of my rotary cutter set up. Sorry I couldn't find a side view and it's under a foot of snow at present.
070712085318_zps5aefeddb.jpg
 
   / Disc harrow conversion #9  
Sean neat build ! Looks great. You know I always pay close attention to what you do with your DT cause I have exact same one.

Boone

BTW : Don't forget to feed the horses. :thumbsup: :D
 
   / Disc harrow conversion #10  
Look like you had several problems to solve in the conversion and developed some creative solutions.

Question: As a tandem disc, can you keep from digging a trench as the soil is thrown outward?

If I happen to set my tandem disc a little too slanted down (forward) the rear gangs won't throw back enough dirt and a trench is made. Without a rear set of blades it seems like this would be an even greater issue.

When plowing with a single set of discs I used to lap the next trip around the field a little over half-way over the previous one. This filled the trench and removed the ridge from the middle. The exception was the last pass, in the center of the field.
 
   / Disc harrow conversion #11  
With a single gang you have to disc twice. On the second pass, you put the centerline of the tractor in the furrow and it should leave it level. You have to disk in multiples of 2. Similarly with a tandem disk, you should straddle the furrow on the second pass, this will also cut the strip that is left between the gangs on the first pass.
 
   / Disc harrow conversion #12  
A quick way to let it follow the ground would be to just unpin the top link while using it. Otherwise you have it mounted ridged like a turning plow and need draft control to get it to work right.
 
   / Disc harrow conversion
  • Thread Starter
#13  
Some good ideas there guys. My rotary cutter has the folding link, I never really thought about it much for a disc but it wouldn't be hard to make one. There'll be another addition to the thread when I start to narrow the gangs this spring. Should be interesting, I don't think the nuts have been off those shafts in 50 years..

No worries about the horses Boone, they're fat as ticks and starting to shed their winter coats! We got more snow last night, and another foot called for next week. I might have caused that by taking the chains off the tractor..

We hauled a few trailer loads of hay into the barn last weekend, they thought it was a snack bar on wheels!

2013-03-10 11.32.12.jpg

Sean
 
   / Disc harrow conversion
  • Thread Starter
#14  
I started what I hope is the final set of modifications to the harrow. The axle nuts came off a lot easier than I was expecting, I got the axles shortened and re-assembled (at least the front set). I removed one disc per gang, and one spool spacer, which narrowed it by about 18 inches.

I cut about 2+ feet out of the tongue, I can't make it any shorter-coupled or the discs would hit the rear wheels.

The frame is re-welded to the T-frame for the 3-point. All I have left to do is replace the angle adjusters and add some stiffening frames. Then I'll look at ways to attach the second gang.

Pouring rain here today, I should be able to get some pictures posted tomorrow if the weather cooperates.

I hope that it'll do a better job in fewer passes than before, with any luck I'll be able to add some weight and still have the tractor able to pick it up. The alternative is buying a new set of harrows, which a little bit rich for my blood. At that cost I'd be looking for a used tiller instead to do our garden plots. There don't seem to be many small used harrows available here, my dealer can't remember the last time he sold a set.

Sean
 
   / Disc harrow conversion
  • Thread Starter
#15  
Okay, after a month of re-design, cutting, and welding including a two-week diversion which I'll explain later, the harrows are finished.. again! The pics with yellow lines show where I cut the frames, axles and other parts (including myself!), the ones with green arrows show which parts were added.

old disc 2 cuts.jpg
I shortened the tongue again by about 18-20 inches, cut 7 inches off both axles, and narrowed the frame that hangs the bearing housings in the initial phase of the project. That also required cutting and redesigning the angle adjusters for the front gangs.

old disc 3 cuts.jpg
It just about choked me to cut that 3 inch square tube, after all the time I spent getting the angles just right a year and a half ago.

old disc 4 cuts.jpg
The frames that sandwiched the angle adjusters were lost as part of the process, which gave me some concerns about the stiffness of the whole thing. All that would have held it from twisting were the welds holding the tongue to the 3-point frame. I don't do too bad a job at welding by amateur standards, but everything has it's limits. More on that in the next post.

old disc 6 cuts.jpg
The bearing assemblies are pretty simple, just a piece of hex stock with an inner rotating sleeve that gets grease from the back. The hex stock is held in place by a semi-hexagonal shape in the bearing holder halves which are then bolted together. The only grease seals are short lengths of rope held by grooves in the bearing holders. I doubt they're very effective at keeping grease in, but that was the fashion when these were built.

Sean
 
   / Disc harrow conversion
  • Thread Starter
#16  
cut finger 1.jpg
An afternoon event, one that pretty much ended the day's activities other than sitting in the emergency waiting room at the local hospital. A few stitches later and a week for things to heal up enough to get back to work.. let's just say zip-cut wheels on an angle grinder don't differentiate between a piece of flat bar and a finger.

new harrows 1.jpg
Green arrows are new additions in this picture. I added the angled braces from the old frame up to the first upright post to reduce any twisting motion where the tongue attaches to the 3-point frame, one of the more complicated compound angles I've ever cut. I used a piece of 2x2 wood and a compound miter saw to get a dummy piece to fit, then copied it in steel tube with the cutting wheel on a grinder. If it doesn't fit perfectly, a welder really IS your friend!

DSC01702.jpg
DSC01705.jpg
Now I need some warm dry weather to get the whole thing painted again, and by that time we'll be ready to give it a try before we plant our vegetable garden. The rake angle on the gangs is roughly 20 degrees fore and aft of 90, I doubt I'll have much use for it in a 90 degree configuration. If I do I'll need to devise a way to adjust the rear gangs. The front ones are adjustable by moving the ends of the adjuster arms to a different set of holes.

I got the weight just about right.. the Kubota will pick it up, it acts about the same as it does picking up my rotary cutter, which weighs about 650 pounds. They're both about the same length, which tells me the disc is between 600 and 700 pounds, give or take.

The front set of discs is about a foot behind the rear wheels of the tractor with them raked fully ahead, so I can't get much closer than that.

Sean
 
Last edited:
   / Disc harrow conversion #17  
Looks like a real nice job (except on the finger). It should serve you well. A little paint and off you go.

Now, how to deal with that pesky 4" un-disced strip down the middle where the blades miss.
 
   / Disc harrow conversion
  • Thread Starter
#18  
Looks like a real nice job (except on the finger). It should serve you well. A little paint and off you go.

Now, how to deal with that pesky 4" un-disced strip down the middle where the blades miss.

Thanks, if I'd known how much work the whole thing was going to be when I got it a couple years ago, I think I might have bitten the bullet and bought a set of new ones. To be honest though, the old ones are pretty solidly built compared to the ones you see in catalogs today. I'm guessing, but I'd say these are no less than 60-plus years old, maybe more.

I did see an ad for a Land Pride or Woods disc that had an optional trailing arm or "finger"that leveled up the ridge left in the center. It would still be unworked ground in that area though. Does an offset disc eliminate that problem?

Sean
 
   / Disc harrow conversion #19  
Yes, an offset disc doesn't leave anything undisturbed along its path.

My solution for the bare strip down the middle on the tandem disc is shown in the photo.

View attachment 318523
 
   / Disc harrow conversion
  • Thread Starter
#20  
Today was harrow-the-garden day! It's been so wet that it was my first chance to get in the garden and do some final prep for planting. It's a late start, but there's no help for it.

First impressions are really good, much better results than last year with a single row of discs. The added weight of the second row holds the first set in the ground much deeper than before, and they break up the soil better too. I'd say I'm getting 100% depth (to the axle) on the first row, and maybe 75% on the second as well. The soil is still predominantly clay, although we're adding composted manure and peat moss every year to improve it.

I adjusted the top link to allow the front set to touch slightly before the rear to help it dig better, and it works.

Now it's time for paint and some final finish welds and trimming and we're done.. incidentally, the 8 bearing housings took almost 2 full tubes of grease before it started squeezing out!

As luck would have it, it rained this afternoon, so planting will have to wait for another day.

DSC01748.jpg DSC01749.jpg DSC01750.jpg


Sean


Tractor & Equipment Auctions

2010 Massey Ferguson 2625 (A60462)
2010 Massey...
2022 Ligchine Spiderscreed Concrete Screed (A59228)
2022 Ligchine...
2264 (A60432)
2264 (A60432)
2015 Toro Z Master 6000 Series 60in Zero Turn Commercial Mower (A59228)
2015 Toro Z Master...
Volvo ECR235CL (A53317)
Volvo ECR235CL...
2006 iDrive TDS-2010H ProJack M2 Electric Trailer Dolly (A59228)
2006 iDrive...
 
Top