Diverter valve installation for 3x20 tractors

   / Diverter valve installation for 3x20 tractors #1  

Superduper

Platinum Member
Joined
Jul 18, 2006
Messages
523
Location
Somewhere, over the rainbow.
Tractor
John Deere 3120, Kubota BX2350, Deere X740
Installing diverter valve for the 3x20 Series tractor

Had a free weekend, time to tinker with my toy:

Well, I know many of you with similar tractors are thinking about adding a diverter valve for some additional remotes. If you are and am wondering what is involved in the installation, here was my installation:

(1) Park on level surface. Found the spot in front of garage to be just right.
 

Attachments

  • Picture 001.jpg
    Picture 001.jpg
    170.8 KB · Views: 515
   / Diverter valve installation for 3x20 tractors
  • Thread Starter
#2  
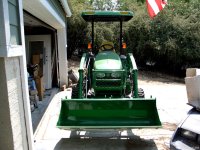
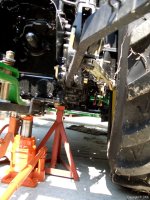
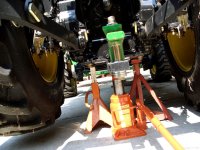
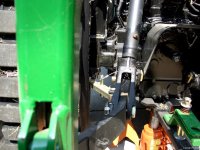
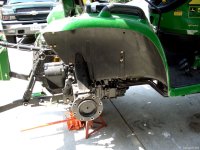
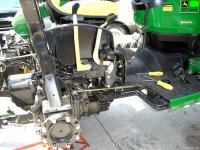
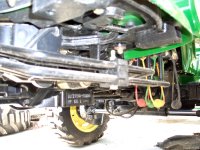
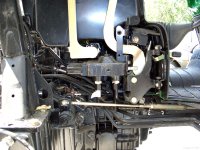
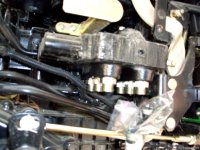
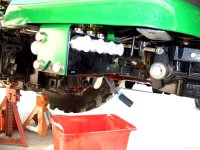
Jack up rear of vehicle. This proved to be more challenging than I had expected. Unlike a car with sold rear axle where there is a substantial "axle tube" from which you can place your jackstands, the tractor rear axle is very narrow and there is no "axle-tube" per se. It would take too much verbage to describe but suffice it to say that if you go underneath, you'll know what I'm talking about. In my case, the only solution I found was to jack up the rear under the drawbar bracket with large bottle jack. The jackstands went under outer edges of the differential center unit just under a couple of hefty bolt heads... well, see the images. The stands aren't as outboard as I wanted, but again, there really isn't any good location outboard of this spot. The extra width of a floor jack would have precluded the use of the stands at this location. Gosh, I sure wish there was a familiar frame. Alas, I looked and there is no such animal on this beast.

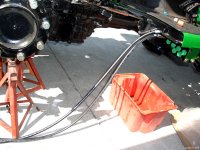
Warning to those relatively new to tractors (like myself). When jacking tractor, it will not behave like a car! I found this out the hard way. Unlike a vehicle which is sprung on all 4 corners, a tractor might as well be sprung on 3 corners. If you jack up the rear of a tractor, you are jacking up two of the 3 corners and the tractor will now teeter totter side/side. The reason is that the front axle is not sprung but actually pivots at the center. Therefore, the slightest force either way will cause tractor to swing over. It is a very hairy experience, trust me, I had a front row seat when it happend inches from me! Luckily, the rear was only jacked up about an inch or so, but when it tilted over, that one inch was like a 15 degree instant tilt. After letting it back down, I decided to have the stands ready at the desired locations and as soon as tractor was up, I slid the jacks under pronto. DO NOT work on tractor unless stands are in place. Any weight shift (such as removing tires) will cause enough weight to shift to cause tractor to pivot. On the last image, I believe you'll see why you'll find it hard to place the jackstands any further outboard.
 

Attachments

  • Picture 004.jpg
    Picture 004.jpg
    95.7 KB · Views: 475
  • Picture 006.jpg
    Picture 006.jpg
    147.7 KB · Views: 423
  • Picture 007.jpg
    Picture 007.jpg
    134.9 KB · Views: 450
Last edited:
   / Diverter valve installation for 3x20 tractors
  • Thread Starter
#3  
Tires don't look that large when they are on the tractor, but when placed next to something more familiar, they ARE rather large, aren't they? As per instructions, remove right rear wheel, right armrest/console, console controls wiring harness, and right rear fenders to gain access to joystick control valve (dual SCV). The instructions are key, without which I wouldn't be able to make heads/tails of all the parts. I labeled sandwich bags for the removed hardware and I made a photocopy of the instructions on clipboard so I could mark off completed steps as I went along without worrying about soiling/destroying manual during which I expect is a very messy job. I expected this to stretch over several days so I wanted to make sure I could always pick up where I last left off, especially these days with my waning memory. I was told by salesperson that this would be a 8 hour job. Since this is the first time and everything is totally foreign to me compared to wrenching on cars, I figured it would take me twice as long, especially if I want to snap pictures along the way.
 

Attachments

  • Picture 008.jpg
    Picture 008.jpg
    138.4 KB · Views: 424
  • Picture 011.jpg
    Picture 011.jpg
    105.7 KB · Views: 372
  • Picture 016.jpg
    Picture 016.jpg
    116.5 KB · Views: 409
  • Picture 017.JPG
    Picture 017.JPG
    179.4 KB · Views: 432
   / Diverter valve installation for 3x20 tractors
  • Thread Starter
#4  
Here is the kit. The rear coupler brackets are not displayed here as they are being painted (I like green). The one green bracket you see in the picture is the diverter valve hanger bracket and no, it did not come green. What can I say, I like green. One thing I'd like to say is that the kit was not cheap, something like $1167 if I recall correctly. I researched and debated over and over regarding the various manners I've seen others here on TBN tackle adding the extra remotes. I decided on this method because (1) the tractor is still under warranty and I wanted to keep everything factory for now, and (2) the custom jobs while costing less on the materials list require fabrication skills and access to materials, neither of which I possess and (3) I am not a patient person and (4) I like hard lines as opposed to flexible hoses, which is more common on custom jobs. Finally, any savings I realize on the materials list will likely be small for me as everytime I tackle a custom job, I find I always have a ton of unused stuff left over because I find myself not familiar enough with what I need so I buy too much just in case I need it.

Overall, the quality of kit is first rate. The lines alone are probably worth the price as they fit perfectly and any custom job that entails such close fitting hard lines so perfectly and evenly spaced will certainly cost more than the kit in fabrication time. The manual, is for the most part, written well and addresses virtually everything except there are a few areas where I cursed JD for the prescribed installation order leaving me to wonder whether the engineers that wrote the manual actually did the installation. Take note however, that the manual makes presumtions that the installer has good mechanical aptitude and does not hold your hand during the install. If you have never done any kind of wrenching before, you may want to rethink the installation. You should also have a good arsenal of tools at your disposal.
 

Attachments

  • Picture 023.jpg
    Picture 023.jpg
    125.1 KB · Views: 2,631
  • Picture 026.jpg
    Picture 026.jpg
    135.6 KB · Views: 2,568
  • Picture 027.jpg
    Picture 027.jpg
    73.9 KB · Views: 403
   / Diverter valve installation for 3x20 tractors
  • Thread Starter
#5  
The install in a nutshell: This cluster of 4 lines go from the front loader couplers to the joystick control valve. They will be replaced with a new set of 8 lines which includes an electric diverter valve integrated in the middle. Two more lines runs over the transmission to the other side of the tractor where they will be installed into the mid PTO diverter, and finally 4 more hard lines run to the rear where they will power the 4 new remotes. In total, you will remove 4 lines and install 14 new lines.
 

Attachments

  • Picture 009.jpg
    Picture 009.jpg
    125.4 KB · Views: 407
   / Diverter valve installation for 3x20 tractors
  • Thread Starter
#6  
Remove the 4 lines from front loader couplers to dual SCV. My dual SCV also is plumbed for the 3rd SCV. These lines are plumbed into the outermost ports and are in the way. The instructions do not call for removing these but they are sort of, well, in the way so I removed them. I later discover that the kit does not include new O-rings for these two lines. I reused them later and luckily, they did not leak. It is somewhat hard to see in the picture but the 4 inboard ports are the ones that go to front loader couplers and the two closest to you are the ones for optional 3rd SCV. I've put a baggie over those lines to prevent anything foreign from entering. It will be a couple days before they get re-attached. In the second image, you will see two gold colored levers. The one on the left is for the rockshaft control and the other one is for the optional 3rd SCV.
 

Attachments

  • Picture 018.jpg
    Picture 018.jpg
    167.7 KB · Views: 398
  • Picture 019.jpg
    Picture 019.jpg
    107.1 KB · Views: 365
   / Diverter valve installation for 3x20 tractors
  • Thread Starter
#7  
Next up is installation of the (14) adapters into the diverter valve, installation of hanger bracket, installation of small hydraulic line in preparation to install valve onto tractor. These need to be torqued and you may want to buy the inch/pound wrench now that you never thought you would need. During the installation, you will find specified torque applications of 7, 15, 37 foot pounds. No torque wrench? In all probability, snug them down without overtorquing and you'll probably be all right. Eventually, I discover that if I had to do it all over again, I would not install the adapters as prescribed by installation manual until they were actually required. The reason is that you'll find the installation of the lines much easier without the adapters sticking out and getting in the way.
 

Attachments

  • Picture 032.jpg
    Picture 032.jpg
    114.2 KB · Views: 349
  • Picture 031.jpg
    Picture 031.jpg
    70.1 KB · Views: 351
  • Picture 034.jpg
    Picture 034.jpg
    116.8 KB · Views: 2,627
Last edited:
   / Diverter valve installation for 3x20 tractors
  • Thread Starter
#8  
Diverter valve installed up. Look carefully and you will see two small bolts at the top of the valve (secured at the underside of the green bracket). Those two nuts are left loose for now and do not get tightened up until all 14 hard lines are installed and tightened. You might as well know now: you will be cursing JD for not making this any easier and you'll be running around trying to buy up all the various offset, shorty, curved or otherwise "specialty" wrenches trying to find something that will make your life easier to torque up those two nuts. There has GOT to be an EASIER way!
 

Attachments

  • Picture 036.jpg
    Picture 036.jpg
    125.6 KB · Views: 407
   / Diverter valve installation for 3x20 tractors
  • Thread Starter
#9  
Front lines hooked up.
 

Attachments

  • Picture 039.jpg
    Picture 039.jpg
    174.8 KB · Views: 393
   / Diverter valve installation for 3x20 tractors
  • Thread Starter
#10  
Instructions says that the next step is to connect and tighten these two lines. One of these two lines connects to the innermost valve adapter port and the other connects to the skinny short hard line that crosses over to the other (front) side of the valve. As previously discussed, the manual calls for all adapters to be installed and torqued prior to hanging the valve. The problem is that tightening two "small" hoses, being in the innermost location is almost impossible with the adapters protruding. The green plugs in the pictures are merely plugs that I reinstalled to keep fluid from leakign out. The actual adapters will protrude about an inch and a half. I'm not going to go so far as to say it's impossible to tighen the lines with the adapters installed, but it didn't have to be that difficult. It certainly wouldn't have been possible to "torque" them to specifications like that. I removed all the adapters on that side so that these two lines can be properly torqued. As I will discover later, there will be more cursing to come later regarding these two lines.
 

Attachments

  • Picture 040.jpg
    Picture 040.jpg
    153.2 KB · Views: 349
  • Picture 041.jpg
    Picture 041.jpg
    108 KB · Views: 337

Tractor & Equipment Auctions

2010 Ford Edge SE SUV (A51694)
2010 Ford Edge SE...
UNUSED IRANCH IRMC HIGH END ELECTRIC MASSAGE CHAIR (A54757)
UNUSED IRANCH IRMC...
2014 Ag Spray Schaben Sidedresser (A53472)
2014 Ag Spray...
2016 CLUB CAR (A53424)
2018 Ford Fusion Hybrid Sedan (A53424)
2018 Ford Fusion...
Utility Trailer (A52377)
Utility Trailer...
 
Top