Diverter valve installation for 3x20 tractors

   / Diverter valve installation for 3x20 tractors
  • Thread Starter
#11  
Next up is to install the first set of the 4 hard lines that goes to the dual SCV. This was uneventful. Then, the two flexible lines are then draped over the transmission to the other side.
 

Attachments

  • Picture 042.jpg
    Picture 042.jpg
    155.6 KB · Views: 292
  • Picture 044.jpg
    Picture 044.jpg
    145.8 KB · Views: 282
   / Diverter valve installation for 3x20 tractors
  • Thread Starter
#12  
Darn, more cursing! Manual now calls for removing two plugs and install two adapters into the mid PTO diverter. The two flexible lines that are draped over the transmission is installed at this location. PROBLEM: These two lines will not swivel to face the correct location with the lines cinched up at the other line. Required going back to the other side to loosen these two lines so that they can be swiveled to the proper orientation. Of course, by this time, the 4 hard lines are installed and now in the way. Again, I need to undo these 4 lines and the adapters so that the flexible lines can be properly installed at the other end first, THEN these diverter to dual SCV lines should be installed! Whoever wrote that manual should do a couple of installations first and rewrite it! If the order of the installation was properly prescribed, I the installation would have been a breeze!

First picture, lines not oriented properly and unable to swivel into position.

Second picture, line loosened at other end, correctly installed into mid-PTO diverter. then all lines re-attached/tightened once again.
 

Attachments

  • Picture 043.jpg
    Picture 043.jpg
    150.1 KB · Views: 299
  • Picture 046.jpg
    Picture 046.jpg
    104.6 KB · Views: 267
   / Diverter valve installation for 3x20 tractors
  • Thread Starter
#13  
Diverter to dual SCV lines installed, 3rd SCV remote lines ready for reinstallation into front most two ports.
 

Attachments

  • Picture 045.jpg
    Picture 045.jpg
    95 KB · Views: 315
   / Diverter valve installation for 3x20 tractors
  • Thread Starter
#14  
New rear remote bracket, lines, installed into diverter valve. These are especially long pre-bent lines that I found somewhat challenging to route properly. Don't be discouraged, it CAN be done. Spacers are installed to keep lines seperate.
 

Attachments

  • Picture 048.jpg
    Picture 048.jpg
    120.6 KB · Views: 306
  • Picture 051.jpg
    Picture 051.jpg
    168 KB · Views: 285
  • Picture 065.jpg
    Picture 065.jpg
    159.5 KB · Views: 286
   / Diverter valve installation for 3x20 tractors
  • Thread Starter
#15  
Next up, install the relay, make cutout for switch, route wiring harness. Notes: relay, when installed into specified location, can rub against joystick lockout valve lever. I looked to install at various alternative locations. Eventually, I settled on installing at specified location and bending mounting tab to relay so it is angled slightly which results in an acceptable clearance to everything. I spend a long time, too long, trying to make the switch cutout with utility knife. Eventually, had to dust off and utilize my dremel tool with cutoff wheel. Harness was another beef. The ground lug location was supposed to be installed under the footrest support bracket bolt, that is now completely hidden beneath all the hydraulic hard lines, since installed and torqued. Even if I was able to access the nut (not), it would not be possible to unscrew as the hard lines were only 1/4" or so from the surface of that bolt. Needless to say, it was impossible to utilize the specified location without disassembling 1/2 of the work already performed. I looked for and found an alternate location about 3 feet away -- too far away as the harness clearly was designed to utilize THAT specific location. The harness needed to be extended to use the new location and required a trip to NAPA to find weatherproof connectors and such to make a good splice. Weatherproof shrink tubing over soldered splice hopefully ensures a lasting repair. This part of the installation really tested my resolve to refrain from calling the person who wrote the manual downright stupid. I lost another day and had to modifiy the kit simply because the manual couldn't specifiy the correct order to do the installation steps.
 

Attachments

  • Picture 050.jpg
    Picture 050.jpg
    149.7 KB · Views: 295
  • Picture 053.jpg
    Picture 053.jpg
    118.6 KB · Views: 267
  • Picture 055.jpg
    Picture 055.jpg
    161.2 KB · Views: 286
   / Diverter valve installation for 3x20 tractors
  • Thread Starter
#16  
TESTING TIME:

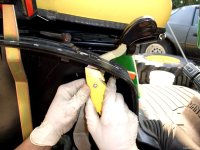
With the harness installed, now is the time to test the installation before buttoning everything up. Tractor started up fine and a quick peek revealed NO leaks -- hallelujia! But tractor dies shortly thereafter. Oh no, what gives. Oh yes, I forgot to turn the fuel line valve back on -- problem solved. Operated loader, no problems. Flipped diverter valve switch but it does not light, oh-oh. Sure enough, operating the joystick still operates the loader. Time to recheck the harness installation. Checked and rechecked -- everything A-OK. Tested for power at relay, OK. Hmmm. Tried it again and this time, pushed button more forcefully -- voila! Button lights up and circuit is diverted to rear remotes! Yes! The switch is a special 3 position design where there is an OFF-HOLD-ON with the on position being a momentary position. You must push down on the switch to the momentary ON position activating the valve. The switch then bounces back to the hold position where it remains (valve remains in divert position) until you turn it off. If you shut off the tractor while it is in the Hold position the valve will remain in the default mode (non-divert) until you activate it again by momentarily depressing the button to the on position. I guess this ensures that the tractor is always in the default position until you expressly activate the divert mode, no matter which position the switch is in when tractor is started.

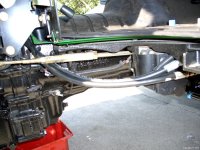
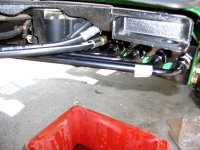
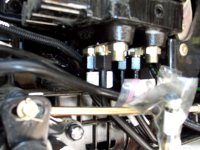
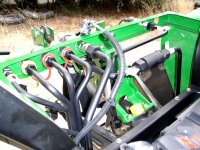
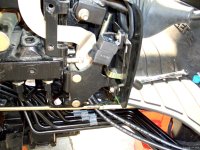
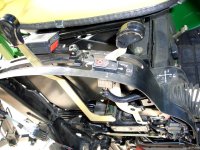
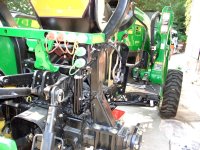
Re-installation of the removed parts (fenders, etc) completed the installation. The attached image shows how your tractor will look when opened up for accesibility before reinstalling fenders, control pod, and wheel.

Also while the tractor was open and accessible, I decided to add power beyond at the same time. I'll try to post that installation in the future. With the console pod off, I also installed the cruise control option (automotive style), which was a piece of cake.

Hope you all find this interesting and informative. I thought I would convert the entire post into a pdf. If there is sufficient interest for a pdf version, I'll be happy to post one (or email you one.)
 

Attachments

  • Picture 052.jpg
    Picture 052.jpg
    191.1 KB · Views: 328
   / Diverter valve installation for 3x20 tractors #17  
Superduper,

Thanks for the great writeup! I will be adding the 3rd SCV soon when it comes in. Hopefully it will be alot less involved than yours although I do know I need to remove the same body parts that were involved in your build as well. When you removed the hoses from the SCV did you take a bath in hydraulic fluid? Just curious if I need to wear a raincoat when I add the two hardlines for my 3rd scv.

Regards,
Mike
 
   / Diverter valve installation for 3x20 tractors #18  
That's a great review of the kit and installation! Thanks for taking the time to share-it will be of great value to a lot of members.
 
   / Diverter valve installation for 3x20 tractors #19  
Thamkyou very much for the install write up!!

I am interested in the PDF.
unix888@verizon.net

I would also like the power beyond install.

How many hours did the install recommend? How llong did it really take? What was the investment in the power beyond and diverter kit?
 
   / Diverter valve installation for 3x20 tractors
  • Thread Starter
#20  
MikeyB said:
Superduper,

Thanks for the great writeup! I will be adding the 3rd SCV soon when it comes in. Hopefully it will be alot less involved than yours although I do know I need to remove the same body parts that were involved in your build as well. When you removed the hoses from the SCV did you take a bath in hydraulic fluid? Just curious if I need to wear a raincoat when I add the two hardlines for my 3rd scv.

Regards,
Mike

Mike, in some of the pictures, you see an orange bucket. At most, I lost 1" of fluid during the entire job, which probably equaled a quart or two at the most. Much of that was from emptying of the fluid from the lines and it would have been even less if I didn't have to redo some of the hoses due to the improper sequencing of steps (in my opinion) of the installation manual. I didn't even notice any difference in the fluid level when I rechecked after completing the installation. Good luck with your project. From what I can see, yours is much less involved. Just be careful when jacking up the tractor.
 

Tractor & Equipment Auctions

2013 FORD F450 XL SUPER DUTY BUCKET TRUCK (A51406)
2013 FORD F450 XL...
Terms and Conditions (A47477)
Terms and...
UNUSED LANDHONOR BS-12-2500G BALE SPEAR (A54757)
UNUSED LANDHONOR...
1977 Ford F100 (A53422)
1977 Ford F100...
2022 Adams CLC-1013 Conveyor - New (A55302)
2022 Adams...
2020 Deere 325G (A50123)
2020 Deere 325G...
 
Top