The Suburban Farmer
Silver Member
I inherited some old Oneida Victor animal traps from my father (circa pre-1920 or so) and they were in pretty rough shape after sitting in a cardboard box in the garage for 30 years. I have several, and they aren't ever going to be used for trapping again, but they do have a LOT of sentimental value, because he paid for his school supplies as a kid by trapping and selling fur -- that was the only way he could afford to finish high school. He went on to become an electrical engineer after serving in the Army (thank goodness for Army-paid training and GI-Bill educational funding!) He sent all of his own kids to private colleges, so I look at these traps as being the pivotal driver of his success in his later life -- and ultimately the driver of why I'm comfortably middle-class and well educated today, and able to give my kids a good life.
I wanted to bring these back to life and mount them for display -- I think it's a great reminder to my own kids that life wasn't always so easy as it is today, and we take things like money and comfort for granted. They ADORED their grandpa, and they couldn't hardly believe his stories about how he had to get up at 4AM every day during the school year to check his traps just so he could afford shoes and books and pencils, just so that he could finish high school. They only knew their successful "upper middle class" grandpa that had a nice house and bought really cool Christmas gifts and owned a REALLY cool old Ford tractor that they enjoyed riding with grandpa at the wheel -- not the poor farm boy that worked his fingers to the bone just so he could get off the farm, avoid the coal mines, and make a better life for himself.
Anyway, I didn't want to grind them or wire brush them, so I rigged up an electrolysis bath:
Supplies:
Steps:
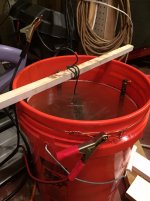
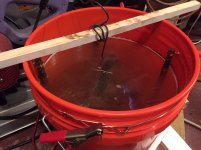
I used a 5 gallon bucket, and the setup looked like the pics below, but you can make this as large or as small as you want, depending on the size of the part.


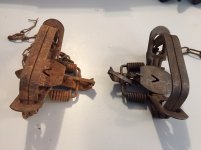
Here is a before and after pic after about 6 hours:

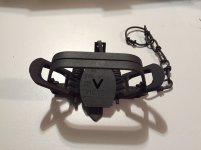
Here's a final pic after about 24 hours in the machine, and then a couple of rounds through my Harbor Freight ultrasonic cleaner and a good rubdown with a scotch-brite pad. The black residue that remains can be sanded or wire brushed off, but I like the look this way -- looks more "antique" than "brand new" which is what I was going for. Cover with some oil to prevent surface rust, and voila -- restored antique traps with (almost) no elbow grease.
Now, I just have to make a nice display board so I can mount these and hang them on my office wall.

NOTES:
I wanted to bring these back to life and mount them for display -- I think it's a great reminder to my own kids that life wasn't always so easy as it is today, and we take things like money and comfort for granted. They ADORED their grandpa, and they couldn't hardly believe his stories about how he had to get up at 4AM every day during the school year to check his traps just so he could afford shoes and books and pencils, just so that he could finish high school. They only knew their successful "upper middle class" grandpa that had a nice house and bought really cool Christmas gifts and owned a REALLY cool old Ford tractor that they enjoyed riding with grandpa at the wheel -- not the poor farm boy that worked his fingers to the bone just so he could get off the farm, avoid the coal mines, and make a better life for himself.
Anyway, I didn't want to grind them or wire brush them, so I rigged up an electrolysis bath:
Supplies:
- Water
- 1 cup of Arm & Hammer Washing Soda (NOT baking soda)
- An automotive battery trickle charger or bench power that puts out low-amperage DC current
- 4 old pieces of rebar (steel, NOT stainless steel)
Steps:
- Mix up the solution of water and around 1 cup of washing soda per 5 gallons of water to create an electrolyte solution that will conduct electricity in a PLASTIC container
- Connect the rebar with wire so that they are all connected, but not fully completing a circuit (leave 2 of them unconnected) and leave enough wire to attach a lead from the battery charger
- Sand enough rust off your part to get a good metal-to-metal contact and then wrap a separate wire around the item to be cleaned
- Connect the NEGATIVE to the ITEM TO BE CLEANED (remember, "black to rust")
- Connect the POSITIVE to the wire connecting the sacrificial annodes (the rebar)
- Turn on the charger (ideally set to <2 Amps to minimize any pitting)
- Watch for micro-bubbles to start appearing... bubbles means "it's working"
I used a 5 gallon bucket, and the setup looked like the pics below, but you can make this as large or as small as you want, depending on the size of the part.


Here is a before and after pic after about 6 hours:

Here's a final pic after about 24 hours in the machine, and then a couple of rounds through my Harbor Freight ultrasonic cleaner and a good rubdown with a scotch-brite pad. The black residue that remains can be sanded or wire brushed off, but I like the look this way -- looks more "antique" than "brand new" which is what I was going for. Cover with some oil to prevent surface rust, and voila -- restored antique traps with (almost) no elbow grease.
Now, I just have to make a nice display board so I can mount these and hang them on my office wall.

NOTES:
- Don't use stainless steel EVER. If you do, it will release the chromium atoms and create the Erin Brokovich chromium 6 toxin (hexavalent chromium.) Very nasty stuff.
- If a magnet will stick to your rusty piece and your annodes, then you're good to go.
- Don't mix up your positive and negatives -- get them wrong, and you will clean the rebar and all the rust will be attracted to your antique part.
- So long as you follow rule #1, you can dump the residual water down the drain -- it's 100% non-toxic and safe.
- This only works in "line of sight" -- that is, if there isn't a straight path fromthe part to one of the annodes, it won't work -- add more annodes if you have a complex part, but I found 4 to be enough in a 5 gallon paint bucket
- You can leave the part in the solution and run it for days if necessary. The reaction will stop when there is no more rust -- no need to monitor it or risk damaging the part by leaving it in too long. It may take several days for a badly damaged, or a highly intricate part with a lot of nooks-and-crannies
- It will gather some surface rust almost immediately when you rinse it off, so make sure you either paint it or oil it ASAP after you've rinsed and dried the part
- You CAN use more power (amps) but it doesn't really help the speed much and you risk pitting the material due to the reaction being too intense. While this turns rust back into metal, there are "micro-explosions" of hydrogen gas happening, and these can pit soft metal if the amperage is too high.
Last edited: