Enhancing a tree platform

/ Enhancing a tree platform #1  

mvwicker

Gold Member
Joined
Sep 8, 2009
Messages
301
Location
St Louis, MO
Tractor
2007 New Holland TC34DA
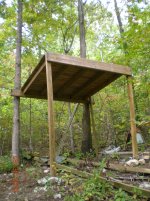
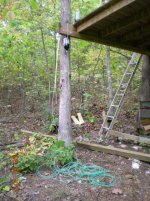
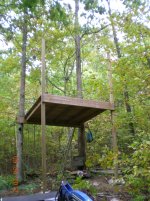
There is an 8x8 ft deck about 10 feet above ground, supported by two trees and two 4x4 in legs, on a hillside above a meadow in the middle of my property. In the past I cobbled a hunting blind atop it out of ropes and a tarp, but it really needs a roof and sides and a gunrest and a shooting window (and a carpet and some comfy chairs and a coffee maker and a flatscreen TV and ...:D). The first step was to replace the original 4"x4"x10' front legs, which were flush with the floor, with 4x4x16' legs that could support a roof.

Here is the original setup, before this project:
http://www.tractorbynet.com/forums/...39d1349063932-enhancing-tree-platform-002.jpg

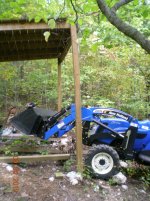
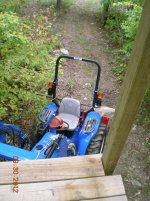
The tractor served as a lumber hauler, tool carrier, and temporary jack. I put the 4x4x16' posts along one side of the tractor, supported in front by the FEL bucket and in back by a pipe clamped to the ROPS. This idea came from TBN. Shorter pieces of lumber to be used later were tied to the long 4x4s. The FEL bucket carried all my tools and fasteners:
http://www.tractorbynet.com/forums/...40d1349064248-enhancing-tree-platform-003.jpg

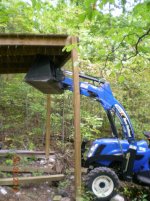
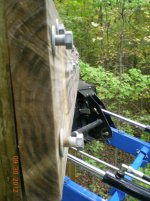
Next I parked the tractor under the platform to use the FEL as a temporary support. I chocked the wheels with large rocks (plentiful on my property!) and lowered the box blade for extra stability:
http://www.tractorbynet.com/forums/...41d1349064504-enhancing-tree-platform-004.jpg
http://www.tractorbynet.com/forums/...42d1349064606-enhancing-tree-platform-005.jpg
http://www.tractorbynet.com/forums/...43d1349064893-enhancing-tree-platform-006.jpg

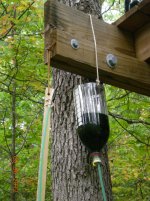
I used a water level made from a 2-liter soda bottle, 1-hole rubber cork, yardstick, rubber bands, food-colored water and 100 feet of polyethylene tubing. It is simple to use and completely reliable over long distances:
http://www.tractorbynet.com/forums/...44d1349065045-enhancing-tree-platform-007.jpg
http://www.tractorbynet.com/forums/...45d1349065172-enhancing-tree-platform-008.jpg

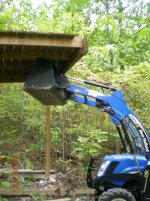
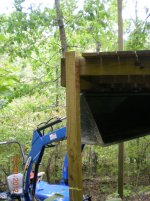
With the FEL holding up the platform, I removed one leg, replaced it with the longer post, drilled pilot holes and lag-screwed the new leg in place:
http://www.tractorbynet.com/forums/...46d1349065331-enhancing-tree-platform-009.jpg
http://www.tractorbynet.com/forums/...47d1349065549-enhancing-tree-platform-010.jpg
http://www.tractorbynet.com/forums/...48d1349065619-enhancing-tree-platform-012.jpg

Then I did the same to the other side:
http://www.tractorbynet.com/forums/...49d1349065752-enhancing-tree-platform-016.jpg

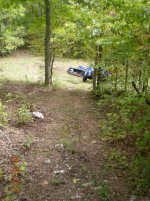
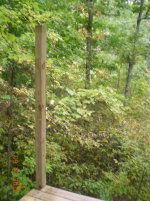
Here are the "After" photos, from the platform and from the ground:
http://www.tractorbynet.com/forums/...50d1349065839-enhancing-tree-platform-015.jpg
http://www.tractorbynet.com/forums/...51d1349065974-enhancing-tree-platform-017.jpg
http://www.tractorbynet.com/forums/...52d1349066049-enhancing-tree-platform-018.jpg

This was a good checkpoint, so I called it a day. These pictures don't show some of the more time-consuming steps like pulling the old posts out of the holes, which then had to be dug out or filled to get the new posts to the right depth. Also, the FEL lift and curl were both used to get fine height adjustments before the platform was attached to the new legs. At no time did I work under the loader, and the ladder always had a good brace to lean against.

The posts rise 6'2" above the platform which is high enough for me, but I may add a header before putting up the roof to make room for my taller friends.
 

Attachments

  • 002.jpg
    002.jpg
    831.6 KB · Views: 687
  • 003.jpg
    003.jpg
    991.9 KB · Views: 490
  • 004.jpg
    004.jpg
    712 KB · Views: 457
  • 005.jpg
    005.jpg
    854.7 KB · Views: 429
  • 006.jpg
    006.jpg
    624.1 KB · Views: 420
  • 007.jpg
    007.jpg
    770.5 KB · Views: 504
  • 008.jpg
    008.jpg
    849.4 KB · Views: 409
  • 009.jpg
    009.jpg
    711.1 KB · Views: 383
  • 010.jpg
    010.jpg
    707.4 KB · Views: 347
  • 012.jpg
    012.jpg
    581.6 KB · Views: 348
  • 016.jpg
    016.jpg
    742.1 KB · Views: 379
  • 015.jpg
    015.jpg
    750.9 KB · Views: 378
  • 017.jpg
    017.jpg
    699.3 KB · Views: 348
  • 018.jpg
    018.jpg
    826.1 KB · Views: 1,286
Last edited:
/ Enhancing a tree platform #2  
Lookn good, what in the world would a guy do without a loader! I dont know what you got in mind,but a little insulation goes a long way in a deer stand, the carpet will do the floor, but you might think about the sides and roof,I know the wind up in that country gets cold when u guys have a bad winter. Regardless of what u do, shapn up to be a nice lookn deer stand. LUTT
 
/ Enhancing a tree platform #3  
I see all the pics as attachments but all the links
in the text are dead...
Shall I stop by and plumb in a WC for ya? maybe
just bolt a closet ring to the floor and lether rip? :confused3:
 
/ Enhancing a tree platform
  • Thread Starter
#4  
Lookn good, what in the world would a guy do without a loader! I dont know what you got in mind,but a little insulation goes a long way in a deer stand, the carpet will do the floor, but you might think about the sides and roof,I know the wind up in that country gets cold when u guys have a bad winter. Regardless of what u do, shapn up to be a nice lookn deer stand. LUTT

Thanks for the insulation idea!
 
/ Enhancing a tree platform
  • Thread Starter
#5  
I see all the pics as attachments but all the links
in the text are dead...

Thanks, the links in the text now point to the image attachments rather than the thumbnails.

Shall I stop by and plumb in a WC for ya? maybe
just bolt a closet ring to the floor and lether rip? :confused3:

:laughing:
 
/ Enhancing a tree platform #6  
Keep the pics coming when you work on it some more, love to see peoples deer stands. You always seem to see something you can do to the next one for improvement.LUTT
 
/ Enhancing a tree platform #7  
Hmmmmm, you're givin' me ideas here MVW! Looks real good. Keep us updated!
 
/ Enhancing a tree platform
  • Thread Starter
#9  
Had some more time this weekend to work on the tree platform. Today's task was to add a lintel spanning the two front posts, then build a frame to support the roof.

Step one was to drill a 3/4" hole in the center of each post for the spikes that will anchor the lintel, or crosspiece:
001.jpg003.jpg004.jpg

Next, drill two 3/4" holes at the ends of the lintel and drop it in place:
005.jpg006.jpg

Lastly, the roof structure is assembled on the platform and carefully raised to rest between the spikes, before its back end is lag-screwed to the tree:
007.jpg008.jpg009.jpg010.jpg
The protruding spikes will keep the roof structure from sliding off to the side. Attachment to the tree will keep it from sliding off to the front or back, but it will be able to move to accommodate bending and swaying in the wind.

The roof is a box made of 2x6 treated lumber joined with 1/2"x5" galvanized lag screws. The front-to-back pieces are 10' long and the cross pieces are 88" long to accommodate the particular spacing between my trees. They are spaced for two sheets of plywood which will hold the shingles. I believe I can do all the roofing from the current position, then tilt the whole assembly up and fasten it to the trees.
 
/ Enhancing a tree platform #10  
mvwicker said:
Had some more time this weekend to work on the tree platform. Today's task was to add a lintel spanning the two front posts, then build a frame to support the roof.

Step one was to drill a 3/4" hole in the center of each post for the spikes that will anchor the lintel, or crosspiece:
<img src="http://www.tractorbynet.com/forums/attachment.php?attachmentid=283540"/><img src="http://www.tractorbynet.com/forums/attachment.php?attachmentid=283541"/><img src="http://www.tractorbynet.com/forums/attachment.php?attachmentid=283542"/>

Next, drill two 3/4" holes at the ends of the lintel and drop it in place:
<img src="http://www.tractorbynet.com/forums/attachment.php?attachmentid=283543"/><img src="http://www.tractorbynet.com/forums/attachment.php?attachmentid=283544"/>

Lastly, the roof structure is assembled on the platform and carefully raised to rest between the spikes, before its back end is lag-screwed to the tree:
<img src="http://www.tractorbynet.com/forums/attachment.php?attachmentid=283545"/><img src="http://www.tractorbynet.com/forums/attachment.php?attachmentid=283546"/><img src="http://www.tractorbynet.com/forums/attachment.php?attachmentid=283547"/><img src="http://www.tractorbynet.com/forums/attachment.php?attachmentid=283548"/>
The protruding spikes will keep the roof structure from sliding off to the side. Attachment to the tree will keep it from sliding off to the front or back, but it will be able to move to accommodate bending and swaying in the wind.

The roof is a box made of 2x6 treated lumber joined with 1/2"x5" galvanized lag screws. The front-to-back pieces are 10' long and the cross pieces are 88" long to accommodate the particular spacing between my trees. They are spaced for two sheets of plywood which will hold the shingles. I believe I can do all the roofing from the current position, then tilt the whole assembly up and fasten it to the trees.

I envy you! How many acres if you don't mind me asking?

You may want to think of a temp "safety" railing made out of 2x4" cross piece about 42" up. I'd hate to hear that you fell off.

Responded to many calls where hunters fall from their stands.

Keep up the good work

Eric
 
/ Enhancing a tree platform
  • Thread Starter
#11  
Good idea there, to have a safety railing during construction. The leftover 4x4x10' legs would do for the sides.

The property has 77 acres total, almost all in timber. This platform overlooks a half-acre meadow at the base of a deep hollow with a small creek.
 
/ Enhancing a tree platform
  • Thread Starter
#12  
With warm dry weather again over the weekend, it was time for the next step in adding a roof and sides to the tree platform.

005.jpg
Temporary brace for the roof frame

006.jpg
Roof frame resting on the brace

007.jpg
Pilot holes for the lag screws holding the roof to the trees

The first experimental roof will be a "soft top" made from a tarp stretched over a frame made of EMT conduit:
009.jpg
3/4" hole in the roof frame, 3" deep
010.jpg
Start bending 9" from the end of a 10-foot conduit to get a triangular frame with 90" base and 16" peak height. Figure this out using Pythagoras' theorem.
011.jpg
Mark the center and bend 2" before it to get a flat ridge
012.jpg
Bending with a "conduit hickey" requires some skill
014.jpg
If done right, the conduit ends slip right into the holes in the roof frame.
017.jpg
Once one tube is bent, the others can be bent to match in less time. Final result:
016.jpg018.jpg
...and that is enough for one day.

Leaving the roof frame tilted down during this phase made it easier to drill the top holes and place the conduit while standing on the platform. The roof frame itself acted like a diagonal handrail.
 
/ Enhancing a tree platform
  • Thread Starter
#13  
The next step in making a "soft top" roof is to reinforce the conduit frame with 1"x2"x8' slats along the ridge and eave bends. These will be attached to the conduits with clamps at 16" centers:
009.jpg
Clamps loose, screws in pilot holes at 16" centers just like the holes in the roof frame

At this point it is clear that not all the conduit bends are exactly the same (remember what I said about skill? :ashamed:) However, by reordering the conduits and flipping some of them right-to-left, I got reasonably straight ridge and eaves lines.
010.jpg
Clamps are tightened down after pressing over the conduit. A rubber mallet is useful here.
011.jpg
Braces in place on the ridge and one of the eaves.

Now the roof frame can be raised and lag-screwed into place:
013.jpg
3 washers prevent bark damage and allow some tree growth; protruding screw allows for the tree's bending in the wind.
014.jpg
Here the roof frame is in place with the conduits placed and braced.

That's it for this weekend. Here are three last photos to show the beauty of the Ozarks in Fall:
001.jpg:)
007.jpg:thumbsup:
008.jpg:dance1:
 
/ Enhancing a tree platform #14  
Looks like you put a lot of time and work into your project. Looks great...........
 
/ Enhancing a tree platform
  • Thread Starter
#15  
Looks like you put a lot of time and work into your project. Looks great...........

Thanks!

Lots of time and work is not necessarily a good thing, though. I wouldn't make any money doing this for a living :)
But it is fun to do a custom job like this, where things have to be cut to fit the space between trees, and assembled in a way that can withstand tree motions.
 
/ Enhancing a tree platform
  • Thread Starter
#16  
Another fine weekend, another step in the tree stand enhancement saga.

It was high time to add hand rails for safety. They are lag-screwed to 2x4s running parallel to the trees, to avoid excessive tree wounding and to provide dimensioned attachment points:

024.jpg
Select a suitably bent 2x4, lash it in place temporarily...
025.jpg
...and then fasten it with two lag screws. Repeat on the other side:
026.jpg
The bottom of the riser rests on the joist ledge, so just one lag screw is needed:
027.jpg
The bend of the 2x4 follows the curve of the tree:
028.jpg

Next, attach a 2x4 handrail to the riser:
029.jpg
...and a thicker 4x4 shooting rail to the front wall:
030.jpg
Later this was replaced with a 3x4 landscape timber which, being rounded, looks and feels better.

This is how it looks after 3 handrails are in place:
031.jpg
Note the obligatory tractor in the picture :), used here as a tool carrier.
 
/ Enhancing a tree platform
  • Thread Starter
#17  
Next, stretch a tarp over the roof and sides.

Start with a Harbor Freight 19'x29' camouflage tarp, cut into two 9.5'x29' halves:
001.jpg
Roll it up with the camo pattern inside, so it will be outside after deployment:
003.jpg

Tennis balls protect the tarp from tearing on sharp edges:
006.jpg

The night before, I made some clips from 1/2" ID PVC conduit. Start by cutting roughly 1/2" rings with a reciprocating saw's metal-cutting blade:
001.jpg
Then cut out a quarter of the ring with tin snips:
002.jpg
A 10-foot conduit can make about 200 of these, and they clamp onto 1/2" EMT conduit with tremendous force.

The tarp gets draped over the roof frame and centered, then clipped to the front and back conduit "rafters":
032.jpg
View from the outside:
033.jpg

The bottom parts of the wall sections of tarp are tied down temporarily with bungee cords and rope:
035.jpg
Note that early evening is a good time to do this, when the winds are calmest.
036.jpg
This is all for now. The next step is to make two more walls and to attach the bottoms more permanently.
 

Attachments

  • 002.jpg
    002.jpg
    1 MB · Views: 199
  • 004.jpg
    004.jpg
    994.1 KB · Views: 198
  • 005.jpg
    005.jpg
    1 MB · Views: 204
/ Enhancing a tree platform
  • Thread Starter
#18  
The sides are stretched down and attached to two more conduits:

At the back, by the trees:
001.jpg

At the front:
002.jpg
This one-screw clamp failed in high wind, so it was replaced later with a two-screw strap.

Use plenty of clips to hold the tarp to the conduit:
003.jpg

Inside view of the clipped tarp.
004.jpg
 
/ Enhancing a tree platform
  • Thread Starter
#19  
The extra weight of the roof necessitated bracing the legs:
005.jpg
Otherwise, the platform would shake from side to side in the wind and when someone on it moved.
 
 
Top