Snowblower Erskine Front Snowblower Modification

   / Erskine Front Snowblower Modification #1  

rbargeron

Elite Member
Joined
May 31, 2000
Messages
3,025
Location
MA
Tractor
L5450, L48, L3250, L345
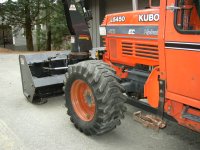
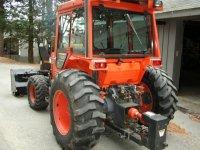
My tractor's rear wheels are 75" overall and my Erskine front blower is only 72". A wider blower head would be good.

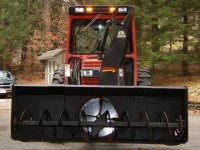
At first I was just looking for an 84" Erskine to trade up to - but when I actually saw one up close it was bigger than I expected. The 84 weighs nearly 600 pounds more - it has a taller housing, bigger fan, bigger auger, bigger frame rails to the back - it's more on the scale for a 75-100 hp tractor. I decided to pass on the 84. Besides, I'd really like 90" width if I could get it in a reasonable-weight machine.

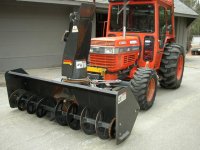
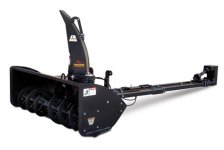
The Erskine 72 is already very rugged - it weighs 1600 lb. The auger and fan do a great job and have plenty of unused capacity. Lets say I've never bogged it down even running into a snowbank. So my little brain got going on a project to WIDEN a 72" blower to 90". Wings might work - but 9" on each side is pushing it and snow won't flow past the auger sprocket very well.

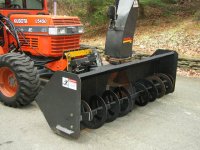
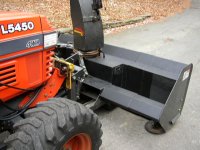
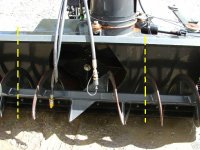
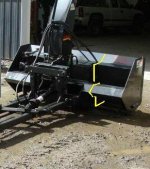
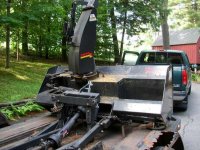
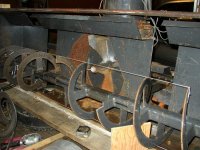
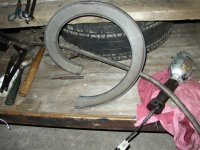
Last spring a nearly-new Erskine 72 came up on CL for short money and I couldn't resist. The pics below show where I'm planning to cut the housing and weld in a 9" extension on each side. The auger and it's drive shaft will need to be extended too. The auger flights are spaced at 9" already so adding one on each side will be a good fit. The chute turner only needs a longer mounting bracket and cable. The cutting starts tonight - wish me luck and stay tuned......
 

Attachments

  • front-mount-snowblower.jpg
    front-mount-snowblower.jpg
    26.7 KB · Views: 1,235
  • cut lines.JPG
    cut lines.JPG
    76.4 KB · Views: 1,031
  • cuts 2.JPG
    cuts 2.JPG
    23.3 KB · Views: 849
   / Erskine Front Snowblower Modification #2  
I'm really want to see how this works out for you. Good luck!!!:thumbsup:
 
   / Erskine Front Snowblower Modification #3  
Why go all the way to 90 to cover 75 in tread width?...I think I'd start with wings, say 3-6 inches, easily done before the first flakes ...it seems that (unless you have a circular drive) you drive out and back and can clear quite a swath with the two passes.

nonetheless, I applaud your enthusiasm and look forward to seeing your progress
 
   / Erskine Front Snowblower Modification #4  
Wow all that work for a few inches on each side good luck not to mention you have to keep everything balanced which will be quite difficult or else you will have a vibrating snowblower that will shake itself apart don't ask me how I know my brother tried to put two together to make a six-foot snowblower LOL didn't quite work out. I use an 84 inch rear snowblower on my 60 hp tractor no problems whatsoever close to 1400 pounds, I would try and trade it or sell it for and 84 inch blower that little bit of weight increase should not matter on your tractor especially with the front mounting system I was looking at one myself but I just couldn't justify $12,000 for a front mount snowblower four months of use take care
 
   / Erskine Front Snowblower Modification
  • Thread Starter
#5  
It's really not looking like that much work - the blower head is already laying on the floor in 3 pieces - took a couple hours to make the cuts. No turning back now.....

Good points about other blowers, but I've sorta BTDT. I have a 7' rear one too - it even has a drag blade I made for it. It works great.

I'm just a snowblower nut - I've had all kinds but lately I'm interested in front ones. My tractor has no mid pto - so the Erskine setup does the trick. It spins opposite from other blower heads - the drive shaft runs from the back - and is reversed. That limits the options for a front blower to an Erskine. Thing is, above 78" their blowers are too huge. So I'm making my own. I'll be in and out for less than $2000 - might be zero if a find a buyer for another Erskine 6-footer I have.

A reason to go a foot or so wider than the rear wheel width is clearing near things like buildings, parked cars, etc. You don't have to line up on it as straight with a wider front blower. Sorta like having an 8' plow on a pickup - quicker & easier to maneuver.
 
Last edited:
   / Erskine Front Snowblower Modification
  • Thread Starter
#6  
I keep getting side-tracked but there has been some progress on my chopped Erskine. The blower head and auger are both cut in two places. The head is sliced down through at 18" in from each end. I traced templates of the cuts so a local metal shop is forming extensions the to fit at the gaps.

The auger is built on a 2-1/2" square tube with 15" diameter 1/4 x 2 steel flights. It needs 2 new flights, one on each side of the center paddle section. I ordered two flat steel rings that I'll cross cut and pull into a helix to make the flights. (Figure I'll need a bench vise, a pipe wrench and a roller skate and a scissors jack for this operation). The flights have flat spokes off the center drive tube so splicing in the new ones should be clean. The center area of the auger will be as-is but with the extensions there will be 4 welded seams in the center tube. To keep the auger strong and straight, a new 4-foot chunk of 2" square tubing will run inside everything. Balance should work itself out because the changes are all symetrical.

I'll post some pics when I find a card for my camera or figure out how to use my phone. :confused2:
 
Last edited:
   / Erskine Front Snowblower Modification
  • Thread Starter
#7  
A few progress pictures - The auger and housing are ready to tack together. I made 2 new flights from flat rings, and a long coupling to extend the side shaft. Erskine uses this design up to 78" width so I think 84" is as far as I will stretch it.
 

Attachments

  • before 1.jpg
    before 1.jpg
    119 KB · Views: 955
  • before 2.jpg
    before 2.jpg
    156.3 KB · Views: 808
  • auger gaps.jpg
    auger gaps.jpg
    142.1 KB · Views: 1,098
  • auger lineup.jpg
    auger lineup.jpg
    143.7 KB · Views: 1,092
  • flight.jpg
    flight.jpg
    137.1 KB · Views: 825
   / Erskine Front Snowblower Modification #8  
Rgargeron
Sure looks like a well designed stretch, and you must have some good skill along with some great tools to work with.
Will be anxious to follow your progress.

Any snow in the near forecast? :)
 
   / Erskine Front Snowblower Modification #10  
Nice job. What did you use to cut out the new flights ?
 
   / Erskine Front Snowblower Modification
  • Thread Starter
#12  
..........you must have some great tools to work with......... Any snow in the near forecast?

The flat rings can be ordered from any steel service center - they use a cnc plasma if you're not real fussy - abrasive water jet if you need it perfect. To pull the ring into a helix I used a 3-axis Milacron virtual cell with 5-axis upgrade and laser positioning, er, uh, .........actually a bench vise, pipe wrench and a ratchet tie-down strap to pull on the end of the wrench handle.

More pics when I get back to it. - Thanks to all for the words of encouragement ! I have to finish it now, it's just scrap steel as-is.

And about the weather forecast, I remember when I did the drag blade it only snowed a couple more times that winter but boy was I ready ! :thumbsup:
 
Last edited:
   / Erskine Front Snowblower Modification #13  
The flat rings can be ordered from any steel service center - they use a cnc plasma if you're not real fussy - abrasive water jet if you need it perfect. To pull the ring into a helix I used a 3-axis Milacron virtual cell with 5-axis upgrade and laser positioning, er, uh, .........actually a bench vise, pipe wrench and a shipping tie-down strap to pull on the free end.

More pics when I get back to it. - Thanks to all for the words of encouragement ! I have to finish it now, it's just scrap steel as-is.

And about the weather forecast, I remember when I did the drag blade it didn't snow but maybe once again that winter but boy was I ready ! :thumbsup:

How much did they charge you for the circles? I see lots of people getting into the CNC plasma cutting arena. There are several companies that sell low cost tables, like Torchmate. I would love one but would hate to tie up the space in the shop or the $3000 to $5000 to get a basic setup.
 
   / Erskine Front Snowblower Modification
  • Thread Starter
#14  
Haven't seen the bill yet - but probably not much. The place I used to get parts profiled could use my .dxf CAD file of the part shape. Rings are even easier - input ID and OD and push the button.
 
   / Erskine Front Snowblower Modification
  • Thread Starter
#15  
Project has been waiting its turn - it's all welded up ready for paint and reassembling. It's turning out great. Total bill for material including rings and formed housing extensions $240. I'll take some pics when it's on the tractor - lucky it hasn't really snowed here.

BTW my other Erskine (un-modified 6-footer) is still available.
 
   / Erskine Front Snowblower Modification
  • Thread Starter
#16  
Here's the finished product - ready to blow snow. I transferred the front mount that I had made for the L5450 - it allows the blower head to tilt side-to-side to follow the ground on my twisty driveways. Still need to wire up the actuator for the chute deflector but other than that it's done. The width is about 86" - it should be a real improvement.
 

Attachments

  • P1010020.JPG
    P1010020.JPG
    69.5 KB · Views: 693
  • P1010014.JPG
    P1010014.JPG
    75 KB · Views: 486
  • P1010016.JPG
    P1010016.JPG
    76.9 KB · Views: 526
  • P1010019.JPG
    P1010019.JPG
    71.3 KB · Views: 607
  • P1010012.JPG
    P1010012.JPG
    74.6 KB · Views: 592
  • P1010024.JPG
    P1010024.JPG
    74.6 KB · Views: 650
Last edited:
   / Erskine Front Snowblower Modification #17  
Here's the finished product - ready to blow snow. I transferred the front mount that I had made for the L5450 - it allows the blower head to tilt side-to-side to follow the ground on my twisty driveways. Still need to wire up the actuator for the chute deflector but other than that it's done. The width is about 86" - it should be a real improvement.

Boy, that looks great! Good job! Where's all your snow?
 
   / Erskine Front Snowblower Modification #18  
Great work! Now you need to load your rig on a trailer and head out to Gothic, Colorado where they recently got 7' of the white crap. After that shakedown cruise, you could head to Mammoth Mountain, California where I hear they got 16' in the past few days.
 
   / Erskine Front Snowblower Modification
  • Thread Starter
#19  
Hey Matt - I looked at your band saw mods and the snake pit on Bambi - wow, now there's some fluid power choices! What tools do you plan to drive with the new SCV's? When I added new 2-spool valves I used three 1/2" lines with daisy-chained PB's and tee'd returns so there's full flow to any valve, or independent sharing without disabling the PB to the 3ph. But it's a lot of plumbing! Happy Holidays - DickB
 
   / Erskine Front Snowblower Modification #20  
That is a great looking mod. By the way what year model is your 5450 and how many hours does it have on it. I have always thought the 5450 was a great looking machine.


Marketplace Items

2025 Ligchine Spiderscreed Concrete Screed (A59228)
2025 Ligchine...
Year: 2015 Make: Ram Model: 5500 Chassis Vehicle Type: Truck Mileage: Plate: Body Type: 2 Door Cab; (A55852)
Year: 2015 Make...
Hyster H155 XL Forklift (A59213)
Hyster H155 XL...
Brent 420 Grain Cart (A61307)
Brent 420 Grain...
2020 DRAGON ESP 150BBL ALUMINUM (A58214)
2020 DRAGON ESP...
2012 MACK GU (GRANITE) CAB & CHASSIS (A56129)
2012 MACK GU...
 
Top