MossRoad
Super Moderator
- Joined
- Aug 31, 2001
- Messages
- 58,153
- Location
- South Bend, Indiana (near)
- Tractor
- Power Trac PT425 2001 Model Year
It is not closed in the rear, but it is not as open as the front, as I recall. It is currently burried in the garage under the mower deck and buckets. I'll have to search for some pictures....
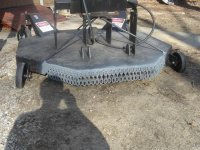
Here's one. From the side.
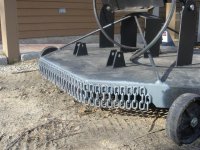
Here's another view. From straight underneath.
As you can see, the deck on the 48" cutter is 8 sided. The front is open on three sides with a small lip. The rear is open on the back side and about half of each edge on the adjacent sides.
And, here's a link to the entire thread showing the re-assembly of my brush hog. You have to scroll through it to find the posts with pictures attached, but it shows just about every component of the unit. Since this pictorial was originally posted, I have added the longer bolts and jam nuts as mentioned earlier. I also turned the hydraulic motor 180 degrees, since I put it on backwards in this assemble. /forums/images/graemlins/shocked.gif /forums/images/graemlins/wink.gif The hoses are now much easier to connect. /forums/images/graemlins/grin.gif
Here's one. From the side.
Here's another view. From straight underneath.
As you can see, the deck on the 48" cutter is 8 sided. The front is open on three sides with a small lip. The rear is open on the back side and about half of each edge on the adjacent sides.
And, here's a link to the entire thread showing the re-assembly of my brush hog. You have to scroll through it to find the posts with pictures attached, but it shows just about every component of the unit. Since this pictorial was originally posted, I have added the longer bolts and jam nuts as mentioned earlier. I also turned the hydraulic motor 180 degrees, since I put it on backwards in this assemble. /forums/images/graemlins/shocked.gif /forums/images/graemlins/wink.gif The hoses are now much easier to connect. /forums/images/graemlins/grin.gif
