I have to measure them still. I had a long day today so I didn't even look at the axle.
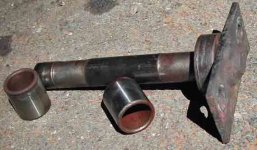
I think the bolt adjustment is what keeps the pivot tight. Which is to say, I think it'll always feel tight even when its shot. Mine felt and worked just as I would have expected, however, you can see the shape its in. The one pivot bracket "stuttered" off the pivot as I removed the axle. Thats always a bad sign to me.
And the seal was an interesting bit.... The dry rot is currently at the lip which contacts the bracket. It didn't look bad until I removed the bracket. You might have the same problem.
Good description.... bizarre. I've decided not to replace the bushings. Too much pain involved. Haven't looked at the thrust washer in detail yet. But I'm definitely adding a grease fitting to each bracket. This whole exercise may have started out under dubious pretenses but what I've learned about the pivots makes the whole thing exceedingly worthwhile. I think anyway.
The pivots look to be at least 1.5" in diameter. That is confidence-inspiring.
Also, the fact that they did not slide off the two supports easily means they
have not developed a lot of clearance (wear). That is also good, unless
rust has built up to keep it tight. The inner and outer wear surfaces are
hardened sleeves...another good thing. I will post a photo of my failed
955 pivot when I take one. It had hardened sleeves acting on a
not-so-hard shaft. Even without zerks, the 4x00 pivot looks like
a big improvement. I wonder how the budget CUTs of that era did it
(JD950, JD970).
What this all means is that anyone with 4x00s or 4x10s needs to be
concerned about the long-term health of their pivots as their machines
get to be 10 y old or more. Maybe disassembly and re-greasing is
warranted for owners who want to keep their tractors a long time.
Nice work, ARRABIL. Getting a grease fitting on the pivots will be an
interesting exercise if you decide to attempt it.


")