Front Axle Pumpkin Vent

   / Front Axle Pumpkin Vent #1  

arrabil

Veteran Member
Joined
Jul 3, 2008
Messages
1,018
Location
Winterstown, PA
Tractor
JD 4200 & X475
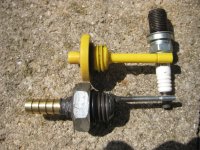
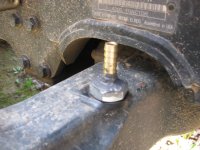
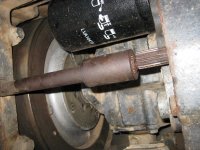
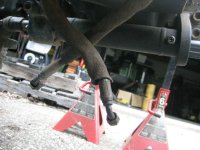
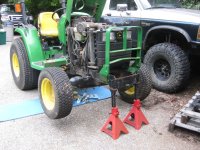
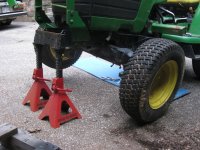
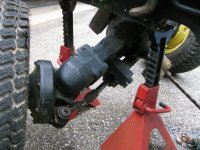
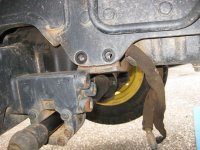
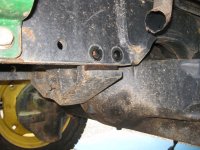
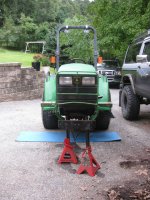
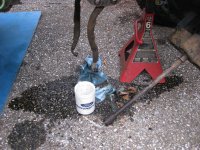
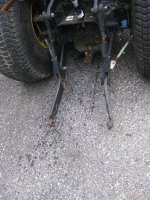
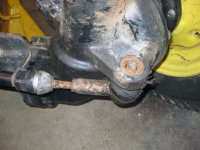
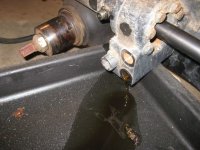
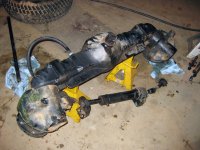
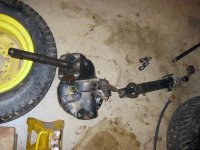
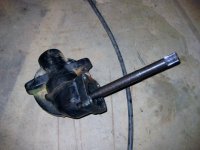
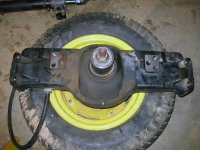
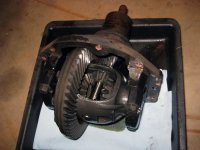
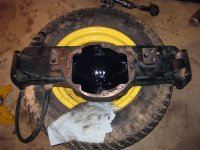
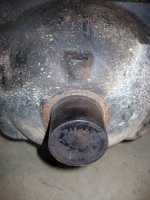
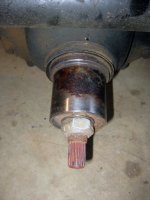
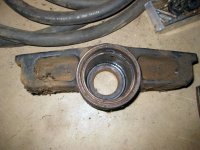
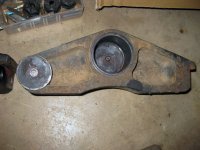
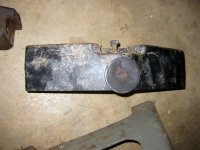
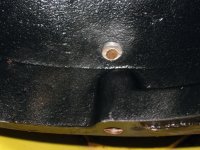
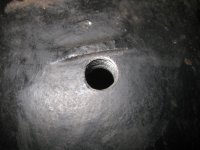
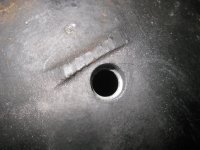
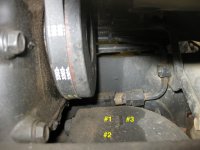
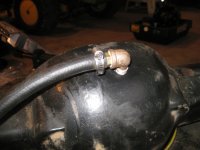
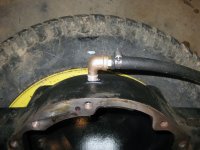
For those that haven't been following along.... There seems to be a rash of axle seal leaks on the 42/43/4400 series of tractors. I'm guessing its because the axle isn't vented and the pressure buildup on older/weaker seals is too much for them. I wanted to vent my axle which is the "normal" way of doing things in the automotive world (and even the rear of the tractor is vented). I made a fill plug vent that I really liked (pics attached). But during hot weather when parked on an incline, the air and oil expanded right out of three feet of vent tube. Dfkrug and I decided that the right answer was either to vent both sides of the axle or the very top of it. I chose the very top of the pumpkin even though its more work.
 

Attachments

  • plug1.jpg
    plug1.jpg
    267 KB · Views: 2,740
  • plug2.jpg
    plug2.jpg
    190.2 KB · Views: 1,173
  • axlevent2.jpg
    axlevent2.jpg
    524.9 KB · Views: 859
   / Front Axle Pumpkin Vent
  • Thread Starter
#2  
First step of disassembly is the driveshaft. Two collars which are held on by roll pins need to be slid down the shaft. Amazingly, there is no way to remove the the front roll pin while the engine and/or axle are installed on the tractor. So out comes the rear roll pin and the front will have to wait.
 

Attachments

  • driveshaft3.jpg
    driveshaft3.jpg
    181.2 KB · Views: 430
  • driveshaft2.jpg
    driveshaft2.jpg
    186.5 KB · Views: 399
  • driveshaft1.jpg
    driveshaft1.jpg
    194.8 KB · Views: 438
   / Front Axle Pumpkin Vent
  • Thread Starter
#3  
Next is the power steering hoses and getting the front of the tractor off the ground. The power steering hoses were hardly attached. I don't know what the torque spec is supposed to be but they were hand-tightened or less. No leaks though. I'm gonna either tighten them more on reassembly (whatever spec is) or use some blue Loc-tite.
 

Attachments

  • pwsteering1.jpg
    pwsteering1.jpg
    169.6 KB · Views: 446
  • raisedfront1.jpg
    raisedfront1.jpg
    272.1 KB · Views: 474
  • raisedfront2.jpg
    raisedfront2.jpg
    260.3 KB · Views: 358
   / Front Axle Pumpkin Vent
  • Thread Starter
#4  
The axle is held on with eight bolts. The eight bolts hold the axle pivots. Interesting design. The axle falls right down when the last bolt is removed. Thats why I left the wheels on.
 

Attachments

  • axledown2.jpg
    axledown2.jpg
    250.5 KB · Views: 697
  • axledown1.jpg
    axledown1.jpg
    255.7 KB · Views: 816
  • axlepivots2.jpg
    axlepivots2.jpg
    227.9 KB · Views: 445
  • axlepivots1.jpg
    axlepivots1.jpg
    228.6 KB · Views: 389
   / Front Axle Pumpkin Vent
  • Thread Starter
#5  
First lesson learned: no way is the power steering cylinder not going to move while removing the axle with the wheels still on. I'm thinking there is no way not to move it no matter how you get the ends off. The fluid shot out like out of a cannon. Its wasn't under much pressure but it did a good job drenching most of the underside of the tractor. Sigh. Good thing I have plenty of kitty litter. Next time... drain the steering cylinder before removing the axle.

Also some pictures of the wife holding the removed axle and the tractor ready for narrow row crop duty.
 

Attachments

  • noaxle1.jpg
    noaxle1.jpg
    299 KB · Views: 421
  • axledown3.jpg
    axledown3.jpg
    283.4 KB · Views: 435
  • pwsteeringleak2.jpg
    pwsteeringleak2.jpg
    334.2 KB · Views: 392
  • pwsteeringleak1.jpg
    pwsteeringleak1.jpg
    316.7 KB · Views: 371
   / Front Axle Pumpkin Vent
  • Thread Starter
#6  
Next the steering is removed. I didn't want to have to realign it after assembly so I'm removing one tie rod and then the whole steering assembly is going to stay attached to one portal end.

Lesson learned two: the power steering bracket bolts go right through the axle housing. There wasn't anything to catch the fluid until it was already partially spilled. Sigh. That pile of kitty litter keeps getting smaller. Next time... drain the axle before removing it.

Looks like someone (possibly me) nailed a rock pretty good on the one side. The allen head opening was bent in. I had to cut out the bent part to get the wrench in. Looks like I'll be replacing these.

Dfkrug, what do you think? A square end that takes a wrench instead of a hex head that takes an allen key? Seems like it would be less likely to get hose-monkeyed to the point of making it impossible to remove.
 

Attachments

  • tierod1.jpg
    tierod1.jpg
    207.4 KB · Views: 380
  • pwsteeringbracket1.jpg
    pwsteeringbracket1.jpg
    226.5 KB · Views: 339
  • drainplug1.jpg
    drainplug1.jpg
    93.3 KB · Views: 385
  • drainplug2.jpg
    drainplug2.jpg
    119.7 KB · Views: 451
   / Front Axle Pumpkin Vent
  • Thread Starter
#7  
Just some pics of the axle coming apart. Had to take the wheels off at this point. This thing is HEAVY. 300#+ heavy. Without the steering attached, the wheels were just caving in on themselves. That wasn't helping to position the axle anymore. Its still heavy even after the wheels are gone. It took everything I had to get it on the jack stands. Wifey decided she had better things to do about ten minutes before hand too.

And another picture of the old girl ready for narrow row crop duty. I can't get over how silly she looks.
 

Attachments

  • noaxle2.jpg
    noaxle2.jpg
    272.5 KB · Views: 528
  • axlewithoutwheels1.jpg
    axlewithoutwheels1.jpg
    219.2 KB · Views: 816
  • axlewithwheels1.jpg
    axlewithwheels1.jpg
    203.7 KB · Views: 1,830
   / Front Axle Pumpkin Vent
  • Thread Starter
#8  
Now we're getting somewhere. The portal ends come off next. I kept the axle shaft with its respective portal just in case they aren't the same length. Didn't think of checking that at the time. Removing the portal ends is tough. The one came off by pulling and twisting. The other end I screwed the bolts back in part way and gently hammered with a sledge to get it apart from the axle housing.
 

Attachments

  • axleportalend1.jpg
    axleportalend1.jpg
    200.3 KB · Views: 731
  • axleportalend2.jpg
    axleportalend2.jpg
    174.4 KB · Views: 668
  • axlenoportals1.jpg
    axlenoportals1.jpg
    195.5 KB · Views: 430
   / Front Axle Pumpkin Vent
  • Thread Starter
#9  
And finally the axle is down to it's components. Glad to see the gears have worn a good pattern. Bearings feel to be in good shape and so does the pinion seal. Glad I don't have to repair any of that today.
 

Attachments

  • ringpinion1.jpg
    ringpinion1.jpg
    161.6 KB · Views: 580
  • axlehousing1.jpg
    axlehousing1.jpg
    211 KB · Views: 379
   / Front Axle Pumpkin Vent
  • Thread Starter
#10  
Some pictures of the axle pivots on the axle. They're hardened sleeves. They don't look good in my opinion. I think something needs to be done here. At the very least a good greasing.
 

Attachments

  • axlepivotfront1.jpg
    axlepivotfront1.jpg
    225.7 KB · Views: 407
  • axlepivotrear1.jpg
    axlepivotrear1.jpg
    167 KB · Views: 592
   / Front Axle Pumpkin Vent
  • Thread Starter
#11  
And some pictures of the axle pivot brackets. Again its a hardened sleeve in there. The axle pivot "slack" is adjusted by turning the bolt. The bolt pushes the washer against the axle housing creating tension. Never seen an axle like this before. Glad I took it apart.

As for the pivots themselves..... I'm thinking they need a grease fitting. Surely that needs to be greased more often than never! What do you guys think? I've never drilled hardened sleeves. Is it even going to work?
 

Attachments

  • axlepivotbracketrear1.jpg
    axlepivotbracketrear1.jpg
    203.4 KB · Views: 195
  • axlepivotbracketfront2.jpg
    axlepivotbracketfront2.jpg
    189.6 KB · Views: 210
  • axlepivotbracketfront1.jpg
    axlepivotbracketfront1.jpg
    183.7 KB · Views: 220
   / Front Axle Pumpkin Vent #12  
As for the pivots themselves..... I'm thinking they need a grease fitting. Surely that needs to be greased more often than never! What do you guys think? I've never drilled hardened sleeves. Is it even going to work?

Great pictures! Thanks for going into such detail.

While my 755 does have a grease zerk for the axle pivot, I always understood the 4x00 pivots were somehow lubed with just the fluid in the axle. You should be able to determine any truth to that.
 
   / Front Axle Pumpkin Vent
  • Thread Starter
#13  
No, unfortunately the axle pivots are just straight-up non-lubed. They may have been from the factory but its highly unlikely anyone owns one of these models with grease in it now. I'm gonna have to measure the clearances between the male and female ends. You have to wonder whether it just takes regular grease like yours does or something special. Or is it really supposed to be non-lubed?

Also, mine is missing at least one of the seals (#13 & #22) while the other one is in the process of dry-rotting. In fact, I have that missing seal in the garage. I found it on the ground this spring and have been wondering the whole time where it came from. Mystery solved. But if the pivots are sealed.... they must be intended to be lubed!

Hmmm.... to zerk or not to zerk? And should I replace the bushings and thrust washer (#2, #26, & #37)?
 

Attachments

  • John Deere - Parts Catalog - Frame 5.pdf
    166.8 KB · Views: 326
   / Front Axle Pumpkin Vent
  • Thread Starter
#14  
JD755, on your 755 the axle pivots in a similar way... two bushings and a rod attached to the frame. On the 42/43/4400 the rod is the axle itself while the pivots are attached to the frame. And yet the 755 is intended to be greased, just like you said, while the 42/43/4400 is not.
 
   / Front Axle Pumpkin Vent #15  
Just last year I happened to be discussing service procedures with the local JD dealer service manager. One thing he mentioned was it was not unusual for him to see x55 tractors with "loose" front axles because people do not grease that fitting, maybe because it is not easy to get to. Of course he also said he sees tractors that never get any owner maintenance. Anyway, I have always kept everything well greased and last time I changed front axle fluid I checked the axle for tightness while I had it off the ground. It felt very good with no problems.

That may be a good test for 42/43/4400 owners. Lift the frame so the axle hangs loose. Grab both sides from the front and try twisting it. Should be solid. However, it might not be as good a test as on x55 because the x55 "hangs" from the mount. The 42/43/4400 is more direct. May have to do with why there is no zerk. I don't really know why there is no pivot zerk on those, but sounds like a good question for a JD service manager. Do they see wear problems with those axles?
 
   / Front Axle Pumpkin Vent
  • Thread Starter
#16  
On to the actual pumpkin vent....

The first picture is of the space I have in which to install it. I took that before I removed anything. I initially had planned to make the hole to the left of that indentation (the line in the middle of the pumpkin). Thats #1. But the bolt hole for the diff cover is right under that. Then I thought about the left of the indentation but closer to our point of view. Thats #2. But the ring gear is right under that and it will throw fluid directly at the hole as the axle spins. So #3 it was....

You can see in the next picture that I had just made a starter punch at spot #1 before it occurred to me what I was doing wrong.

I also tried not to drill all the way through for the threads so the vent barb had a natural bottoming out point. The tap refused to cooperate.... since its tapered it needed to keep going to make the actual 1/4"NPT threads.

The last picture shows the vent installed and what I mean about the bolt hole being in the way.
 

Attachments

  • pumpkininside1.jpg
    pumpkininside1.jpg
    278.3 KB · Views: 262
  • pumpkintop3.jpg
    pumpkintop3.jpg
    175.2 KB · Views: 203
  • pumpkintop2.jpg
    pumpkintop2.jpg
    222.5 KB · Views: 218
  • pumpkintop1.jpg
    pumpkintop1.jpg
    146.2 KB · Views: 267
   / Front Axle Pumpkin Vent
  • Thread Starter
#17  
And finally the vent itself....

Its a 1/4"NPT 3/8" barb screwed to a 1/4"NPT elbow. Since the spinning parts of the engine are right above the vent I want to get the vent hose out of the way the easiest way possible. Instead of bending the hose, we bend the hard parts.

I secured the hose with a clamp. Due to the difficulty of getting to these parts with anything but kid's hands, I don't want anything coming apart here.
 

Attachments

  • vent1.jpg
    vent1.jpg
    157.5 KB · Views: 271
  • vent2.jpg
    vent2.jpg
    151.9 KB · Views: 221
  • vent3.jpg
    vent3.jpg
    176.3 KB · Views: 231
  • vent4.jpg
    vent4.jpg
    187.9 KB · Views: 246
   / Front Axle Pumpkin Vent
  • Thread Starter
#18  
Do they see wear problems with those axles?
I really can't see how they don't. Or won't soon. Mine are worn. The seals are shot. There is no lube of any sort left. They're on the way to being destroyed. There is an awful lot of force being placed on those parts (think loaded bucket) without any grease. We wouldn't operate our loaders without ever greasing them. Ick.

I think I'm going to drill and tap for some grease fittings. Just tapping the bottom should work as they're more or less out of the way and protected by the frame. Need to buy some and a tap for that size thread. And I guess I better order the new seals as it'll be a few days before they get them in. [And here I really need my tractor tomorrow! Hello neighbor....]

Hmmm, I wonder if those aren't the same as the spindle seals on my BII. They look the same..... and they're both made for Dana/Spicer axles.....
 
   / Front Axle Pumpkin Vent #19  
Looks like someone (possibly me) nailed a rock pretty good on the one side. The allen head opening was bent in. I had to cut out the bent part to get the wrench in. Looks like I'll be replacing these.

Dfkrug, what do you think? A square end that takes a wrench instead of a hex head that takes an allen key? Seems like it would be less likely to get hose-monkeyed to the point of making it impossible to remove.

I just got a chance to see your thread. Nice pix!

I had the same problem with my plugs....the hex sockets were destroyed.
New ones are cheap, but a pipe plug with square top would be better.
 
   / Front Axle Pumpkin Vent #20  
Next the steering is removed. I didn't want to have to realign it after assembly so I'm removing one tie rod and then the whole steering assembly is going to stay attached to one portal end.

So does the PS cylinder get in the way of removing the diff cover?
 

Marketplace Items

12' CONTAINER (A60432)
2014 Ford Explorer AWD SUV (A59231)
2014 Ford Explorer...
2020 Takeuchi TL8R2 Track Loader with 72in Tooth Bucket (A61306)
2020 Takeuchi...
2022 Horizon Trailer (A55973)
2022 Horizon...
2014 JOHN DEERE 323E SKID STEER (A60429)
2014 JOHN DEERE...
3ft Metal 5-Point Star Art (A55853)
3ft Metal 5-Point...
 
Top