Garage hacks, adjustments and annoyances.........

   / Garage hacks, adjustments and annoyances......... #71  
With how underbuilt most casters are, I would look for casters that are rated for 2500 pounds each rather than four casters that total 2500 lb...

Aaron Z

I will oversize them but probably not that much, maybe around 1,000 lb each would be enough. I have seen some designs different people have used for the carriage which look pretty interesting. I'm in no hurry on figuring out the carriage system though.
 
   / Garage hacks, adjustments and annoyances......... #72  
So your a eyeball machinist to........ No wonder your redoing the mill it's a mess, and so the tool of budget is a needle gun, loud ain't they, guess you dont have a sand blaster. If you have much more prep work to do them Norton Rabid Strip buffing wheels work good and fast on a hand grinder for removing old paint/rust. For some reason the orange wheels cost more.
Norton Non-Woven Depressed Center Rapid Strip Wheel, 4-1/2" Diameter, 5/8"-11 Arbor Hub, Grit Coarse (Pack of 1): Hook And Loop Discs: Amazon.com: Industrial & Scientific
4-1/2" Diam Aluminum Oxide/Ceramic Deburring Discs: Power Grinder Accessories: Amazon.com: Industrial & Scientific

I eyeball when the need arises and use the dials when appropriate, just part of doing the job.

Thanks for the abrasive links. The local hardware store had some Dewalt flap wheels (not sure if that is what the call them) so I bought one in 80 grit and one in 120 grit. I will try those out to see which gives the finish I want. I just need something in between the grinding wheel and stiff wire wheel. It appears Bridgeport used a very rough grinder in the necessary spots then used Bondo to coverup the worst of areas then applied paint that runs up to .100 thick. All I want to do is clean up the heavy grinding, smooth out the casting pimples and rattle can paint it.

The needle scaler worked great once I dried out the oil using brake cleaner. I do have access to a sandblaster but we still have 1-1/2 to 2 ft. of snow. The areas where the snow was pushed back is sloppy mud so if I did sandblast it would need to be inside which I don't have a place to do that. Plus, the needle scaler was quick and easy and it was easy to stay away from the ways so I didn't cause any damage to them.
 
   / Garage hacks, adjustments and annoyances......... #73  
Nice. I got a Taiwan clone of the step pulley Bridgeport, Precision Matthews brand. I went new because I needed it for work, was worried about getting a clapped-out machine. However, as soon as the Matthews arrived, could see right away it ain't no Bridgeport.

I looked at a variety of the clones and knew I would always regret it if I didn't go with a Bridgeport which is what my experience is on. This one came available and even though it needed a lot of work the base machine was good so I went with it. It is tough to downgrade when you have worked with the best.
 
   / Garage hacks, adjustments and annoyances......... #74  
Some clones are better than others. For instance, Sharp made a real nice knee mill. Generally, thinking was that if it came from Taiwan, it's better quality than mainland China imports. I shouldn't complain about mine too much, it does the job, holds tolerance and all that. But the fit and finish of a true bridgeport just ain't there, definitely something to be said for that.
 
   / Garage hacks, adjustments and annoyances......... #75  
Some clones are better than others. For instance, Sharp made a real nice knee mill. Generally, thinking was that if it came from Taiwan, it's better quality than mainland China imports. I shouldn't complain about mine too much, it does the job, holds tolerance and all that. But the fit and finish of a true bridgeport just ain't there, definitely something to be said for that.

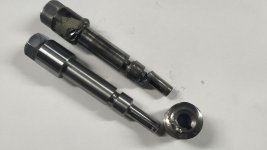
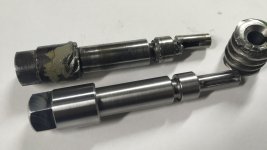
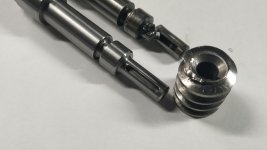
I just finished assembling the head of my 1971 Bridgeport after I took it all apart for a general maintenance (check, clean and lubricate all the internals) and to fix about the only flaw on the machine. It broke the shaft of the worm drive that tilts the head left/right.

So I fully machined on the lathe, including the hex for the wrench and the key way. It was a first for me to do a milling operation on the lathe.

For the key way on the shaft, I just held the part on one of the toolholders. For the hex part, I used a V block I made some time ago, attached it to another 90 degree fixture I had from completely unrelated machine. It worked perfectly.

You can also see the destruction on the original shaft. It does have a couple of faults on the design from factory. The smallest diameter, which will hold the worm and therefore have to deal with all the forces, only gets supported on one side (shaft side). I really don't understand why they didn't just drill the hole a bit further on the head of the milling machine, extended the shaft past the worm a bit, so it had support on both sides. The fault was that they used a woodruff key on the original shaft, this means that the slot is much deeper in the shaft, causing a weak spot.

IMG_20200329_185119.jpgIMG_20200329_193126.jpgIMG_20200329_193129.jpgIMG_20200329_193134.jpg
 
   / Garage hacks, adjustments and annoyances.........
  • Thread Starter
#76  
I just finished assembling the head of my 1971 Bridgeport after I took it all apart for a general maintenance (check, clean and lubricate all the internals) and to fix about the only flaw on the machine. It broke the shaft of the worm drive that tilts the head left/right.

So I fully machined on the lathe, including the hex for the wrench and the key way. It was a first for me to do a milling operation on the lathe.

For the key way on the shaft, I just held the part on one of the toolholders. For the hex part, I used a V block I made some time ago, attached it to another 90 degree fixture I had from completely unrelated machine. It worked perfectly.

You can also see the destruction on the original shaft. It does have a couple of faults on the design from factory. The smallest diameter, which will hold the worm and therefore have to deal with all the forces, only gets supported on one side (shaft side). I really don't understand why they didn't just drill the hole a bit further on the head of the milling machine, extended the shaft past the worm a bit, so it had support on both sides. The fault was that they used a woodruff key on the original shaft, this means that the slot is much deeper in the shaft, causing a weak spot.

View attachment 648346View attachment 648347View attachment 648348View attachment 648349
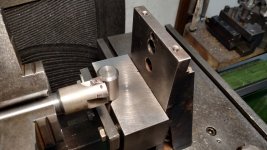
Very nice fix, so using the tool holder vice, clamped on V block to hold shaft from moving is what I'm picturing, other wise I see no other way to hold round shaft from moving.

Is there a way to drill the hole deeper in the head so's to support the small end of shaft?
 
   / Garage hacks, adjustments and annoyances......... #77  
Very nice fix, so using the tool holder vice, clamped on V block to hold shaft from moving is what I'm picturing, other wise I see no other way to hold round shaft from moving.

Is there a way to drill the hole deeper in the head so's to support the small end of shaft?

Yes, it could be done. It would involve a crazy fixture setup on the lathe though.

I'm not expecting for it to be a problem again for a couple of reasons. One is that I used a much better grade of steel and machined radius instead of sharp corners along with using another style of key.

Another reason is because this machine doesn't see a fraction of the use it used see back in the previous owner, which was a tool and die shop and it would work 8 to 12 hours, 5 to 6 days a week along with 8 or 9 more milling machines.

The last reason is that, we all know that some employees won't care at all about equipment or tools, so they wouldn't release the locking bolts all the way, neither help lifting the head with one hand, so imagine the stress of rotating an already heavy head while the locking bolts are still creating an huge drag. Something is gonna give.
 
   / Garage hacks, adjustments and annoyances.........
  • Thread Starter
#78  
:thumbsup: Can you post a picture sometime of the milling machine when all up and running?
 
   / Garage hacks, adjustments and annoyances......... #79  
Sure :thumbsup:

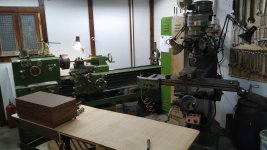
Here is a picture of my little machining corner. It's about a year old picture from when I completely re-organize the shop, hence the still clean bench. :)

I've since upgraded for a much heavier and bigger bench and the milling machine is slightly different as I build a power feed for the Z axis and re-designed the X axis power feed, both not pretty but work very good. Anyways, it's on the paint job waiting list along with it's cabinet.

IMG_20190128_153507.jpg
 
   / Garage hacks, adjustments and annoyances......... #80  
I just finished assembling the head of my 1971 Bridgeport after I took it all apart for a general maintenance (check, clean and lubricate all the internals) and to fix about the only flaw on the machine. It broke the shaft of the worm drive that tilts the head left/right.

So I fully machined on the lathe, including the hex for the wrench and the key way. It was a first for me to do a milling operation on the lathe.

For the key way on the shaft, I just held the part on one of the toolholders. For the hex part, I used a V block I made some time ago, attached it to another 90 degree fixture I had from completely unrelated machine. It worked perfectly.

You can also see the destruction on the original shaft. It does have a couple of faults on the design from factory. The smallest diameter, which will hold the worm and therefore have to deal with all the forces, only gets supported on one side (shaft side). I really don't understand why they didn't just drill the hole a bit further on the head of the milling machine, extended the shaft past the worm a bit, so it had support on both sides. The fault was that they used a woodruff key on the original shaft, this means that the slot is much deeper in the shaft, causing a weak spot.

View attachment 648346View attachment 648347View attachment 648348View attachment 648349
Very nice, clean work! That setup musta been fun...NOT! I take it you did the key way like that too...flipped the setup with the v-block 90 deg? Yessir, a proper dude works with what he's got on hand and get's er done!
 
 
Top