Revisiting this thread as I have had to revisit part of the repair job. I bought a 6' slasher that weighs a bomb and the extra pressure on the hydraulics caused the O-rings under the diverter valve to leak badly, so I have had to finally bite the bullet and make a decent effort on that part of the tractor.
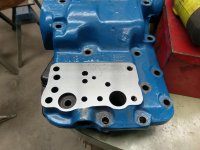
As mentioned earlier in this thread, the diverter valve bolts down onto a machined surface on the top cover and there are a bunch of oil passages between the top cover and the valve, that are sealed by O-rings. The two machined surfaces were not flat but I had hoped to get away with new O-rings as this area had not been leaking prior to the tear-down, but with the heavy slasher, as well as moving some heavy logs with my 3PL forklift attachment, the leak was pretty bad.
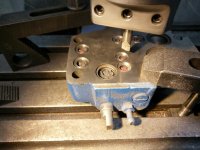
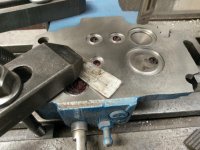
I removed the top cover and stripped it down, then mounted it on my surface grinder to get a properly flat surface on it. The shape of the top cover was a bit of a challenge to mount on the surface grinder but I was able to hang it off the front with the target area within the grinding envelope.
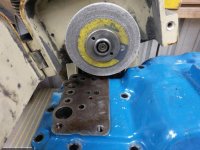
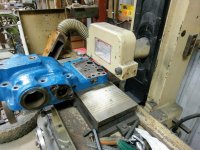
For those unfamiliar, a surface grinder can operate to tolerances of around .0001", much finer tolerances than achievable by machining with most milling machines for example. I was able to get a very flat surface with a fine finish.
I did the same with the underside of the valve itself, getting two mating surfaces that are now very, very flat.
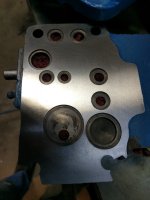
I did a little research on proper fitment of O-rings, it seems the ideal 'squeeze' in this kind of installation is about 30%, meaning the O-ring should be squeezed to 30% less than it's resting thickness when assembled. Having removed a few thousandths from the surface of the valve, I then bored the O-ring seats to a depth equal to 70% of the thickness of each o-ring. I re-sized the diameter of a couple of the seats as I did this, to suit common O-ring sizes rather than the oddball sizes of a couple of them. I made a honing tool to polish the base of the seats with some lapping paste also.
I reassembled the top cover and installed it and the diverter valve to the tractor. I did a little work with the big slasher- very pleased to report I now have no leak from the diverter valve. There was a leak a little lower down that had been hidden by the hydraulic oil leaking from above previously- had to install a new O-ring and apply some thread sealant to this plug on the drop valve.

That was about 5 minutes work, as opposed to about 8 hours on the diverter valve.
Going to have to apply some paint when the weather warms up a bit, as I had to machine the top of the diverter valve to have a surface to mount on the mag chuck.
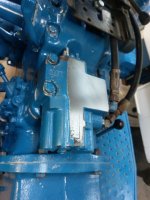
I had tempted fate with this valve by not doing the job properly first time around, telling myself it was an easily accessible part if the shortcut repair didn't hold; I think I was running out of energy and patience for the rebuild at the time. Easily enough accessible but I was glad not to be paying someone else's hourly rate to do this one.
As mentioned earlier in this thread, the diverter valve bolts down onto a machined surface on the top cover and there are a bunch of oil passages between the top cover and the valve, that are sealed by O-rings. The two machined surfaces were not flat but I had hoped to get away with new O-rings as this area had not been leaking prior to the tear-down, but with the heavy slasher, as well as moving some heavy logs with my 3PL forklift attachment, the leak was pretty bad.
I removed the top cover and stripped it down, then mounted it on my surface grinder to get a properly flat surface on it. The shape of the top cover was a bit of a challenge to mount on the surface grinder but I was able to hang it off the front with the target area within the grinding envelope.


For those unfamiliar, a surface grinder can operate to tolerances of around .0001", much finer tolerances than achievable by machining with most milling machines for example. I was able to get a very flat surface with a fine finish.

I did the same with the underside of the valve itself, getting two mating surfaces that are now very, very flat.

I did a little research on proper fitment of O-rings, it seems the ideal 'squeeze' in this kind of installation is about 30%, meaning the O-ring should be squeezed to 30% less than it's resting thickness when assembled. Having removed a few thousandths from the surface of the valve, I then bored the O-ring seats to a depth equal to 70% of the thickness of each o-ring. I re-sized the diameter of a couple of the seats as I did this, to suit common O-ring sizes rather than the oddball sizes of a couple of them. I made a honing tool to polish the base of the seats with some lapping paste also.


I reassembled the top cover and installed it and the diverter valve to the tractor. I did a little work with the big slasher- very pleased to report I now have no leak from the diverter valve. There was a leak a little lower down that had been hidden by the hydraulic oil leaking from above previously- had to install a new O-ring and apply some thread sealant to this plug on the drop valve.

That was about 5 minutes work, as opposed to about 8 hours on the diverter valve.
Going to have to apply some paint when the weather warms up a bit, as I had to machine the top of the diverter valve to have a surface to mount on the mag chuck.

I had tempted fate with this valve by not doing the job properly first time around, telling myself it was an easily accessible part if the shortcut repair didn't hold; I think I was running out of energy and patience for the rebuild at the time. Easily enough accessible but I was glad not to be paying someone else's hourly rate to do this one.