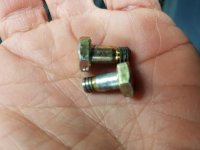
Snow Going through second stage bolts

   / Going through second stage bolts #101  
Yes, I have the updated shear bolt setup in mine:

View attachment 499062

Here is the bolt in the package from Kubota:

View attachment 499063

The total distance of the two flanges lined up is around 3/4". The thread on the bolt could be 1/4" shorter in my opinion.

View attachment 499064
View attachment 499066

And here is the head of the bolt. This is a grade 8 bolt, right? Seems like no where to step up to other than to go to a 5/16".

View attachment 499065

The last bolt I pulled out had a bit of a bend to it, even though it was only in there a short time. They seem to loosen up quickly. I assume that it is stretching the bolt.

I can get pretty good access to the two sides of the flange. It seems like a good, permanent solution would be to weld up the holes and redrill them, as they are a bit loose right now. I will try and find another grade 8 1/4" bolt with a longer flange (less threads). The JH label on bolt head indicates the Chinese manufacture. Maybe they are not really grade 8 or they have some manufacturing problem?
Are you putting this bolt in from the front or from the back? It looks almost like if you put it in from the back the shoulder may line-up into the shear area.

Aaron Z
 
   / Going through second stage bolts
  • Thread Starter
#102  
Are you putting this bolt in from the front or from the back? It looks almost like if you put it in from the back the shoulder may line-up into the shear area.

Aaron Z

I have tried putting the bolt in both directions with no difference in time between shears. Here is a picture showing that it is shearing in the threaded area. I think the two tabs are the same basic thickness, so I think it shears at the same point whether it is put in from the front or the rear.

20170215_175930.jpg
 
   / Going through second stage bolts
  • Thread Starter
#103  
Currently, the shear strength of my bolt is PI*R^2*90,000 or 4400lbs. If I was to go up to 5/16" bolt, this would move to 6900lbs. I am wondering how good the engineering was on this updated tab shear method, and possibly that it was set too tight on tolerance so that when there is any play in the hole, it fails too soon and too often. Moving down to a grade 5 bolt where the shear strength is 72000psi vs 90,000 for a grade 8 yields a shear strength of 5500lbs.

So what are thoughts on drilling it out to 5/6 so I have a tight fit again and moving to a 5/16 grade 5 bolt?
 
   / Going through second stage bolts #104  
I have tried putting the bolt in both directions with no difference in time between shears. Here is a picture showing that it is shearing in the threaded area. I think the two tabs are the same basic thickness, so I think it shears at the same point whether it is put in from the front or the rear.

View attachment 499121

Wow, newest best style flange shear bolt design and the old problem.

Looking at your photo of the fan hub/flange area, there appears to be a gap. The two flanges do not appear to be flat so they are NOT like two pieces of window glass one on top of the other. .

Is this your observation? If there is a gap it would explain two things.

The first is why you are seeing some bending in the failed bolts, the second is why the shear bolt is failing in the threads not the smooth shank.

The two flanges should be acting like a good pair of scissors cutting paper. When the scissors are new and the two halves of the scissors are tight together, they easily slice through thick heavy paper. When the scissors get old and the two halves are not tight together, it is much harder or impossible to cut heavy paper.

If your flanges are bent or something is preventing them from pulling together over the complete face of the flange, this has to be corrected.

Can you remove the bolt through the fan shaft and pull the flange back so the flange on the fan hub can be photographed with the flat edge of your caliper against it to show just how flat it is?

Do the same photo procedure on the flange you pull back.

The bolt head you are asking it it is a grade 8 is indeed a grade 8. The difference between a chinese and a north american one would not be significant in this situation.

What is interesting is the Kubota package for the shear bolt which clearly show a grade 8 bolt. Previous packages of shear bolts with newly purchased blower of your style also clearly stated grade 5 for the auger and grade 2 for the fan. Why the big change by Kubota?

At this stage I am very hesitant to have you up the bolt diameter for fear of causing damage. Thinking quickly, the rotating fan has a lot of stored energy. When it is suddenly stopped that energy is going somewhere. If there was a bigger bolt connecting it to the shaft could that energy be traveling along the fan shaft to the gear box? I have not thought thru my argument enough to say this is a genuine concern but.... Also, deviating from the Kubota design when we are jusst starting to get their attention might just give them a reason to pass you by.

Dave M7040
 
   / Going through second stage bolts
  • Thread Starter
#105  
Looking at your photo of the fan hub/flange area, there appears to be a gap. The two flanges do not appear to be flat so they are NOT like two pieces of window glass one on top of the other. .

Is this your observation? If there is a gap it would explain two things.

This may be the way the photo looks. There is no gap between the two flanges. Maybe it is the way they are rounded off at the edge, but them main material of the flanges comes together good, and when I torque the shear bolt they are pressed together tightly.

There is some extra room in the shear bolt hole. It is not a lot, but I would not say that the shear bolt is tight going into the hole. Initially this is not a problem, since there is no movement since the shear bolt is tight, but after even 15 minutes of operation the shear bolt is a bit loose, and will rock back and forth a bit when I move the fan. At this point when I move the fan there is some play between the two flanges. Since the shear bolt is held with a self locking nut, I am thinking that there is some stretch happening with the shear bolt when it is in operation.
 
   / Going through second stage bolts #106  
This may be the way the photo looks. There is no gap between the two flanges. Maybe it is the way they are rounded off at the edge, but them main material of the flanges comes together good, and when I torque the shear bolt they are pressed together tightly.

There is some extra room in the shear bolt hole. It is not a lot, but I would not say that the shear bolt is tight going into the hole. Initially this is not a problem, since there is no movement since the shear bolt is tight, but after even 15 minutes of operation the shear bolt is a bit loose, and will rock back and forth a bit when I move the fan. At this point when I move the fan there is some play between the two flanges. Since the shear bolt is held with a self locking nut, I am thinking that there is some stretch happening with the shear bolt when it is in operation.

jr

The stretching idea ..... it things are working as they should be the only stretching of the bolt is when it is torqued on installation.

Are you reusing the nyloc nuts? They dont work well the second time around.


How about this test. New bolt and two high quality NON locking nuts. Put the first nut on and torque as specified. Now tighten the second nut against the first one holding the first one from moving with a wrench. If the wrench is too wide to hold the first nut consider grinding the wrench thickness to suit. Alternatively a small washer could be put between the two nuts but this wont work as well.

Try and get a bolt where the threads are past the face of the flange so only the smooth shank is in the two flanges. Use a washer or two between the first nut and the flange to get the nut to tighten without running out of threads.

Now cut the protruding end of the bolt off leaving a few threads beyond the second nut.

At this point I want you to peen the protruding threads into a mushroom so the nuts cannot back off.

To do the peeing dont just bash the protruding threads with a hammer. Something heavy has to be held against the head of the bolt at the same time to resist your bashing of the threads.

Putting the bolt in from the back or fan side should make this test fairly easy.

Now if the bolt fails we will be certain that the nut has not moved thus loosening the bolt.

What do you think?

Dave M7040
 
   / Going through second stage bolts
  • Thread Starter
#107  
jr

The stretching idea ..... it things are working as they should be the only stretching of the bolt is when it is torqued on installation.

Are you reusing the nyloc nuts? They dont work well the second time around.


How about this test. New bolt and two high quality NON locking nuts. Put the first nut on and torque as specified. Now tighten the second nut against the first one holding the first one from moving with a wrench. If the wrench is too wide to hold the first nut consider grinding the wrench thickness to suit. Alternatively a small washer could be put between the two nuts but this wont work as well.

Now cut the protruding end of the bolt off leaving a few threads beyond the second nut.

At this point I want you to peen the protruding threads into a mushroom so the nuts cannot back off.

To do the peeing dont just bash the protruding threads with a hammer. Something heavy has to be held against the head of the bolt at the same time to resist your bashing of the threads.

Putting the bolt in from the back or fan side should make this test fairly easy.

Now if the bolt fails we will be certain that the nut has not moved thus loosening the bolt.

What do you think?

Dave M7040

The nuts I am currently using are not nylocks, but are metal friction locknuts. I am not really sure what they are called, so hopefully this make sense. I am not reusing them. A new one comes in each package from Kubota. I can double nut it like you suggest, maybe with a lock washer between the two nuts? It seems like this would be pretty secure without going to the trouble of cutting the nut and all of this. I think I should even be able to mark it with a scribe or something so I am sure that the buts are not turning relative to the bolt. This is a good idea, since there is a lot of force and vibration in this area, so it is not out of the question that they are somehow working loose.
 
   / Going through second stage bolts #108  
The nuts I am currently using are not nylocks, but are metal friction locknuts. I am not really sure what they are called, so hopefully this make sense. I am not reusing them. A new one comes in each package from Kubota. I can double nut it like you suggest, maybe with a lock washer between the two nuts? It seems like this would be pretty secure without going to the trouble of cutting the nut and all of this. I think I should even be able to mark it with a scribe or something so I am sure that the buts are not turning relative to the bolt. This is a good idea, since there is a lot of force and vibration in this area, so it is not out of the question that they are somehow working loose.
I would use a longer bolt of the same grade so that the shoulder is in the shear area and double nut it (a regular nut and the lock nut that comes with it). If its loosening, either the nut is backing off, or the bolt is stretching.
Double nutting will keep the nut from backing off. If its stretching, you need a higher grade bolt.

Aaron Z
 
   / Going through second stage bolts #109  
jr
Of course how to do this is your choice since you have to do it. :)

My fear was if the shear bolt breaks and you find just the bolt half and not the nut half or vice versa will you be able to tell if anything m.oved. If you found the double nut half with the mushroomed threads against the outer nut you would be certain. I don't know what you have to cut the bolt. Angle grinder, sawzall or hacksaw

You could cut it before you install it if you make provision to get the threads into a condition to let the nut start.

The easy way to do this is to thread a nut, cheap nut, unto the bolt past where you want to cut it. Once the cutting is done, you unthread the nut and it straightens the threads.

Then the peening is all you have to do in place and if you have two hammers, one can the the weight against the head of the bolt while you bash the threads. It is only a 1/4" bolt so it wont take much bashing.

The key part is the threads being beyond the flange and a washer there to allow the first nut to achieve a true torque squeezing the two flanges together and not an artificial torque when the nut runs out of threads as things tighten up.

Dave M7040
 
   / Going through second stage bolts #110  
I would use a longer bolt of the same grade so that the shoulder is in the shear area and double nut it (a regular nut and the lock nut that comes with it). If its loosening, either the nut is backing off, or the bolt is stretching.
Double nutting will keep the nut from backing off. If its stretching, you need a higher grade bolt.

Aaron Z

Aaron

Kubota is already providing a grade 8 bolt! First time I have seen this change. Normally the literature with a new blower say grade 2.

Dave M7040
 

Tractor & Equipment Auctions

2013 CAT 950K WHEEL LOADER (A50854)
2013 CAT 950K...
2021 John Deere 5045E  Only 86 Hours, Loader Ready, 2WD, Canopy (A51039)
2021 John Deere...
2016 LINK-BELT 235X3 SPIN ACE EXCAVATOR (A50854)
2016 LINK-BELT...
2013 MAGNUM TRAILER GENERATOR TRAILER (A50854)
2013 MAGNUM...
Caterpillar 60in Pallet Fork and Frame Attachment (A49461)
Caterpillar 60in...
2005 Big Tex 10PI 16ft. T/A Pipe Top Utility Trailer (A49461)
2005 Big Tex 10PI...
 
Top