Grab Hook Installation

   / Grab Hook Installation #1  

Nightforce

Silver Member
Joined
Aug 6, 2014
Messages
165
Location
Rehoboth, MA
Tractor
Kubota BX25D, John Deer D140, Craftsman GT6000
Because I sort of hijacked Lutt's thread, I decided to create my own. Most of what's below is copied and pasted from there for convenience.

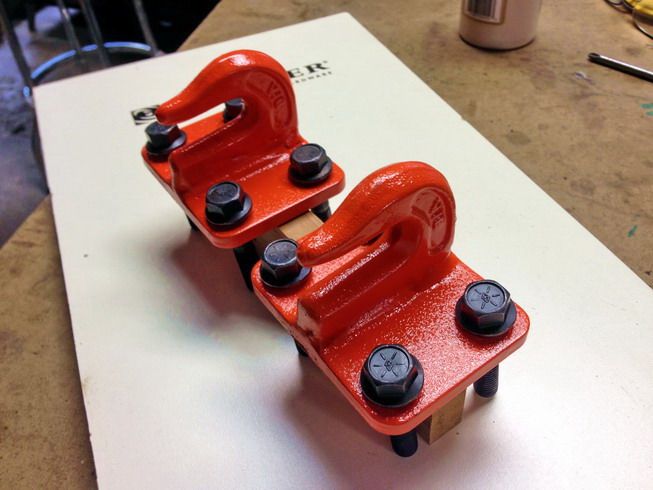
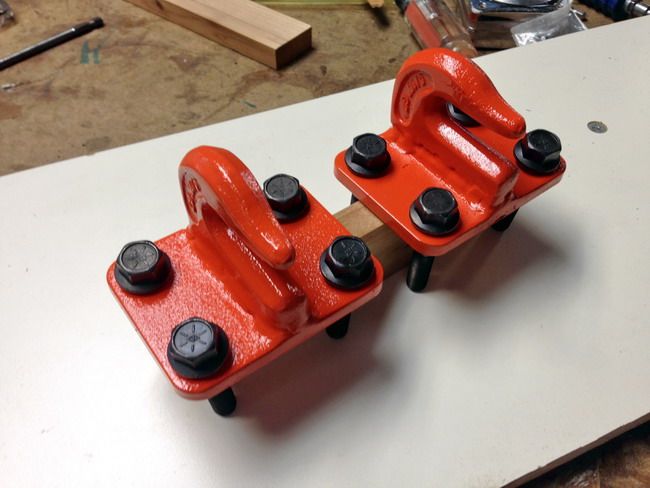
I order a two set of plates and grab hooks from Ken, they arrived in no time, and the individual prices were good! :thumbsup:

Instead of the traditional two bolts as shown above, I opted for (4) Grade 8 3/8-16 per plate.

I drilled the plates this morning then welded the hooks in place. I was pretty pleased with my welding results and got excellent heat penetration. I was using .030 wire so I gave it 2 passes to ensure strength. I cleaned them up using a wire wheel then sanded the assemblies thoroughly before priming and painting.

I used Rustoleum primer and Rustoleum orange trying to make them look as good as Ken's.. While the bolts I used are clearly overkill it helps my little Kubota BX25D feel like one of the big boy's.....


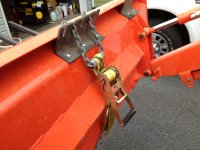
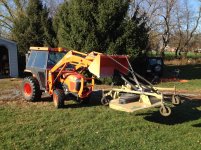
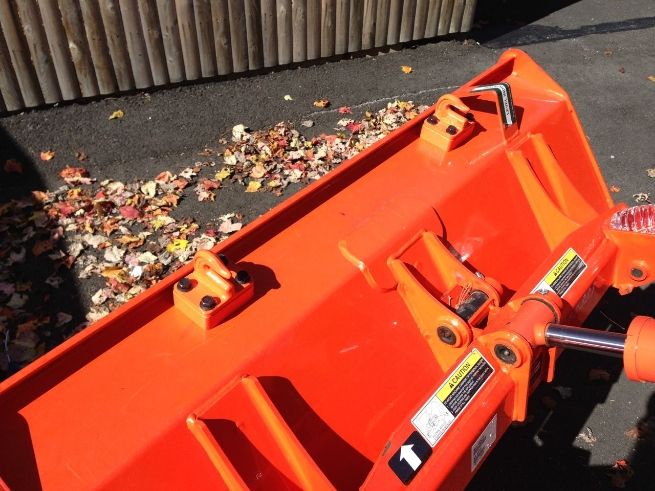
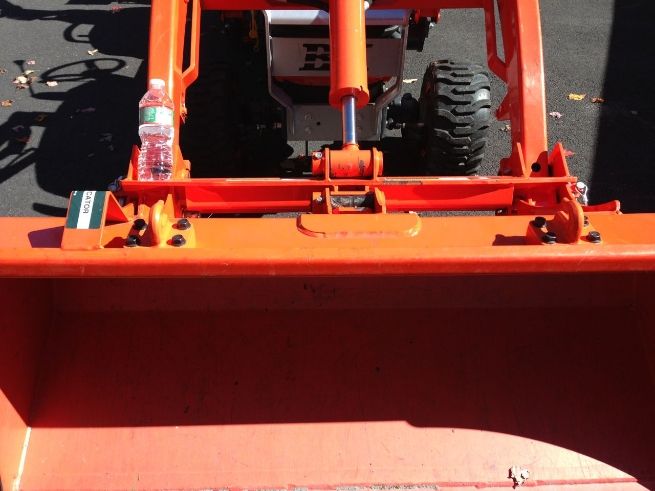
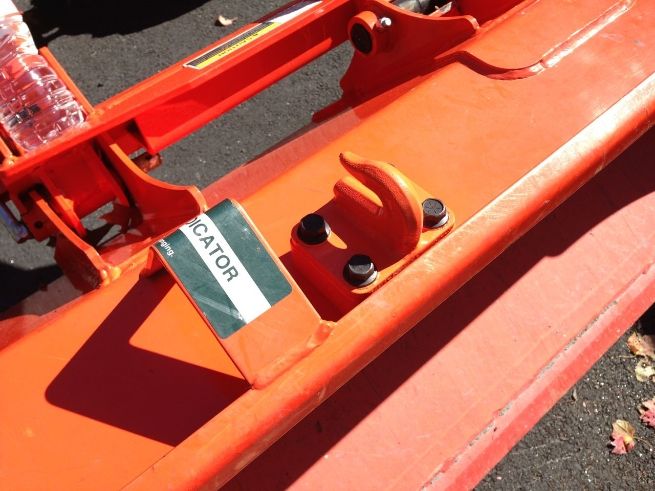
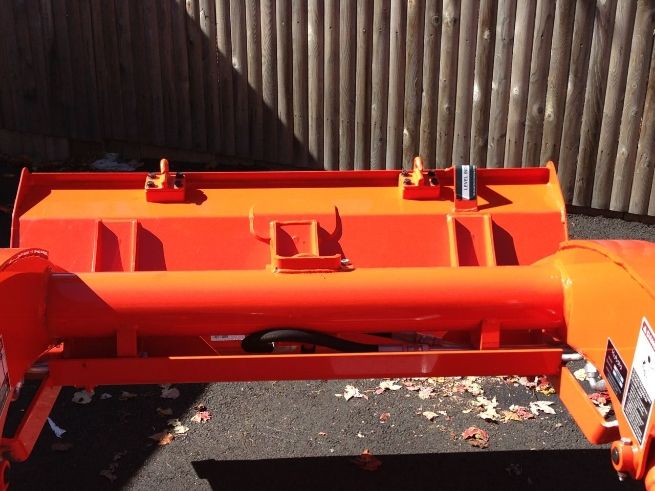
Here's a few photos of the finished product installed on my Kubota-BX25D. I placed them just inside of the bucket mounting brackets for strength and balance.

I think they came out great and I'm pretty sure those bolts will hold!


   / Grab Hook Installation #2  
Nice job. You'll get allot of use out of those. You can never go overkill as far as I'm concerned on bolts. For the little extra cost, it's better to be safe than sorry.
 
   / Grab Hook Installation #3  
Fantastic job , they look almost as good as mine :wink:
 
   / Grab Hook Installation #4  
Nice. I like 3 better, but the way you kept them in a little, should work well.
 
   / Grab Hook Installation #6  
I used a similar but slightly different approach. I put an eyebolt in the middle with two hooks at the outside to give me multiple options when dragging or pulling something. I reinforced the top lip of the bucket on the top and bottom to distribute the stresses when doing things I shouldn't. With this setup, I can use the bucket to pickup things or just hold oversize items in the bucket.
IMG_20141024_172114_865.jpgIMG_20141024_172048_176.jpg
 

Attachments

  • IMG_20141024_172059_424.jpg
    IMG_20141024_172059_424.jpg
    849.4 KB · Views: 817
  • IMG_20141024_172123_535.jpg
    IMG_20141024_172123_535.jpg
    891.2 KB · Views: 606
   / Grab Hook Installation #7  
Nice looking work.
 
   / Grab Hook Installation #8  
GreenAtLast, I see you have one of those "side bucket" alarm systems.:)
 
   / Grab Hook Installation #10  
I have lifted 700+lbs with it but that is approaching the limits of the bucket so I am careful. I use it mostly to drag. With both hooks and the eyebolt, it gives me multiple lifting/dragging options.

The problem with my side bucket alarm is that it likes to transfer to the seat, whether or not I am in it. So help me, if he could push the pedals he would. He is completely unafraid of the machine and when I am running the backhoe, he will get RIGHT beside the bucket and start digging too! I had to move the key storage spot. He could reach it and would take the key and go to the door and wait for me so he could ride.
 
   / Grab Hook Installation #11  
I see a pair of HF bolt on hooks. I too used them, along with a D ring inside for lifting, and an eyebolt on top. Handy. I've had chains and straps slip on me when I was moving something heavy, and I don't want that to happen ever again.

P1010498.JPG
 
   / Grab Hook Installation
  • Thread Starter
#12  
Varmint,

Very nice work and looks factory installed....:thumbsup:
 
   / Grab Hook Installation #13  
Been away from the forums for a couple years. My brother the certified welder came up this summer so we decided to weld the grab hooks I bought a while back to the L39 bucket. I've been following the threads over the years as to the best place to weld the hooks, in line with the loader arms or the outer edge of the bucket. We picked the outer edges because it looked stronger (could weld against the raised sides of the bucket) and I wasn't going to try lifting a heavy unbalanced load from these hooks anyway. My brother did the welding while I did the surface preparation and kept the Red Tail Ales flowing. :) I couldn't be happier with the results.
Here's a few pics:

P1000796_25.JPGP1000779_25.JPGP1000780_25.JPGP1000781_25.JPGP1000782_25.JPGP1000786_25.JPGP1000787_25.JPGP1000788_25.JPG
 
   / Grab Hook Installation #15  
I bought a few grab hooks and clevis mounts from Ken's Bolt on Grab Hooks and found time to weld them on this weekend to the bucket. I plan on adding a few to my rear trailer hitch assembly. Only had time to spray primer for now.IMG_20141102_162224754.jpgIMG_20141102_162232550.jpgIMG_20141102_162237432.jpg
 
   / Grab Hook Installation #16  
I've done the last couple buckets of mine like this, as well as the bucket on a Montana we use for maintenance at work. Heavy angle with slots to drop the chain into have been my favorite for the last dozen years or so. It provides flexibility for hookups. Loads can be applied from the front or back. This setup got a pretty good test today.

The first picture is the HD load binder ratchet that holds the brush forks on. The next two are pictures were snapped today while putting the RFM away till next spring. Usually it's a real fight to get the 6" Landpride deck tucked under the rear shelf in the shed. Seems like the casters each has a mind of its own with regard to the direction it wants to go and I have a really difficult time making the deck go the direction I want it to. This time I tried a different approach. With a sling and a couple chains I hung the deck out in front of the FEL. I was able to pick and drive it right into the spot and lower it to the floor. Hard to tell by looking at the picture, but the deck is about 18" off the ground.
 

Attachments

  • Back Hooks.JPG
    Back Hooks.JPG
    628.1 KB · Views: 430
  • Deck Up.jpg
    Deck Up.jpg
    381.3 KB · Views: 389
  • Deck Up Closeup.jpg
    Deck Up Closeup.jpg
    317.6 KB · Views: 344
   / Grab Hook Installation
  • Thread Starter
#17  
You guys have some great ideas and their execution is outstanding.....:thumbsup:
 
   / Grab Hook Installation #18  
I've done the last couple buckets of mine like this, as well as the bucket on a Montana we use for maintenance at work. Heavy angle with slots to drop the chain into have been my favorite for the last dozen years or so. It provides flexibility for hookups. Loads can be applied from the front or back. This setup got a pretty good test today.

The first picture is the HD load binder ratchet that holds the brush forks on. The next two are pictures were snapped today while putting the RFM away till next spring. Usually it's a real fight to get the 6" Landpride deck tucked under the rear shelf in the shed. Seems like the casters each has a mind of its own with regard to the direction it wants to go and I have a really difficult time making the deck go the direction I want it to. This time I tried a different approach. With a sling and a couple chains I hung the deck out in front of the FEL. I was able to pick and drive it right into the spot and lower it to the floor. Hard to tell by looking at the picture, but the deck is about 18" off the ground.

I can see both good and bad with that design. It is quick to hook up and easy to adjust. The problem would arise when you had to tilt your bucket in order to perform a task. The chains might slide off. It would also be hard to use straps or ropes.
 
   / Grab Hook Installation #19  
I can see both good and bad with that design. It is quick to hook up and easy to adjust. The problem would arise when you had to tilt your bucket in order to perform a task. The chains might slide off. It would also be hard to use straps or ropes.

Tilting the bucket isn't enough to unhook the chains. To unhook the chains the slotted angle iron needs to be below the height that the chain is attached to the load. I do sometimes use that as a method of unhooking without leaving the seat. You need to allow enough slack to drop the bucket low enough.

Not sure why you think it would be hard to use straps because I do it all the time. Two of the pictures I posted above show that. Slings are available in different lengths - none of which are generally the exact length needed. The chain through the eyes allows for almost infinite adjustment.
 

Tractor & Equipment Auctions

Spreader Attachment (A56859)
Spreader...
New Holland S68 Square Baler (A56438)
New Holland S68...
2014 FREIGHTLINER 108SD CONCRETE MIXER TRUCK (A59823)
2014 FREIGHTLINER...
ALLMETAL MOBILE PRESSURE WASHER (A58214)
ALLMETAL MOBILE...
2002 Kenworth T300 TMA Truck (A55973)
2002 Kenworth T300...
FUEL CELL TOOLBOX COMBO (A58214)
FUEL CELL TOOLBOX...
 
Top