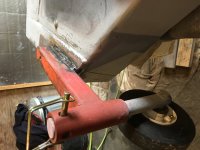
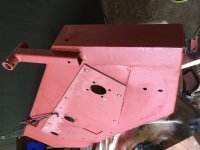
Gravely 40" wing mower restoration

   / Gravely 40" wing mower restoration
  • Thread Starter
#41  
had a good day today, just wish it wasn't so hot because by noon it was 114 heat index and I couldn't take it any more.
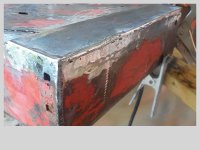
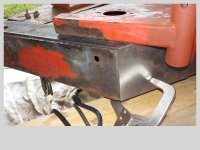
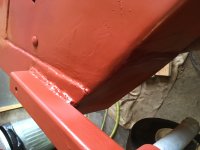
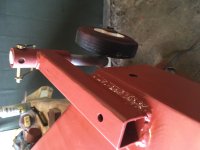
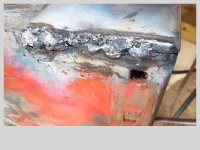
I started off with the world's ugliest weld. I'm sure there's a Ripley's award for ugliest weld I could win.
:dance1:
Welding forum guys having fun with this...
By noon I had done everything three or four times and it was actually presentable in a serviceable sort of way.
Lots more to do.
Boy am I glad I have some of that primer that fills in "imperfections". Oh do I have some imperfections...

but I have to keep in mind this was the free mower of the two, the one in such bad shape it was thrown in for free.
The other wing mower, the Kawasaki powered one, has already been welded by the seller dealer. It will actually be fun to look at their
work on the almost identical deck. They did a lot of welding on the other one.
This is what you find in the boneyards...my favorite place actually.
 

Attachments

  • DSCN0731.JPG
    DSCN0731.JPG
    520.8 KB · Views: 125
  • DSCN0747.JPG
    DSCN0747.JPG
    514.2 KB · Views: 125
  • DSCN0720.JPG
    DSCN0720.JPG
    517.9 KB · Views: 122
  • DSCN0718.JPG
    DSCN0718.JPG
    517.1 KB · Views: 115
   / Gravely 40" wing mower restoration
  • Thread Starter
#42  
chatted with Jamie Juftes, Richard's son, at Richard's business in WVA, considered at least on the east coast
one of the last bastions of older Gravely equipment. Among Gravely Nuts he apparently has rock star status.

I'm hunting red paint , something other than oem 11 dollar a rattle can.
And he suggested Rustoleum Gloss Red, which I ordered a six pack of from Amazon for less than 5 dollars per can.
If I like the color, which I think is going to be indistinguishable from Massey Red, I might track down some gallons of
this paint to try my hand at spray painting. Also ordered a couple of cans of automotive clear enamel.
I'll have this all so shiny when I hook it up to the 8199G that old girl's ten year old paint job will look pretty dowdy.

Rust-Oleum Stops Rust 12 oz. Gloss Cherry Protective Enamel Spray Paint (6-Pack)-248568 - The Home Depot

The 8199G is starting to leave a puddle of oil on the floor of my new storage shed, which is a real no no, so sooner vs later I have to deal
with that. The new Vanguard engine isn't the issue, it's further back . Time to crawl. I put a pad under there for now.
 
   / Gravely 40" wing mower restoration
  • Thread Starter
#43  
with all the rain coming in today it should be an ideal day to work in a cooler barn and make progress on this deck. Have a patch to weld on top, could not close a hole
in deck, and then a piece for the front, and that part is done. Then on to the big hangar frame where I have to weld a piece of steel over the hole left when the mount ripped out.
Then a new mount on to the new steel, and that should be it prior to paint prep and painting. Might have a build party where two old friends who are mechanically inclined might come and we can put it all back together, together. Thank goodness I have a twin we can look at...
Long way to go before that point, but I'm seeing an end, which is always good.
 
   / Gravely 40" wing mower restoration
  • Thread Starter
#44  
made some progress today, put patch on top and another piece on front.
Light above my work area went out, not enough light to see easily so will resume tomorrow with new LED bulb.
I did go look at the other mower to see how long the one wheel arm should stick out, and yikes what a mess that was.
It has been "fixed" in the same place; clearly poor design since both mowers seemed to have damage in same place.
Do you think they used a big enough piece of angle iron? Geez, that will be a mess cutting down.
Tomorrow I'll pick up a much smaller piece that will fit nicely and try that out on the other mower. The handwriting is on the wall that
this area needs more buttressing.
 

Attachments

  • IMG_0245[1].JPG
    IMG_0245[1].JPG
    2.5 MB · Views: 124
   / Gravely 40" wing mower restoration
  • Thread Starter
#45  
I finished most of the welding on the deck today. I have one important wheel bracket to weld and by the time I got to it at 4pm, I was too tired and called it a day.
Will start again tomorrow. Good thing to do on a rainy day. Next is the support to weld on the main frame, then I can start painting.
dirty day, grinding, grinding, scraping bottom, rust all over me, I could taste it in the shower later.

One part of the internal framework under the deck had rusted to bits, so I replaced that with a patch underneath. Remarkable that 7014 bites through that crud, but it held.
Then I heavily applied rustfix to the bottom and much of the top of the deck to convert the rust. Once I'm done painting, I'll apply truck bed undercoating to the underneath of the deck.
 

Attachments

  • IMG_0250[1].JPG
    IMG_0250[1].JPG
    2.4 MB · Views: 183
   / Gravely 40" wing mower restoration
  • Thread Starter
#46  
finished the welding on the deck today. Trailing pivot wheel welded back in place.
Red primer now on everything.
Now on to the frame where a tab was ripped off. More welding but at least heavier metal.
Then I'll be done the welding and can start to paint.
 

Attachments

  • IMG_0270.JPG
    IMG_0270.JPG
    1.6 MB · Views: 106
  • IMG_0269.JPG
    IMG_0269.JPG
    1.7 MB · Views: 150
  • IMG_0268.JPG
    IMG_0268.JPG
    2 MB · Views: 164
  • IMG_0271.JPG
    IMG_0271.JPG
    1.9 MB · Views: 115
   / Gravely 40" wing mower restoration
  • Thread Starter
#48  
thanks Dave. Next step is to hand sand all this primer, get all the weld spatter and junk off it, then start layering the paint.

that link was very interesting. My third garden tractor is a year old XT2, with Kawasaki engine but no power steering. I would love power steering on it though, hard to steer without it. The difference between a 2k CC and a 12k JD is pretty remarkable, as it should be. Of course it appears the power steering units have some problems. Not an MTD fan...

Clear weather coming up. Fields are still wet from rain, need to disc a neighbor's place but also want to work on this deck...Sunday morning, good time to do quiet things in the barn. Of course using a diamond blade to cut hardened steel is not exactly quiet.

It felt really good to cover that ugly welding with primer, and more primer. Making progress.
 
   / Gravely 40" wing mower restoration
  • Thread Starter
#49  
started early this morning working on the deck and by about noon had all the welding and fab work done. Built a new attachment hanger and welded it onto a new piece of steel
where the old part had literally been ripped apart. Lot of ugly welding as usual but it should hold. Took a while to drill that hard steel, just kept adding some oil, watched the little corkscrew pieces curl out of the work about two inches long. Nice sharp bits help. And nice to weld relatively thick metal to thick metal today.

if anyone just so happens to have three 3/8x24x1.25 carriage bolts, well you have a rare item. Hard to find anywhere. Refuse to pay three dollars a bolt from Gravely.
These are the bolts that hold the spindles to the deck and they have to be that exact size to clear the belt pulley. I'm going to have to use 1.5 inch bolts and cut them down.
 

Attachments

  • IMG_0272[1].JPG
    IMG_0272[1].JPG
    1.7 MB · Views: 128
  • IMG_0275[1].JPG
    IMG_0275[1].JPG
    2 MB · Views: 696
  • IMG_0273[1].JPG
    IMG_0273[1].JPG
    2.8 MB · Views: 126
  • IMG_0276[1].JPG
    IMG_0276[1].JPG
    3.5 MB · Views: 127
   / Gravely 40" wing mower restoration
  • Thread Starter
#50  
Very satisfying to get this far, where I'm ready to mask and paint.

Not satisfying to find that red paint recommended to me just isn't all that close.
More like a Massey Red, very nice color, but not enough orange.
So now I have 8 cans of red paint I may not use...well, the diesel fuel tank could use a coat...
I just hate paying twelve bucks a can for this stuff.
Perhaps I could cheat a little and put down first finish coat in the "almost Gravely" red, the one without enough orange,
and then a final coat of the oem paint. I even have some nice clear for a top coat if I get industrious.

cut off the ends of the too long bolts with a hack saw, fresh blade, worked fine. Was reminded by very nice guy at Ace Hardware to spin the nut on first,
then make the cut, then spin the nut off. Voila. Works every time.

I've been busy for days mowing and disc'ing a neighbor's fields. Need a quiet day tomorrow hand sanding all this primer to take a rest from all that bouncing around.
going to plop myself down on that red seat and see if I can get that finish a bit smoother.
Then I'll wipe it all down in paint thinner to clean it, after air blasting it thoroughly.
Then a few more bits of primer(the ends of the bolts I cut off are now fresh metal), some blue taping and then I'm ready for the red stuff.

I do have to get another can of the truck bed spray I used on the underneath. It's all covered, but a couple of places could be a little thicker.
I'm only going to do this once...and the bottom is nasty in parts, like bad surgery went on above...which it did.

Am under the gun to get this painting done. Old friends from far out of town coming in first week in October to help me put Humpty Dumpty back together again.
 

Attachments

  • IMG_0138.JPG
    IMG_0138.JPG
    3.9 MB · Views: 152

Tractor & Equipment Auctions

2014 FORD F150 4X4 CREW CAB PICKUP TRUCK (A52576)
2014 FORD F150 4X4...
10x16.5 Tire Assembly (A53472)
10x16.5 Tire...
2017 FORD F150 REG CAB LONG BED 4X4 (A52577)
2017 FORD F150 REG...
John Deere 5425 4x4 Tractor with Loader (A51573)
John Deere 5425...
Ford Pickup NR (A50323)
Ford Pickup NR...
2003 Paris Utility Trailer (A52377)
2003 Paris Utility...
 
Top