GX 255 drive belt

   / GX 255 drive belt
  • Thread Starter
#11  
Sorry everyone for the confusion, but ...

The JD diagram and parts list I posted is correct as "BELT DRIVE & IDLERS".
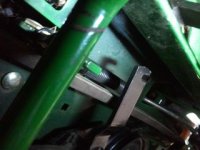
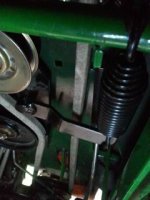
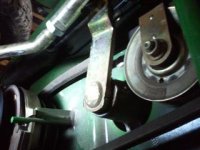
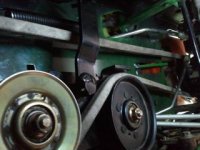
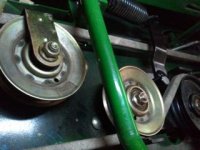
The right frame is rear and shows the trans. fan and the left side shows the front pulley and underneath that is the clutch.
At my JD store, they call it a "Drive belt" as listed in the caption of the drawing and as part #26 it is a generic "V-belt". It costs about $45 or twice what a mower belt does.

You can drive the tractor without the mower deck and belts but you can't drive the tractor without this 'drive belt'.

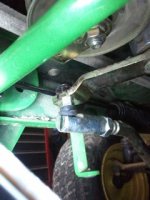
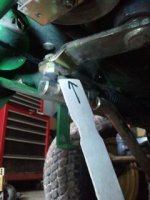
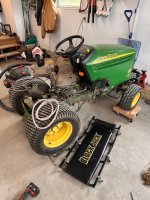
So, I ask does anyone have experience with this and as to the best way to replace this belt since it is 'tight quarters' and more involved than the deck mower belts.
Someone suggested removing the seat and chassis from the frame and attack this from the top vs. working from underneath the tractor. Thanks again!
 
   / GX 255 drive belt #12  
gaffer, Sorry for my DUH moment - I have'nt had to replace that belt yet on my 325 nor do I have it here to look at. But below is an account of someone who has done the job on a 325, which I would think to be very similiar - Hope it is of some help finally!

Well, I did the job today. The only difficult part was removing the idler spring, that was a "mother". Anyway the new belt is in and I even included two new idler pulleys to replace two that were starting to sound a little dry.

My reccommendations for the job are. 1) Remove the fender deck and trans fan so as to make removing the old belt easier. 2) Use some long screw drivers or the like to leverage off the idler spring. It may help to relieve the spring a little by unloading the idler plate, it has two pulleys on it, then removing the spring. 3) If your removing the drive belt be sure to check out the idler pulleys for wear since they are very easy to replace while the belt is off. They are of the permently lubed type and can run dry over time. 4) It will help to jack the tractor off the floor a little to ease access to the pulleys and for rethreading the new belt. 5) It was easy to unload the idler spring a little with the fender deck removed as it allows you to get a pry bar to wedge against structure easier.

My old belt and pulleys lasted 320 hrs of mowing and S.E. MI snowplowing. We have some mild slopes in the yard and a sloping drive and 60 x 40' apron to plow. I did replace the two belts on the 48c mower deck this summer as well.

The cost of the parts were as follows at the local JD dealer.

drive belt...........$60
large idler pulley..$17
small idler pulley..$12
There was one small idler I did not replace. (would have been another $12)

Difficulty of job...1 easy to 10 hard......I give it a 6. Go for it guys!
 
   / GX 255 drive belt
  • Thread Starter
#13  
Appreciate your follow through with the additional information on the 325. the belt routing does look similar and the approach from the top has me intrigued to attempt that. I'll report back my experience in a few days. best.
 
   / GX 255 drive belt
  • Thread Starter
#14  
Once upon a time my adventure began finding a 3-1/2" spring next to my 48" mowing deck and discovering that the JD GX255 would not travel anymore. Had to tow it back to the garage and spend too much time underneath the tractor to find where that spring came from. See pictures #1,#2, #3.
My first clue was finding a 1-1/2" length; 1/2" diameter of an oak branch caught on the belt pulley. Had to be a million to one chance of that happening to freeze the pulley and tear the belt. Then the issue continued of where does the spring go? (At this point I did not know of the resources of the JD website and this great user group site.)

I found the notch on the pulley/idler plate and a scratch on the cross frame where it would attach. (*Trick on reattachment is to put the spring onto the notch first. Then I tied a small piece of #4 tie-line or recoil line on the opposite end of the spring to grab onto the frame.)
But before putting that spring on, comes the adventure of figuring out where the "drive belt" travels between the engine and the rear transmission. *See the John Deere website and download the belt drive and idlers pages. ref. catalog 9331/grid C12/section 50/page 2

Pictures #4, #5,#8(close up pic of ball joint) will show that you 'can't get there from here' reattaching a new drive belt, as the front steering link and tie rod assemblage is in the way of putting the drive belt onto the #1 front pulley above the clutch drive pulley. You have to remove or separate that steering linkage to allow the belt to pass through.

I marked the ball joint so that I could get it back into the original alignment after the belt was placed on the engine pulley. I actually removed the link at the wheel also to make it easier. For reattaching the linkage I started both ends tightening just a couple of threads so that I wouldn't have to fight with the articulating of the ball joints. *Another note to self was to use 6-point sockets and have that metric set close by. I was also not sure it any bolts were 'counter-threaded'. Not the case, but I did not want to put too much torque on the bolt and break it. To solve that unknown, I was able to thread a spare nut onto the existing bolt threads to realize how they were cut.

Pictures #6 & #7 show the JD GX255 Drive belt routing through the pulleys and idlers. Good advice was that the flat part (outside) of the belt travels the idlers and the groove/ "V" end goes onto the pulleys. I loosen and or removed the pulleys to get the belt on past the belt guides. I also started the belt replacement at the transmission (rear) pulley end by slipping the belt over the fan blades. I had removed the deck rear two bolts to give me a little more working space at that end. I fed the belt from underneath the tractor and by using a tie-line that I attached to the belt I was able to accomplish getting it onto that pulley.

All and all, it was a learning experience that took much longer than I would have guessed. But I worked on the GX255 from the garage floor and didn't have much information on hand. If I had to do this again, I would guess maybe two hours including removing the mower deck. Good luck if you have to do it, but I know I saved serious dollars doing it myself and learned a bunch.
 

Attachments

  • JD GX 255 "drive belt" spring (1).jpg
    JD GX 255 "drive belt" spring (1).jpg
    18.3 KB · Views: 218
  • JD 255 spring location for drive belt spring 2.jpg
    JD 255 spring location for drive belt spring 2.jpg
    22.3 KB · Views: 346
  • JD GX255 drive belt spring 3.jpg
    JD GX255 drive belt spring 3.jpg
    21 KB · Views: 363
  • GX255 front steer linkage 'impass' 4.jpg
    GX255 front steer linkage 'impass' 4.jpg
    23.2 KB · Views: 273
  • GX255 close up ball joint 6.jpg
    GX255 close up ball joint 6.jpg
    23.9 KB · Views: 225
  • JD GX255 front Idler & pulley 7.jpg
    JD GX255 front Idler & pulley 7.jpg
    24 KB · Views: 430
  • GX255 Drive belt path 8.jpg
    GX255 Drive belt path 8.jpg
    25.1 KB · Views: 425
  • Close up of ball joint JD GX255 pic #5.jpg
    Close up of ball joint JD GX255 pic #5.jpg
    22.3 KB · Views: 489
Last edited:
   / GX 255 drive belt #15  
I bought a Gx255 last year for my son (14) to begin mowing in the neighborhood. It’s been a solid rig, but the drivetrain belt just went.

We towed it home with my 4052R and looked to see what may have been causing the issue. As I was looking under it I yanked out a 1/2 stick that was jammed up in there - likely helped with its demise.

I’ve watched some sketchy YouTube’s on this job, but I can’t find one that makes me think this job will be simple. Tip it up vertically - take off the operator station - crawl around under it - all sounds dreamy. I flirted with having the dealer do it, but I’m not looking to toss money in the fireplace.

Headed down to buy the belt now, but nothing is in the manual for this job.
 
   / GX 255 drive belt #16  
   / GX 255 drive belt #17  
Thanks for the reply! Agree this will be a learning experience!

When I say operator station I’m referring to the fender deck.

I found a YouTube where a guy takes that off - but I also found one where a different DIY guy hangs the tractor by the front so he worked on it vertically. Front end was tied to a beam with the fuel sealed off with a trash bag and the battery was flipped to keep it from leaking.

I’d personally like to work on it from the top and avoid the circus, as you suggested.

Just got the belt for 50 bucks - which will be the easiest part of the job. 🤓

So far, I think my steps will be to remove the mower deck, then remove the fender deck. I’ll check the pulleys for wear when it’s all taken apart.

This old thread was about the best resource out there.
 
   / GX 255 drive belt #18  
   / GX 255 drive belt #19  
Correct. Thus is the driveline not the deck primary or secondary.

I’ll get after it and report back! Thank you!
 
   / GX 255 drive belt #20  
I tackled the job today. It’s not bad and nobody should be afraid to tackle it. I didn’t have any directions other than what was discussed here. I just took my time and kept the workspace organized. 😎
 

Attachments

  • IMG_8498.jpeg
    IMG_8498.jpeg
    271 KB · Views: 16

Tractor & Equipment Auctions

2019 RBR Venturi 380 (A48561)
2019 RBR Venturi...
Roller Inspection Table (A47369)
Roller Inspection...
ACTUATOR VALVES (A47001)
ACTUATOR VALVES...
2012 GALYEAN 130BBL VACUUM TRAILER (A47001)
2012 GALYEAN...
Bad Boy ZT Elite (A47307)
Bad Boy ZT Elite...
2016 KENWORTH T660 SLEEPER TRUCK (A47001)
2016 KENWORTH T660...
 
Top