Well, back to the original question. Our pole barn was built in a "bookshelf" style, around here known as commercial style. Our construction is with 6X6 poles in the ground and a slab poured after the structure was built. Our shop is insulated with fiberglass batts- R18 in the walls which was very easy to do with the bookshelf style. The one issue we had is our poles were 6X6 and the girts were dimensional 2X6, thus the poles were about 1/2" off on the interior of the barn. This is not an issue unless you are finishing the inside, which we did, no extra framing but a little funny looking at the poles. The other issue is using fiberglass you need a good vapor barrier on the warm side so moisture doesn't condense on the metal siding and get the fiberglass wet. Although we didn't have to do extra framing, our sheet rock on the inside is on 24" horizontal "bookshelf" centers and given 12' between posts, there is risk that you might not meet code on the number of screws for sheet rock. I agree with some posts above, that given our insulation/sheet rock and concrete slab, we should have bid out a stick frame on foundation.
You are using an out of date browser. It may not display this or other websites correctly.
You should upgrade or use an alternative browser.
You should upgrade or use an alternative browser.
Has anyone built a pole building using "bookshelf construction method"?
- Thread starter jimgerken
- Start date
- Views: 45180
More options
Who Replied?
/ Has anyone built a pole building using "bookshelf construction method"?
#21
If cost is an issue, another consideration is taxes. I'm in the design stages of putting up a barn, I went to our assessor with 3 different designs, all for a 32'x80' building with gravel floor. For a fabric building the tax cost would be zero because of the way they categorize the structure. For a pole barn with wood siding and metal roof the tax would be about $1000/year. For a stick built building on foundation (but no slab) it would be about $1800/year. So the tax costs of the building exceed the cost of what it will cost me to put it up after about 15 years. Surprised me that they don't factor in whether I build it myself or not: they look up cost to build in a book and that's the tax basis. I told him I could build it for about a third of his cost estimate, said it didn't matter. Also didn't matter that I plan to run about 40amps out there, just enough for lights and a saw if I need to do some repairs. I could run 200A service out there and they consider both to be "electrified". goofy
OP
jimgerken
Veteran Member
Everyone, thanks again for the info.
Rustyiron: I understand your well written description and the ideas to combine the frost wall, the RFH, and the bookshelf wall and it tempts me, but one thing I wonder about. As insulated the way you describe, the edge of the slab is uninsulated. Right? In fact, it seems that the entire frost wall is a thermal bleed. The slab is heated from the embedded hydronic tubing, and the heat spreads out to the colder parts of the slab, one of them being the frost wall, which the entire outside surface of is exposed to the cold air above ground and the frozen soil below ground. Unless I didn't understand properly, which is likely...
COST is of course a big issue. Cost of construction, cost of taxes forever, and cost to heat. I just called the county tax office and confirmed that a "pole building" (the lowest tax cost structure type) is still a pole building if there are steel brackets embedded or bolted to concrete at ground level and poles vertically up from there, and it is then sided with pole building steel siding. No difference between soil embedded poles in the ground and poles bolted thru brackets on top of concrete. That seems very cool, because I can use a frost wall or similar, as long as there are poles and steel, not studs, and cut the taxes to less than half of a stud-built structure. Now I must reconcile the construction cost differences, and the heating cost differences into the equation. More concrete of course, but that cost is being poured into a solid investment in the building quality. Working on details......
GOOD STUFF GUYS !!!
Rustyiron
Super Member
Jim, there are a million details that would be hard to describe, but yes I have a thermal break where the slab meets the frost wall, (1"of foam) . I did this from suggestions that I read on another forum - Greenbuildtalk in the radiant section, very helpful bunch there too! I believe that the insulated frost wall helps to keep the cold from migrating in/under your heated slab. It also keeps any moving ground water out and from what I've read , that really carries off our heat. There is a small horizontal "shelf" of 3 1/2" that the slab rests on the fw that is not insulated but I was concerned about the overall slab stregnth. I had a pair of 2x4 laid flat in the forms of the 8"FW at the inside to create a shelf for the slab and rebar to sit on.
OP
jimgerken
Veteran Member
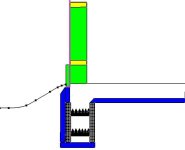
OK, starting to get back to this design. Have been kicking around a variation of an Alaskan slab/slab on grade/frost protected shallow foundation/whatever you want to call it... Picture attached. In the pic, the black cross hatched area represents a single ICF block such as Introduction to Insulated Concrete Forms | Reward Walls. ICF blocks add $1000 to the project, but also supply about $400 worth of foam insulation, so their convenience for forming and rerod placement really only costs $600. I can see lots of forming if not using the ICF, and almost none if using them, so it seems like a great addition for labor reduction. Also, some concrete saving will be possible with the ICF blocks, since the quantity will be so closely predictable using them, as opposed to normal forming technique (mine anyway).
Rerod not shown for clarity, but you can maybe imagine horizontal and vertical sticks in the "wall" part of the drawing. Outside, inside and under the black ICF area, the deep blue color is to represent extruded polystyrene (XPS). Total depth into the ground of the outer XPS is about 24", so this is not a frost wall, although it is somewhat protected. Plenty of insulation on the outside of the foundation and floor, about 4.5 inches thick total, for R value of about 18. R-10 under the slab, which is enough since this is a shop building afterall, and so will not be heated to 72 degrees air temp.
The idea would be to pour the entire ICF building perimeter square with rerod, nearly full of concrete, then backfill the inside and outside of the ICF "form" with aggregate, then pack and level, then the XPS under the floor area on the aggregate, next lay all the floor 1/2 inch rerod on 2 foot grid, wire tie intersections, all set up 1 inch above the surface of the XPS. Then the RFH tubing zip tied to the rebar grid. Then a second pour to the top of the finished floor height. Then metal brackets such as http://www.permacolumn.com/drill_set_models.aspget
which are bolted (hammer drill the holes after the pour) to the surface of the floor to bolt the laminated 3 times 2x6 pole assemblies into. Then the bookshelf wall gets assembled. Pink line is Tyvek outside structure and inside steel siding. Gradeplank shown is not set into poles, but added conventionally.
A big advantage of this is the way the floor and wall float (I bet very little) together. So doors always fit properly all winter long. Floor pour should be way easier than pouring after the building walls are up. The perimeter wall is quite tall and with rerod dependably placed in the trays in the ICF, the wall should be really stiff. Also, I think I have designed (with your help) a pretty thermally well isolated mass for the RFH method. One minor thermal nosebleed area is the overhead door thresholds, which will radiate heat outside. A possible band-aid would be to keep the tubing further from those areas, to use the concrete slab's own low R-value (resistance to heat flow) to minimize the total BTUs lost this direction. In fact, I'd keep all the tubing a couple feet from the outside edge of the floor, since I am not worried about an uncomfortable cold spot. Most of the wall space gets cabinets or tools or benches anyway. Maybe even three feet inside the outer edge would work for the first run of tubing.
Your feedback welcome. Again, this is a heated shop in MN, frost penetrates 48 inches.
Attachments

Last edited:
Rustyiron
Super Member
I think that your foundation/slab design is a winner. :thumbsup:
I know a few guys that have used the ICF's and they are great.
A few thoughts that I had are, do you think that the outside layer of insul. at grade might get loosened or wiped off by the ground heaving more than the foundation. (This 4' frost thing is new to me, I'm from south on the Mason Dixon line!)(and not going back). The radiant heat was new to me as well, I had the sys. designed and laid out by a pro. For me I believe that it was worth it because what I've read about tubing layout widely varried and he (of course) did the hear load calc's and really put the science to it. It looks like my perma column note may have helped, but am wondering why you would not use the type that you "wet dip" or stick into the wet crete?
One last thing that I saved some bucks on was I found a place that sells ridgid foam insulation that has been used. I got some 1 1/2" iso 4x8 sheets for about $7/sht. It is used but in very usable cond. They like to sell 48' trlr loads but at that $ it's worth looking into. I put 2 layers in the walls and I think that the poiyisocianurate (spelling?) that I got has an insulation value of about R6.5 to 7 per inch. Get going, winters coming!:laughing:
OP
jimgerken
Veteran Member
Rustyiron, thanks for the reply.
Outside insulation wiped off: Maybe, good point. Maybe I will "restack" the layers so the bottom horizontal is under the outside vertical. I have redrawn that and re-attached it below. I am thinking that is better, if not a cure.
Drill and bolt on instead of wet set: Yea, I feel the wet set would be better strength-wise, but the Perma-column (thanks for that!) site shows real respectable numbers for the drill and bolt ones. And think of the wonderful luxury of being able to finish the slab flat without all the obstructions. And it will be way easier to get them exactly placed if doing it on the cured concrete, rather than in the wet, the day of pour with all the stress and hurry that goes with that. Just thinking of lower stress, if it can be done that way. I will keep pondering that one though.
Rustyiron, would you mind private messaging me that re-utilized foam business information please? I am interested in talking to them. Thanks...
Still looking for input from the Duffster with his frosty midwest freezing experience viewpoint.
Attachments
trailbuilder
Silver Member
- Joined
- Mar 31, 2011
- Messages
- 139
- Tractor
- JD 333E, JD 333D, JD 328D, JD 450J, JD 50 D, CASE 621C,JD 4210,JD 3346,JD 5093,JD 825i, PB10050.
We have a Cleary Pole barn (actually 3 of them). The last one was built on the slab with the brackets. It is 40 x 54 x 14. The slab sits on a nice sand slab and the slab is thickened to 2 foot around the perimeter and has 2 courses of rebar. It was so nice to pour the concrete without the barn in the way and then we had a nice working area for the barn construction. It is 5 years old without issue. It might be worth getting a materials quote from Cleary Buildings.
trailbuilder
Silver Member
- Joined
- Mar 31, 2011
- Messages
- 139
- Tractor
- JD 333E, JD 333D, JD 328D, JD 450J, JD 50 D, CASE 621C,JD 4210,JD 3346,JD 5093,JD 825i, PB10050.
The brackets were wet set. They were like a J and not critical for setting them dead nuts.You could be off an inch or so and the building still was true and square and plumb. It did take 2 extra guys 2 hours during the placement to set the brackets while the other 5 of us placed 33 yards of concrete.
This barn is not heated or insulated.
This barn is not heated or insulated.
