Home built hydraulic FEL mounted hedge cutter

   / Home built hydraulic FEL mounted hedge cutter
  • Thread Starter
#11  
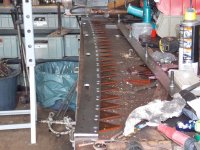
Jumping ahead to 2019, when I did a bit refit. Bigger belt, smaller ratio to slow it down. bigger capacity hydraulic pump on the tractor to slow the engine down, and a totally new blade pack with opposed scissor action blades.

new blade.jpg

The rod bearings were shot; probably overstressed due to incorrect alignment. Since getting the pushrods right is really hard, I decided to switch to wobble bearings. That meant a whole new crankshaft.

hedge cutter original crankshaft.jpg


New pulleys, wide belt, wobble bearings, and the holders I made for them.

New crankshaft parts + drive belt.jpg


I'll cut a section of this old rod to cut the crank from.


new crankshaft scrap stock.jpg


I have a saw now; it's shitty, but it's here and works.
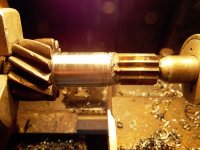
new crankshaft stock cutting.jpg


Blank on the lathe;

new crankshaft 1 stock marking.jpg


It has to have a thinner web to make room for the new bearings, so instead of pressing pins into a disk, I cut it from solid.
Also, the wobble bearings will forgive the errors caused by my basic machining skills and machinery.

new crankshaft 2 finish cut.jpg


old and new.

new crankshaft 3 center and end bearings.jpg


Trying to get good lineup; it didn't come out as accurate as I'd hoped.

setting bore marker position.jpg


The hunt for center...

centering a punch mark.jpg
 
Last edited:
   / Home built hydraulic FEL mounted hedge cutter
  • Thread Starter
#12  
boring the new crank end;
eccentric bore.jpg


Then cutting away most of it to make clearance for the rod bearing holder

Eccentric raised bore.jpg


Parts ready for pressing. you can see why the end had to be made from 1 piece.

crankshaft parts.jpg


The pulley has a bearing set into it, the post to hold the bearing is set into the crankcase end plate.

new pulley bore.jpg


Trying to get the parts lined up radially before the final press.

lineup before pressing 2.jpg


First section press. I made a press since the first part of this thread, I like it.

pressing crank 1.jpg


Back in the lathe to line up the next section

lineup before pressing 3.jpg


And in the press again.

pressing crank 2.jpg
 
   / Home built hydraulic FEL mounted hedge cutter
  • Thread Starter
#13  
I needed to replace the cogwheel, sprocket, inner splined tubes, brake and bevel gear. The sprocket was stripped, and kept slipping.
I found this little 12v winch on ebay for 50 euros. It came in one piece but didn't stay that way for long.
little winch disassembled.jpg

I powered it up and found I need more reduction;
these car gears are really hard; they can be annealed by heating and then being left to cool slowly. After that, they're still hard but machinable.
ford escort 1st gear.jpg


giving the front flange a shave.
litle winch on lathe.jpg

Welding the car gear to the spline from the winch. I cut indexing centers in the shafts first of course.
welded gear + spline.jpg


The ugly weld becomes a nice bearing surface after a minute on my old lathe;
little winch adaptor.jpg


Next I welded this shaft from the differential I butchered 5 years earlier, to the large gear from the transmission of the same car.
It belonged to a friend who scrapped it in the 90's.
These parts will connect the winch to rotate the cutting head with a 3.5:1 reduction.
large gear and rotater spline.jpg


Jumping ahead a few months, here it is mounted up; it works great, I'm really happy with it.
rotation motor 2020.jpg

winch motor rotator 2020.jpg


I had some old Bosch fuses, I just needed a holder. No worries, I have lexan, copper strip, and epoxy.
Bolts right onto the battery post clamp.

80A fuse homemade holder.jpg
 

Attachments

  • spline gear finished.jpg
    spline gear finished.jpg
    348.5 KB · Views: 59
   / Home built hydraulic FEL mounted hedge cutter
  • Thread Starter
#14  
Now the next epic; creating new opposing toothbars.
It took a long time to find the straight smooth strip. A shop 150 miles away said they'd have to order it, no delivery I had to come pick it up. Luckily a friend lives near there, and he brought it for me when he was coming this way.
As I had no milling machine, I milled the slots on my lathe. This took a long time to set up, but it worked quite well.
new cutter bar slot cutting.jpg


Next I riveted the new blades in. I used the press instead of a hammer, more civilized and controllable.
These mild steel rivets deform like marshmallows, and fill the slightly oversize hole.

pressing rivets.jpg


I made the form tool and back anvil from rod, and then hardened them. After pressing 100 steel rivets, the drill marks on the form tool still show perfectly on the rivet heads. I don't know what this material is, but it sure gets hard.
rivet head.jpg


pressing rivets2.jpg


rivet form tool.jpg

pressing rivets 1.jpg

I guess this was predictable, but I had no clue that the blade would warp like this from the riveting.
top blade with curve.jpg


I made some jigs, and straightened both new bars with the press.
straightening toothbar.jpg


Here are the 2 new toothbars, rivets ground down on the face sides and straightened for assembly.
new blades grinding rivet heads.jpg
 

Attachments

  • warped toothbar.jpg
    warped toothbar.jpg
    354.8 KB · Views: 57
   / Home built hydraulic FEL mounted hedge cutter
  • Thread Starter
#15  
Moving along with the new blade theme;
here are the parts ready to assemble. as well as the tooth bars, there's a buffer strip between them, a top and bottom plate too. these 5 plates all bolt loosely together before fitting into the welded up channel frame I made years ago for the grass cutter blade.
new blade pack disassembled.jpg

Here they are fitted together. I was pretty nervous because I wasn't at all sure the movement would be ok; it was. The tooth bars slide over each other with great malevolence, like a really terrifying sci fi monster.

new blade pack assembled.jpg

I drilled these bolts and put zerk fittings in the ends, the rings are cut from rod and hardened. They fit nicely in the toothbar slots.
drilled tapped mounting bolts.jpg


I cut keyhole like slots in the blade frame, so the whole blade pack can slip in and out if the stepped spacers are lifted out.

fitting blade pack in.jpg


After 3 hours of cutting, everything jammed up solid.
Disassembly revealed serious galling to the toothbars.
As you can see, the damage is behind the bolts, so I reasoned that the major cause of the pressure was the cutting teeth being forced apart during work.
I made 2 changes; pinch bearings on each side to hold the plates, and now I stop and pump grease in through the 4 zerks every 4 hours, with the machine running. Grease spreads between and along the plates and does its thing.

To repair the damage, I ground lightly with a floppy grinding disk, then packed the parts with grinding paste and put it together. I ran the motor for 15 minutes, then took it apart and cleaned out the debris before regreasing.

plate damage galling.jpg


the upper and lower guide bearings need axles welded to the blade frame. I made them from rod.

blade guide bearing mount.jpg


The first wheels I made were plastic and didn't last long;
plastic wheel failure.jpg


So I ordered some alumimum tube and made new ones. These are cut to press over the bearings without the need for circlips.
aluminum wheel detail.jpg

new wheel.jpg


Here they are, with the new hose guide and larger bore hoses in a sleeve, with the power cables for the new electric rotator in there too.

blade guides + hose guides 2020.jpg
 
   / Home built hydraulic FEL mounted hedge cutter
  • Thread Starter
#16  
A couple of breakages; The linkage that swings the main tube right to left slid half off it's pivot and twisted until it popped off.
twisted link2.jpg

That's 20X60mm bar, but I had to make a cut in it to clear an obstruction.
After straightening it, I added a retainer to the end of the 30mm pivot rod so hopefully this won't happen again.
twisted link.jpg


Then this happened; the whole head broke off.
broken collar2.jpg


broken collar.jpg


Not made good enough back in 2014;
broken collar3.jpg

I was at the scapyard and bought this chunk of thick wall pipe, just what I need.
new collar 1.jpg

After a few minutes on the lathe, and after adding a little back plate, it's welded and fitted back together for another day of blocking the road with my tractor to cut the hedge.
Farmers slow down to watch; some pull over and park for a while.
new collar 2.jpg
 
   / Home built hydraulic FEL mounted hedge cutter
  • Thread Starter
#17  
I skipped over this invention; a solenoid lock pin for the tube rotation collar.
I needed to add this because of changes to the hydraulic system. The valve block has 2 better circuits, that are closed when not in use and have better flow. One of them was used for the tube rotation, and would hold it in place hydraulically. I wanted that circuit for the main cutting motor, for the better flow with lower restriction.
That meant moving the tube rotator to an open circuit, and the need for some sort of position lock.
The "right" way to do this would be to spend a lot of money and buy a suitable valve block instead of continuing with the thing from ebay. I did this instead; I had a biggish starter solenoid. It had to be modified a lot, because starter solenoids are powered through the starter windings.
I also use the contacts that used to power the starter to switch on the hydraulic valve for the ram, so it won't try to move before the solinoid has pulled the lock pin out.
solinoid modified electrics.jpg


Making the case parts;

solinoid mount drilling.jpg


The lockpin at the top of the white board fits inside the piston, which is in 2 parts that screw together just below. It acts as a slide hammer, the piston moves first then impacts the back of the pin to pull it out of the lock hole.
I had to modify a smaller spring; it ain't pretty but it works.

solinoid parts 1.jpg

The parts are flame hardened, then tempered in a ceramic kiln.
tempering oven control.jpg


solinoid parts 2.jpg


Here the piston is screwed together; it's made to replace the one that used to operate the starter pinion gear. It also hits the electrical switch when back, shutting off its own 4A pull coil (like most of this type, there's a 1A hold coil too) and energizing the hydraulic solenoid valve to initiate the tube rotation. This is to switch from forward driving hedge cutting to reverse, rarely necessary actually but every now and then it's what I need.

solinoid half assembled.jpg

Assembled solenoid lock pin device. The spring pushed the hardened 12mm pin out, the solenoid pulls it back.
Solinoid assembled on bench.jpg


Here you can see it mounted on the machine.
It works; not as well as I'd hoped though. Sometimes a few hits to the button are required to hammer the pin out.
My first idea was a hydraulically activated one, but the components would have cost a bit and I was tapped out by that time. This solution cost me almost nothing.
It was painted after this picture was taken.
rotation motor 2020.jpg
 
   / Home built hydraulic FEL mounted hedge cutter #18  
Mark - Very impressive seeing something of that complexity being designed and built by one guy with relatively simple tools. I envy your abilities !!!

gg
 
   / Home built hydraulic FEL mounted hedge cutter
  • Thread Starter
#19  
This is the new video of the cutter with the latest upgrades;


I touched on changes I made to the hydraulic system, that started when I added a pressure gauge to the dashboard and saw how high the working pressure was before.
Every hydraulic machine should have one, they're not expensive at all.
hydraulic pressure gauge.jpg


I did some tests, and realized the long tubes out to the motor were undersized.
Now with the better flow solenoid valves and bigger bore tubes, as well as lower ratio between the motor and crankshaft, pressure is far lower, cutting power is improved, and the oil temperature is barely warm instead of dangerously hot.

I also swapped the hydraulic pump for a larger capacity one.
It took a lot of research to find one that would bolt in; mainly, to find the Bosch number for the pump, which is the defacto cross reference number everyone uses.
In case anyone wants to know;

Same Mercury 85 hydraulic pump info;
Pump gear is 1.27/1 over crankshaft speed; the repair book gives wrong numbers.
Pump has a 9 spline shaft, and “Euro 2” mounting flange with centering collar.
14cc pump [European versions, including “Special Export”] sdf part number; 2.4539.410.0 Bosch number 04394801
19cc pump [US versions] sdf part number
2.4539.430.0 Bosch part number; 0510625332
22.5cc Bosch / Rexroth number 0510725348 [will bolt on].


There are still issues. mainly, the new cutting teeth are too thin, just 2mm. I've already broken 4 of them.
hydraulic pump Same Mercury 85.jpg
old + new pumps.jpg
rexroth for SAME Mercury 85.jpg
Same mercury hydraullic pump.jpg
 
   / Home built hydraulic FEL mounted hedge cutter #20  
Wow! Great fabrication and problem solving skills. Enjoyed your post.
 
 
Top