toddwulf
Silver Member
/forums/images/graemlins/smile.gifVery nice. With over 16 days of plus 100 degree's out here in Northern CA., I think it's time to do the same to my baby blue 1920. Thanks for sharing.
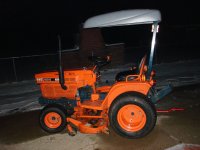
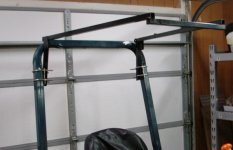
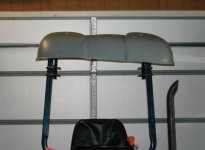
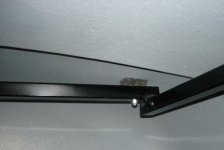
Not much of a story really. A member on another site actually mentioned it, and had a full luggage carrier lid on his tractor. I looked at it and thought how much it would look like a purchased canopy with just a little trimming. So I located a used luggage carrier locally that someone was giving away, and bought 116" of 1" square tubular steel, 4 u-bolts to go around the ROPS, and some misc. plates from around my shop. About $80 in steel, and about 4 hours of my time to build a frame and trim the lid. The sizing was perfect!!!! it makes it to the end of my steering wheel. Will make my work alot more comfortable.Tig said:Neat idea Camo. Looks good. You should start a new thread and tell us the story behind the idea.
")
Camo said:Well, my car luggage carrier conversion canopy is finally done.
mjncad said:Though I doubt nh1520's canopy mounts will break, having an 80 pound roof hanging out there like that could be dangerous should there be a structural failure and the canopy decides to get up close and personal with your body.
nh15201 said:Many thanks for the welcome back. I'm now working as a Plant Manager for a family owned business headquartered in St. Marys (Penn Pallet, Inc.). I've got many friends that live at Treasure Lake. Small world....