Homemade Pull behind grader

   / Homemade Pull behind grader #1  

kdlamoreaux

New member
Joined
Oct 5, 2010
Messages
3
Tractor
Mahindra 2616 hst
After doing a lot of reading on this site and looking at all of the projects I decided to embark on a build of my own. This is a tow behind road grader that I built to reshape and rebuild my road and driveway. Please take a look and let me know if you have any suguestions, I am always looking to make it better.

thanks Doug
 

Attachments

  • grader 1.jpg
    grader 1.jpg
    757.5 KB · Views: 16,088
  • grader 3.jpg
    grader 3.jpg
    725.5 KB · Views: 28,437
   / Homemade Pull behind grader #3  
Welcome to TBN.
Do plan on adding some sort weight over scraper rear tires?..help for traction also stop bouncing when pulling.
 
   / Homemade Pull behind grader #4  
After doing a lot of reading on this site and looking at all of the projects I decided to embark on a build of my own. This is a tow behind road grader that I built to reshape and rebuild my road and driveway. Please take a look and let me know if you have any suguestions, I am always looking to make it better.

thanks Doug

I would suggest shortening the distance between the blade and wheels - make it as short as you can before the blade interferes. Narrow the wheelbase if you have to.

As the pull vehicle rises and falls through the whoop-do-doos, the blade will follow and re-create the whoops, but the vehicle to blade distance behind. However, the height/depth of the new whoop will be reduced by roughly the ratio of the distance from blade to back wheels divided by puller to back wheels. With a very short distance between blade and wheels, the blade will have little vertical movement - two passes and it'll be flat!

I like it though - it looks pretty rugged.

JayC
 
   / Homemade Pull behind grader #5  
Graders were one of my favorite machines to run just behind excavators, mainly because I could actually cut a good grade with them unlike dozers where the blade is out in front and you can get rocking back and forth and do what we called fancy dozer work. That's when you've got bumps all over the place and the boss hollers "never mind that fancy work, just make it level".
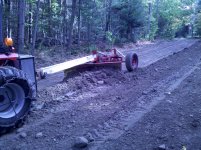
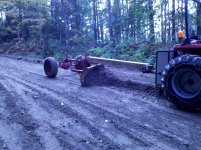
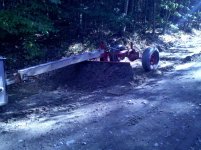
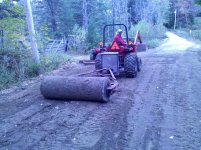
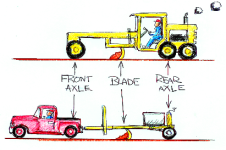
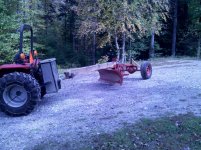
As Thomas suggested , weight will definately help. I can't quite tell from the photo but it looks like you can adjust the tilt with the link on the rear axle which will help to build the crown in the center. As far as length, the general theory as I always understood it, is the more length the better, as it will bridge further over any crowns to take them out and fill in the hollows over a longer area.
You've probably already discovered you can't cut much at a time. To start you can run through with a straight blade cutting lightly to discover where your highs and lows are. When you get them pretty well filled, start at the edge of the road and wing toward the center with a light cut. That action of the material moving across the blade fills any depressions the straight blade didn't get and the loose material in the resulting windrow will easily wing across on the next pass. You may have to move the material back and forth a couple times until you're satisfied that it's smooth enough. For any leftover windrows, just raise outside blade edge a little and lose it. There is one problem with working the grade too much though and that is segregation. The larger stones will tend to come to the surface while the fines settle and unless you have a really good roller, you may get what we call raveling, where the stones get kicked off by traffic and you get an uneven surface again.
It's very hard to tell anyone how to grade, it's more of get out and do it until you learn how.
Hope this helps.
Smiley
 
   / Homemade Pull behind grader #6  
Welcome Doug, as you use it, you will be able to tell more of what it needs, than anyone. good luck man. looking good. zman :thumbsup:
 
   / Homemade Pull behind grader #7  
I made one and couldn't get it to track stright with blade turned and moving much gravel. You well need alot of weight over the wheels to keep it stright behind the tractor, as was said before.
 
   / Homemade Pull behind grader #8  
Doug:

I like it!

What is the function of the adjustable link at the rear, to tilt left or right?
 
   / Homemade Pull behind grader
  • Thread Starter
#9  
Thanks guys for all of the tips. I finally had a chance to use it last night and I must say it worked as well as I hoped. The blade did a good job cutting into the ground and I was able to take about a 2"-3" cut (blade angled to the right and tilted -3", then the whole blade lowered 1.5"). The grader tracked fine even with a full blade piled up it followed the tractor pretty well. I cut and shaped about 200 ft of road and it came out pretty smooth (so I thought) then I switched to the roller ( 6'x2' block of granite). Once it was compacted I can see some areas that still need some work, but not bad for a first timer. This weekend I will finish the road and I will try to get some action shots.
 
   / Homemade Pull behind grader #10  
I think I might try mine again. I might of had my wheels to close to the blade, Yours are back more then mine was and that might of been my trouble.
 
   / Homemade Pull behind grader #11  
Doug, nice work, I just joined TBN as well. Can't wait to borrow the grader!!
 
   / Homemade Pull behind grader #12  
Nice build! If you do decide that you need weight, try a barrel of water.
 
   / Homemade Pull behind grader #13  
I made one a few years ago for a hobby farmer that was maintaining some logging roads. THis blade on an angle would side pull like a big grader so what I did was put on an old rear axle and pivot off an old 205 MF combine it was a smalled machine and the the axle wasnt really all that wide. I na serious angle cut you could adjust the drag link on the steering with a toplink. Also used the pivot for the tilt with a cylinder. We had a weight box on this rig to.
 
   / Homemade Pull behind grader
  • Thread Starter
#14  
Thanks for all of the tips, as promised here are a few pictures of the grader in action. Also a pic of the roller I used after grading.
 

Attachments

  • IMG_20101008_112738.jpg
    IMG_20101008_112738.jpg
    845.2 KB · Views: 5,080
  • IMG_20101008_112748.jpg
    IMG_20101008_112748.jpg
    813.2 KB · Views: 5,140
  • IMG_20101008_104117.jpg
    IMG_20101008_104117.jpg
    727.7 KB · Views: 2,465
  • IMG_20101008_130446.jpg
    IMG_20101008_130446.jpg
    737 KB · Views: 3,141
   / Homemade Pull behind grader #15  
After doing a lot of reading on this site and looking at all of the projects I decided to embark on a build of my own. This is a tow behind road grader that I built to reshape and rebuild my road and driveway. Please take a look and let me know if you have any suguestions, I am always looking to make it better.

thanks Doug

Just one question as I am thinking of building something similar, why did you use wood for the reach? was there a specific reason or am I not seeing what I think I am?:confused2:
 
   / Homemade Pull behind grader #16  
In case Doug doesn't check in to answer, I'll give you the version that I know, which is that he gets custom lumber for free because his family owns a bandsaw mill that lives on a family woodlot right at his house and steel for that piece would have been $$.
 
   / Homemade Pull behind grader #17  
Thanks for all of the tips, as promised here are a few pictures of the grader in action. Also a pic of the roller I used after grading.

I am pretty amazed that you can carry that much on the blade without sliding sideways, but apparently you've got more weight there than it looks.
Lookin good.
Smiley
 
   / Homemade Pull behind grader #18  
Wow! That is awesome! You have inspired me. I am building something similar starting with a front mount hydraulic blade. Gonna be interesting. Still not sure how far behind the blade to put the wheels. I hear logic in both close and far???
 
   / Homemade Pull behind grader #19  
Wow! That is awesome! You have inspired me. I am building something similar starting with a front mount hydraulic blade. Gonna be interesting. Still not sure how far behind the blade to put the wheels. I hear logic in both close and far???

Close rides up and over the humps and down through the hollows. Far cuts off the humps and fills in the hollows.
 
   / Homemade Pull behind grader #20  
Wow! That is awesome! You have inspired me. I am building something similar starting with a front mount hydraulic blade. Gonna be interesting. Still not sure how far behind the blade to put the wheels. I hear logic in both close and far???

I don't see any logic in having the wheels close.

If you want a land plane that works really well, you want it really long, with the blade in the center.
 

Attachments

  • motor_grader_truck-411x273.png
    motor_grader_truck-411x273.png
    111.3 KB · Views: 1,732

Tractor & Equipment Auctions

2006 CATERPILLAR 304C (A58214)
2006 CATERPILLAR...
1984 Trailmobile Enclosed Van Trailer (A55315)
1984 Trailmobile...
Case 950 8 Row Air Planter (A61307)
Case 950 8 Row Air...
(2) UNUSED 31" X 8 MM EXCAVATOR TRACKS W/ PINS (A60432)
(2) UNUSED 31" X 8...
Crown RC5535-35 Stand-On Electric Forklift (A59228)
Crown RC5535-35...
MANIFOLD TRAILER (A58214)
MANIFOLD TRAILER...
 
Top