House for my Parents

   / House for my Parents #531  
Eddy is using the ceramic tile type which can look great but I've seen people ruin the natural look by putting too much of a space between and then using a light grout.

IMHO, they should butt and use the same color grout as the tile.

:2cents:
 
   / House for my Parents #532  
Not much risk in old linoleum or asbestos tiles unless they are literally turning to dust. Virtually all asbestos related disease is caused by industrial exposure to high levels of dust from insulation etc. I didn't think linoleum itself had any asbestos but even other types of asbestos tiles are very low risk.

Linoleum can and often does contain asbestos. Usually found in the backing.

Asbestos has been used in over 4,000 different products. The most unusual place that I have seen asbestos was a bridge driving surface in Nebraska. Apparently, the Dept of Transportation mixed asbestos into the asphalt as a test to see if it would improve the durability.
 
   / House for my Parents #533  
The place looks great!

Do you always start in the middle and work out towards the walls? I can see the advantage in keeping the lines straighter over a long distance. I can't tell is that wood grained tile or laminate?

I don't know about Eddie, but most tile setters do this. Most rooms are slightly off from being perfectly square, and very very few will have dimensions that allow a full tile pattern from one wall to the opposite one. It is more layout work, but looks much better to have the tile pattern set properly and partial pieces along each wall than to start at one wall and have the others with a partial tile at the edge.
 
   / House for my Parents #534  
I don't know about Eddie, but most tile setters do this. Most rooms are slightly off from being perfectly square, and very very few will have dimensions that allow a full tile pattern from one wall to the opposite one. It is more layout work, but looks much better to have the tile pattern set properly and partial pieces along each wall than to start at one wall and have the others with a partial tile at the edge.

Cant you just measure the room, then figure out how many tiles in width that equates to allowing for grout joints then splitting the "partial" tile on the both sides?

What i mean is say you determine that your partial tile will be 80% of the width of said tile, for ease of example say your useing 20" tiles, i know eddie is not and i dont even think they make 20" tiles??? Anyway that would mean that you would have a 16" partial tile on one side if you started on one wall with a whole tile. But divide that 16" by 2 and that gives you 8" so in theory if you put a line of 8" tiles along one wall you will finish with 8" tiles on the other wall. Also you will need to allow for wall run out or in if your walls are not perfect right angles to each other but i would put that on the wall side so as to not scew out the pattern and far wall.

May be harder than starting in the middle i am no tile or flooring guy but i think in theory it will work the same way, just require more math maybe than just finding the center of the room and then fiding the center of a tile for that line and getting a square line to start off with.
 
   / House for my Parents #535  
That's basically what I've done in the past, with the little tile I've set. Snap a line mid-room (minus 1/2 grout line width), tack down a strait-edge and lay the first row of tiles to it...you've got your split room.

Now I've only every laid about 1k sq. ft. of tile, so take that as what it's worth...I learned early that my back and knees didn't like it, but what little I did came out real nice (ya have to trust me on that one :D) Baseboard and shoe are enough of a pain.

It gets more fun the more adjoining rooms you're doing with the same tile.
 
   / House for my Parents
  • Thread Starter
#536  
Every room that I tile, I decide what the strong points are of the room and where I want my cut tiles to end up. With my parents great room, I wanted to make sure the tile went into the hallway as full tile. This was close to center of the room. I was very careful in my framing and the room is square. Both outside walls are the exact distance from each other, the full length of the room. With the tile being 9x35, I got lucky that on both outside walls, the tile was 7 inches wide on one side and 8 inches on the other!!!

The island is another area where I got lucky. When measuring out the forms for the foundation, I figured the island drain should be kind of where it is. No cabinets had been ordered or planed then, other then a sketch that I came up with on the original plan. The drain line is off about 4 inches to the South, and perfect East and West. It was an easy adjustment to get it centered to where the sink is going to be.

I also didn't have a solid plan on the outlets for the island or how to turn on the garbage disposal. That sort of evolved as I put them in place. The switch for the garbage disposal is inside a side cabinet. I had to cut the switch a bit, and take out a bit of wood in the door to make it work, but with the door closed, you will never know it's there, and when you open it, it looks clean and safe.

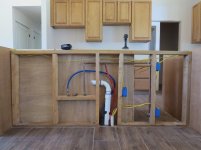
Inside the sink base, I had to put both hot and cold water to one side of the drain. This was to deal with being off on the drain location when measuring the foundation. I think it came out nice, but it's not what I would have wanted in a perfect world.

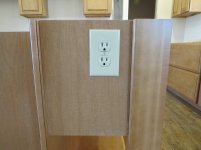
Both my parents want outlets on the island. We ran three dedicated 20 amp lines to the island in the framing. One for the dish washer, one for the garbage disposal and another for outlets. The outlets are on a GFCI. Since the island is one height and the cabinets didn't have a great spot to put outlets on them, I modified them by removing a door and using some of the back panel scrap wood to make it look solid. I put two outlets in. One on either side. Both are hidden from view, but sort of, kind of, easy to get to. The thought is that they might want to be able to plug something in at the island, but nobody wants to see an outlet on the top of the counter, or in the pretty cabinets.

The kitchen is ready to get measured for granite.

202.jpg

203.jpg

204.jpg

206.jpg

208.jpg

210.jpg

212.jpg

Eddie


Eddie
 
   / House for my Parents
  • Thread Starter
#537  
Every room that I tile, I decide what the strong points are of the room and where I want my cut tiles to end up. With my parents great room, I wanted to make sure the tile went into the hallway as full tile. This was close to center of the room. I was very careful in my framing and the room is square. Both outside walls are the exact distance from each other, the full length of the room. With the tile being 9x35, I got lucky that on both outside walls, the tile was 7 inches wide on one side and 8 inches on the other!!!

The island is another area where I got lucky. When measuring out the forms for the foundation, I figured the island drain should be kind of where it is. No cabinets had been ordered or planed then, other then a sketch that I came up with on the original plan. The drain line is off about 4 inches to the South, and perfect East and West. It was an easy adjustment to get it centered to where the sink is going to be.

I also didn't have a solid plan on the outlets for the island or how to turn on the garbage disposal. That sort of evolved as I put them in place. The switch for the garbage disposal is inside a side cabinet. I had to cut the switch a bit, and take out a bit of wood in the door to make it work, but with the door closed, you will never know it's there, and when you open it, it looks clean and safe.

Inside the sink base, I had to put both hot and cold water to one side of the drain. This was to deal with being off on the drain location when measuring the foundation. I think it came out nice, but it's not what I would have wanted in a perfect world.

Both my parents want outlets on the island. We ran three dedicated 20 amp lines to the island in the framing. One for the dish washer, one for the garbage disposal and another for outlets. The outlets are on a GFCI. Since the island is one height and the cabinets didn't have a great spot to put outlets on them, I modified them by removing a door and using some of the back panel scrap wood to make it look solid. I put two outlets in. One on either side. Both are hidden from view, but sort of, kind of, easy to get to. The thought is that they might want to be able to plug something in at the island, but nobody wants to see an outlet on the top of the counter, or in the pretty cabinets.

The kitchen is ready to get measured for granite.
View attachment 323229

View attachment 323230

View attachment 323231

View attachment 323232

View attachment 323233

View attachment 323234

View attachment 323235

Eddie


Eddie
 
   / House for my Parents
  • Thread Starter
#538  
This picture didn't take the first time, so it's a bit out of order. To anchor the cabinets, I built a knee wall with four anchor bolts in the slab to hold it in place. I then laid the tile, grouted and then attached the cabinets to the wall. The wall is built out of 2x4's and allowed me to run the drain line, water lines and electrical lines so nobody will ever see them. I understand that sometimes you have to see a drain line in a sink cabinet, but I really didn't want that to happen here.

200.jpg

Eddie
 
   / House for my Parents #539  
Very pretty cabinets and kitchen layout.

Is the vent for the stove hidden in the cabinets or is no vent required in Texas?
 
   / House for my Parents
  • Thread Starter
#540  
Vent is in the attic, but I haven't connected it to the cabinets yet. The wall behind the kitchen is 8 feet, and the pipes are just laying there, waiting for me to connect them.

Eddie
 

Tractor & Equipment Auctions

2016 Autocar Xpeditor T/A New Way Side Loader Garbage Truck (A55852)
2016 Autocar...
2015 Ford Taurus AWD Sedan (A55853)
2015 Ford Taurus...
2018 INTERNATIONAL LT625 TANDEM AXLE SLEEPER (A54607)
2018 INTERNATIONAL...
2012 International 4300 Vacuum Excavation 7.6L Diesel Truck w/Vanair Vacuum (A51692)
2012 International...
UNUSED (2) 7000# DROP AXLES W/ BRAKES (A54756)
UNUSED (2) 7000#...
2013 East Manufacturing 45ft T/A Walking Floor Trailer (A53422)
2013 East...
 
Top