tungularafishcamp
Veteran Member
- Joined
- Sep 30, 2010
- Messages
- 1,418
- Location
- kodiak island, Alaska
- Tractor
- kubota L2800, 1/2 of a L48
Cariboo Dave
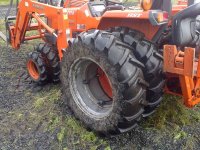
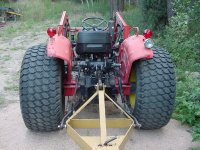
I found an extra set of full size front rims and bought the smaller set of tires n rims. I cut off the outer part of the extra full size rims, had the welding shop in town roll me some plate so it was slightly smaller than the rim on the little wheel. I welded the rolled plate to the smaller rim after cutting the center out of that and then put the cut out center of the larger rim to the other side of the rolled plate. Had to get longer studs and both wheels now bolt thru the same studs. It works well in the soft but watch it as there is a lot more torque as a couple of bent tie rods will attest to until I learned not to dig into tundra with 4 wheel drive. The fronts don't do much for stability but they sure keep the front end up in sand, mud, and snow.
I found an extra set of full size front rims and bought the smaller set of tires n rims. I cut off the outer part of the extra full size rims, had the welding shop in town roll me some plate so it was slightly smaller than the rim on the little wheel. I welded the rolled plate to the smaller rim after cutting the center out of that and then put the cut out center of the larger rim to the other side of the rolled plate. Had to get longer studs and both wheels now bolt thru the same studs. It works well in the soft but watch it as there is a lot more torque as a couple of bent tie rods will attest to until I learned not to dig into tundra with 4 wheel drive. The fronts don't do much for stability but they sure keep the front end up in sand, mud, and snow.