HST Fan Victim Today

   / HST Fan Victim Today #11  
My Condolences!

And thanks for the reminder..., my mower is off for the year and it's time to put the front plate back on.
 
   / HST Fan Victim Today #12  
conner,

I saw your other post that you completed the replacement of your fan. Any tips or learnings that you can share would be helpful. Did the workshop manual PDF that was posted above help? You posted that you did not remove the floorboard or seat. Would you recommend the same approach? Any pics of your work?

Unfortunately, this is a repair that I need to do as well.:mad:
 
   / HST Fan Victim Today
  • Thread Starter
#14  
JKirkwood,

The PDF did help but as I mentioned we didn't remove floor pan, ROPS, seat, etc. It was painful to get at that back bolt - if you look at the transmission schematic that you can get online from Messicks you will see one bolt tucked way back towards the transmission. This wasn't especially difficult to remove because the fan blades were completely sheared off but it was challenging to get it back in and properly torqued. Both my brother and I had our hands up and under "there" with my brother putting downward pressure on a wrench with me pushing with 2 fingers against the wrench to tighten. Awkward, but in hindsight we're both glad we didn't take anything else off of the machine. Would it have been easier to get at the bolt - yes - but also more work to get everything apart and then back together again which we avoided.
As others have said, take your time, do it right. I rented an engine hoist that had an adjustment on it so that the engine could be moved very slightly and also forward and backward - this "attachment" hooked to the main hook of the engine lift.
I had to get clear access to the propeller shaft because I not only needed to replace the fan but the rubber boot as well so I had to take propeller shaft completely off.
There was some wiggling needed to get the radiator loose which was also required.
In order to get to the painful bolt you may want to look into a flexible wrench attachment - they don't provide a lot of torque but it might be enough to get that bolt out which would eliminate the need to take ROPS, floor pan, etc off.
My brother had a very handy very small Snap On tool wrench with a pivoting head that made getting to the bolt easier (not easy - just easier). In order to keep the bolt in the socket we loaded the socket with grease because the bolt would have fallen out otherwise (gravity).
Sorry, going in lots of directions here - trying to remember the whole process. Also sorry I didn't get pictures but at the time I was pretty keen on getting it done as I had other maintenance to do as well. PM me if you have more questions and I'll do my best to help.
 
   / HST Fan Victim Today
  • Thread Starter
#15  
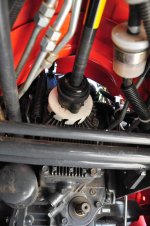
Be really careful that you don't lose any of the bearings either - again, when re-assembling, grease needed to be added to these to keep them in place. Also, there is a very small clip ring that is extremely difficult to put back on. I'm not referring to the one you need split ring pliers for that you can see if you slide the rubber boot forward - this other ring is very small and goes just behind the coupler that holds the 4 bearings. If you don't need to replace the boot you may not need to worry about this but I had to replace the boot as well which meant dealing with that coupler.

Even though access to the rear bolt would be 100% easier from the top (with ROPS, seat, floor pan, etc) out of the way if I were to ever need to replace the fan again I would try and do it the same exact way we did it.

Again, I also had an opportunity to put anti-seize on every bolt/nut we took off and some were starting to show signs of galling so I'm glad I was able to do this.

I called a couple of dealerships - some said it would be impossible to do this without taking ROPS, seat, pan off and others said it would be extremely difficult but not impossible. I got some helpful coaching from TBN members (dmacneil and orangeridge) that had to do this repair or knew how to do it and I figured if worse came to worse everything we did would have still been required so the repair would have been just slightly out of order. Again, luckily for me, I was able to replace boot and fan without removing everything.

My tractor hasn't left the spot where we repaired it. In fact I ordered the Bro-Tek skid plate a week ago and after having looked at more pictures of it online wasn't confident this was adequate protection for working in the woods so I also ordered the front skid plate from Bro-Tek that attaches to the rear one for additional protection (I sound like I'm doing a condom commercial).

If anyone wants the Snap On tool part # that was important for this repair please let me know. It's just small socket wrench but proved invaluable.
 
   / HST Fan Victim Today #16  
conner
I will have to replace the boot as well. Thanks for the additional info. I am thinking about removing the floorplate just to make it easier. The tractor is garaged for the winter so this will be my first spring project when I get back out to MO. I may be in touch with you then if I need more help.
 

Attachments

  • 2009_11_07-2058.jpg
    2009_11_07-2058.jpg
    637.3 KB · Views: 249

Tractor & Equipment Auctions

New/Unused CFG Industrial MH12RX Mini Excavator (A51573)
New/Unused CFG...
2014 KOMATSU PC490 LC-10 CRAWLER EXCAVATOR (A52576)
2014 KOMATSU PC490...
CATALOG IS A GUIDE ONLY!! (A50775)
CATALOG IS A GUIDE...
36'' Mini Excavator Bucket (A51573)
36'' Mini...
New Wolverine 3pt Receiver Hitch (A53002)
New Wolverine 3pt...
MASSEY FERGUSON 492 TRACTOR (A51406)
MASSEY FERGUSON...
 
Top