3RRL
Super Member
- Joined
- Oct 20, 2005
- Messages
- 6,931
- Tractor
- 55HP 4WD KAMA 554 and 4 x 4 Jinma 284
I still have a few things to share on this thread. That would be the receivers for the boxblade and also the landscape rake (which I don't have yet). But the attachment will be very similar for it and maybe a rear blade in the future?
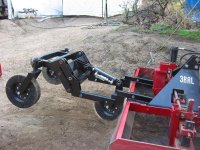
I had made the receivers at home to fit those dog-leg connectors you saw in the first thread. For the boxblade and rake, I needed the dog-leg connectors to get the gauge wheels closer to the ground since they were originally designed to sit on the rotary cutter which is much lower profile. I don't need them to suspend the boxblade or rake up very high off the ground anyway, since they will be true leveling wheels on these implements.
So I went through the same painstaking ordeal of fitting and spacing them. Only this time the receivers not only had to fit the QA wheels, but the dog-leg connectors as well. You can see the dog leg connectors and part of the QA wheel frame in the last photo.

The spacing has to be pretty good for it all to slide on and off for the heavy wheel assembly. I welded a 3/8" plate to the boxblade and the receivers on top of that. I ended up angling them up a little more than I wanted because of where I needed to weld, but I still got enough travel for the wheels to work properly. You can see they will use the same pin on design as the rotary cutter.
I had made the receivers at home to fit those dog-leg connectors you saw in the first thread. For the boxblade and rake, I needed the dog-leg connectors to get the gauge wheels closer to the ground since they were originally designed to sit on the rotary cutter which is much lower profile. I don't need them to suspend the boxblade or rake up very high off the ground anyway, since they will be true leveling wheels on these implements.
So I went through the same painstaking ordeal of fitting and spacing them. Only this time the receivers not only had to fit the QA wheels, but the dog-leg connectors as well. You can see the dog leg connectors and part of the QA wheel frame in the last photo.


The spacing has to be pretty good for it all to slide on and off for the heavy wheel assembly. I welded a 3/8" plate to the boxblade and the receivers on top of that. I ended up angling them up a little more than I wanted because of where I needed to weld, but I still got enough travel for the wheels to work properly. You can see they will use the same pin on design as the rotary cutter.