woodlandfarms
Super Member
- Joined
- Jul 31, 2006
- Messages
- 6,149
- Location
- Los Angeles / SW Washington
- Tractor
- PowerTrac 1850, Kubota RTV x900
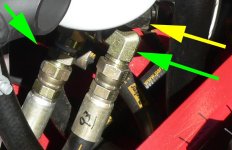
As I had to replace all my wheel hoses, I found that it was a very simple circuit. From pump to front motor then hose to back motor, then back to pump. Same for both sides...
It would make parked crabbing a lot easier....
It would make parked crabbing a lot easier....