Installed Cinematic Kit for my Joystick

   / Installed Cinematic Kit for my Joystick #1  

Mousefield

Elite Member
Joined
Aug 24, 2008
Messages
2,583
Location
Qualicum Beach on Vancouver Island, BC. Canada
Tractor
Sold 2008 CK35 HST
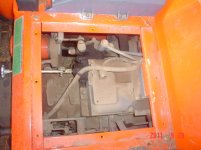
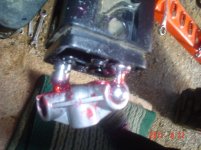
Well it turned out one of the 3 plastic balls had broken off. Took the seat off and loosened the Grey control cover nest to the seat as well as the steel plate this cover is bolted to. Raised the rubber boot at the bottom of the joystick enough so I could unscrew the joystick. Then unbolted the the 2 bolts holding the joystick control box to the tractor. Then pushed the joystick box with the two cable still attached below the tractor. I was able to work on it as you can pull it in front of the back tire. Took the two cables off and then took out the three ballshafts. Found it a bit tricky getting the new ones back in, ended up screwing one of the cable all the way up and the other almost all the way out, this was the only way to fit the 3 ball/joystick housing onto the 2nd ball. Then had to screw the 2nd cable all the way up so the 3 ball/joystick housing was as far away as possible from the black square housing, only then could you put the 3 ball/shaft in. Took me over an hour :ashamed: :confused2: :confused: just to figure out this one step. Made sure the new steel balls had lots of grease. Then reassembled it and works great.
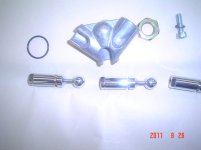
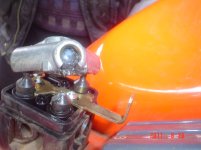
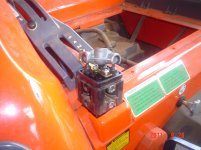
1st pic is the new kit. 3 pic shows the broken ball. Last pic shows the angle needed to get the 2nd ball into the housing.
 

Attachments

  • JoystickFix 003.jpg
    JoystickFix 003.jpg
    125.2 KB · Views: 2,010
  • JoystickFix 007.jpg
    JoystickFix 007.jpg
    221.7 KB · Views: 1,858
  • JoystickFix 009.jpg
    JoystickFix 009.jpg
    194.7 KB · Views: 2,329
  • JoystickFix 010.jpg
    JoystickFix 010.jpg
    212.6 KB · Views: 2,096
  • JoystickFix 013.jpg
    JoystickFix 013.jpg
    193.7 KB · Views: 2,026
  • JoystickFix 014.jpg
    JoystickFix 014.jpg
    233.9 KB · Views: 3,214
   / Installed Cinematic Kit for my Joystick #2  
Those are some shiny balls.

Good job with the fix. What is the weak link now that the plastic balls are so much stronger? I mean, should you fall onto the FEL control lever something will need to break.
 
   / Installed Cinematic Kit for my Joystick #3  
Hmmmm. Needs more grease.
 
   / Installed Cinematic Kit for my Joystick #4  
Thanks for this post. I used it to replace the joystick ballshafts on my CK35 last night. ernie
 
   / Installed Cinematic Kit for my Joystick #5  
I have a CK30HST with 368 hours on it... and my joystick just plain decided to take a flop!
I am researching the repair here.

I have no manual so I am going to ask some perhaps stupid questions.
It looks like the ball ends installs on the ends of the cable.
Do they unscrew from the cable and pull out the top or come out of the bottom of the block?

My ball tops are nylon. Is this a newer style or older style?
They just plain wore out and cracked.

Any input would be greatly helpful.

BTW... anyone know where i can get a shop manual?
There are no dealers near me so I am on my own.
There were 2 and both went belly up!

Thx
 
   / Installed Cinematic Kit for my Joystick #7  
Well, I went to the closest dealer to pick up the new Cinematic V kit for the joystick. Bought 2 just in case I mess something up. Two cost me $175.

When I asked the owner about the installation he said it had been so long since he had done one of those he just didn't remember.
The other guy (parts guy)... he had no clue.

Even with all the info on line it still took me a while to get the three balls into the receiver. Turned out one of the ball units was slight seized in the baklite body.

Once I got the joystick reassembled I started the tractor and whalla... I had the cables backwards. (guess that will teach me to mark things first)
So... again I rip it apart, switched the cables, fired up the tractor to test.
The loader lifted up & down but the bucket would only roll down... NOT UP!
The new ball unit on the upward roll will just push downward (bucket roll down) but just flops up (for upward bucket roll).
Makes NO SENSE!
When I had it apart the FIRST time I thought it was flopping due to the cables being in the wrong place. NOT!
Before reassembling it the second time I tugged on the cable to make sure it wasn't broken or something of that nature.

So, I want to take the cables off the pump to check that end.
Can anyone tell me after backing off the big nut and unscrewing the allen screws to remove the cover... do I just push out the pins to pull the cables off the pump?

I know... it sound about as clear as mud... but my closest dealer is 60 miles away and I have no way to get the tractor to their place and they will not come to my farm.
(WOW... I am wondering why I bought a Kioti at this point.)

It's been a good tractor but a lot of the Kioti dealers in our area went belly up, leaving me in a heck of a position!

Any advice as to why I have no bucket UPWARD roll and what I might check at this point would be GREATLY APPRECIATED!
 
   / Installed Cinematic Kit for my Joystick #8  
I installed the new kit several years ago. Reading your description of problems is exactly the same problem I ran into including the reversal of the cables. The pins do just push out to release the cables. You may have to back off the tension at the covers to get the pins out. You can check and adjust the movement of the cables there to get the proper movement of the valves. There are O-rings in the cover to seal against the pump. If the O-rings have come out of the cover, you will have to replace them. Could not find any the right size anywhere and had to get them from the dealer. Real pain to keep in place when reinstalling the cover. Speaking of the cables, when I was installing the kit in dead of winter, I really did not want to be switching them around when the temps were in the single digits. That was two years ago. I got used to it.
 
   / Installed Cinematic Kit for my Joystick #9  
Well, I have succeeded! Hurray!

Turns out that when one of the cables on the joystick side was being backed off it actually unscrewed from the valve plunger underneath. This is why it would roll the bucket in one direction and not the other. The cable could push the valve rod inward but not pull it out.

When i put the Cinematic kit in i noticed one of the ball plungers would not slide out easily so I used a brass drift and tapped it out. Once it was out I noticed it was scored. Then the stationary ball plunder was a bit rusty. Not sure why as the rubber boot was fine. Matter of fact this tractor has been kept in my barn when not in use for 7.5 years.

Turns out water had gotten into the inner cable (on the valve side) and run down to the valve rod. When I took off rod cover it was all full of some kind of white chalky stuff. I cleaned it up and re-assembled the cable into the end of the rod. Worked like a charm.

I had actually removed the other rod cover to be sure it was well lubed and it was. However, I did notice the o-ring was broken on one of the covers and the rubber inside the bronze washer had come un-assembled. The problem is you have to buy an entire kit to get those pieces.

I did a lot of research and found my best info here on TractorByNet. The Kioti documentation, other than a SMALL parts explosion, was pretty much useless AND, as I mentioned in my earlier post, the dealer was not even as good as the manual.

So to all who have posted here on this topic... THANK YOU... you were of GREAT HELP!

She's up and functional.

Please don't hesitate contacting me with any questions. I'll do my best to help out.

BTW... if anyone is looking for a Service Manual... check servicemanualvault .com. The dealer wanted $120 for one and I downloaded one in .PDF format for $9.95.
 
   / Installed Cinematic Kit for my Joystick #11  
I'll try and revive this thread, if I may. I broke the joystick today after 11 years and 1400 hrs on my CK 20 HST. Obviously they are plastic balls - and from what in read here, I need to replace with the newer metal balls /kits. What i don't understand is: the dealer told me I had to take the whole assembly off...cables - unhooked underneath the tractor floor where the cables then go into a large junction that feeds the hyrdraulic cables.
I'm a stonemason- not a mechanic, so this may not sound right.
But why can't the new balls /cinematic kit be replaced after just taking off the rubber boot and all?
 
   / Installed Cinematic Kit for my Joystick #12  
On mine I removed the boot. Unbolted the lever from the floor and adjusted the balls so I could change them still hooked underneath. Hope that helps.
 
   / Installed Cinematic Kit for my Joystick #13  
Yep, you can do it without unhooking everything. For a shop it may be easier to do it that way. If you detach the assembly from the tractor (leaving all cables attached) you can actually move it outside near the rear tire to work on it so you don't need to reach in from under the seat (which pretty much has to be removed in any case). Not as easy as on a workbench, but totally sufficient.

edit: that's on my CK27, your CK20 may be enough different that this may not apply.
 
   / Installed Cinematic Kit for my Joystick #14  
Im having the issues with needing to repair the cinematic kit on my CK30. I got everything out fine but I am not able to get the three rods lined up correctly to get all 3 into the joystick holder (nice technical term huh). I can get 2 of the 3 but not all of them. Is there a specific order? Also forgot to mark my cables as to which one goes where. Can someone tell me if the outer cable (while sitting in the drivers seat) connects to the right side or left side of the joystick holder? Pretty sure the black block goes in so the pivot rod is at the back and to the right (closest to the seat)? Based on the pivot rod being correct does the outiside line go the the right of the pivot rod? Also someone mentioned other parts within the black housing like rings and a spring. Does anyone know what parts should be in that black housing? Sorry for all the dumb questions but I had taken it apart some time ago and just getting back to it so I'm a bit lost. Thanks
 
   / Installed Cinematic Kit for my Joystick #15  
I ended up getting the coupler attached to all the rods. Found out the cause was water within the cable when I opened up the cover from underneath. Probably the equivalent of a teaspoon puked out (was probably the reason I couldnt get the balls into the coupler in the first place). I still don't know how the two cables connect from the bottom to the rods on the black box. Could someone tell me how to connect them? If I am sitting in the drivers seat, does the lower outside cable go to the outside rod on the black box? I tried to follow the hydraulic lines from the bottom connection out to the bucket hydraulics. I was able to determine that each line splits into two lines (2 for the bucket raise/lower and 2 for the bucket curl up/down) The problem is the hydraulic lines go into the frame of the FL (thinking my is the KL130?) and wasnt able to accurately follow the path of the lines. I know there are markings on the bottom of the lower box where all the hydraulic in/out lines connect but there wasn't any identifiers to help me know which connector to use. I would like to get this done today because my grandson is coming over and he loves to ride his Papa D's tractor :)
 
   / Installed Cinematic Kit for my Joystick #16  
Perhaps this will help: 20190311_080822.jpg
 

Marketplace Items

2023 FORD F-150 XL CREW CAB TRUCK (A59823)
2023 FORD F-150 XL...
Truck Mounted Carpet Cleaning Extraction Machine (A57454)
Truck Mounted...
2008 MAXX-D FUEL TRAILER (A58214)
2008 MAXX-D FUEL...
2358 (A60432)
2358 (A60432)
2019 Jeep Grand Cherokee SUV (A59231)
2019 Jeep Grand...
John Deere 855DXUV Gator (A57148)
John Deere 855DXUV...
 
Top