millsan1
Gold Member
- Joined
- Feb 10, 2015
- Messages
- 324
- Location
- Riegelsville, PA
- Tractor
- Mahindra 2538 Cab, Volvo ECR40D Excavator
Hey all.
Just thought I would share a project I recently completed.
I have an Intimidator EV Classic. It's a great machine, but with the one big drawback of the range. I was lucky to get 9 miles out of it, and if working hard, I might only get 5. The machine weighs 2000 lbs, and is super capable.
One of the challenges that has been standing in the way of switching to Lithium batteries is the large amp draw that a heavy UTV like this can pull. Many golf carts have been upgraded to Lithium, but they generally are a lot smaller, lighter, and have much lower amp draw. 200 Amp controller is fairly normal for a golf cart, and my sxs has a 650 amp controller, pushing a 30 hp motor. That equates to over 500 amp draw, probably closer to 550 with conversion losses etc.
Up until recently, it was normal to replace your golf cart batteries with 12V lithium batteries, and the amp draw would be OK for lighter vehicles. For mine, there was not a solution that would really work.
Big Battery has a solution that works really well. They sell a 48 volt battery, that is capable of a constant 80 Amp discharge rating, and a peak of 180 Amp, for 6 seconds, and is almost a direct drop in for the 6 volt Trojan batteries I had in my sxs (within 1/8 inch in most dimensions). The kit in the link is 4 batteries, which can provide 320 Amps continuous, and 720 for a spike, when hooked in parallel. That should have met my needs , but I would have had to be judicious with the throttle. Upgrading to 8 total batteries gives me all I need. 8 batteries in parallel gives me 640 Amp constant and 1440 for peak. Perfect. As an added bonus, the energy available to me would more than double my range. A side benefit is reducing weight by about 200 lbs due to the lighter batteries.
Total price was ~$5500.
After everything was received, work started.
First step was to remove the Lead Acid batteries. Disconnected all the cables, remove the battery holders, and pull out the batteries. Simple, but those were heavy.
Next I needed to mount the charger and the bus bar, where all batteries connect to. Charger went in on the passenger side, on the rear firewall. This is right next to the stock charger port. I eventually cut the cord for the standard charger, and wired in the new charger.

The bus bar mounted on the driver's side, rear wheel well.

The batteries sit like this: 1 front to back, on the outside, then 3 left to right, stacked next to each other. This is repeated on both sides.

The battery holders needed to be modified slightly, with a little grinding and bending. The 3 batteries are about 3/16" wider than the holder, so I bent the ears a bit. Also, these batteries are connected using a forklift type plugs, on the side, so I had to cut the holders to make room for that, and there is a breaker and display on each battery, again, a little cutting and grinding to make room. The single battery holders just needed to be cut and ground to make room for the connector and breakers.

One of the tricky bits is that the motor is offset towards the driver's side. Through trial and error, I learned I needed to connect the plugs to the batteries before dropping them in. There is also limited space to cleanly wire manage the cables. So protect them, I double or triple loomed the cables. I put 1/4" loom over each cable, then put 3/4" loom over the two cables with loom on them already. Where the cables might rub a sharp area, I added a third loom of 1".
As a side note, one of the great things about working with Lithium batteries, is that they come with circuit breakers, so I could kill the power, and work with wires, without worrying about causing a short, etc.
I dropped in the batteries on the passenger side, and that has plenty of room. I still double loomed those, just to be safe. Also mounted the connector for the charger. There is a stock cable that runs from one battery bank to another. That was used to connect the controller to the negative side of the bus bar. The positive side of the bus bar connects to the stock location for the fuse and relay for the controller.
There are three wires that needed to be extended to the bus bar, two for the stock charger (which I replaced with a 2000 watt inverter) and one other for the ground for the onboard 48 to 12 inverters.
Everything was home run to the bus bar and wire managed.
I then removed the stock charger and dropped in the inverter and connected the wires.

Next I ran the voltmeter to the dash.

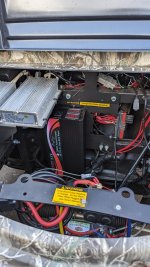
Final install (kinda, I loomed and cleaned up after this) of batteries etc

Double checked everything, and viola! It worked as advertised.
I ran the sxs gently at first, just to make sure it all worked, then harder, and finally pushed it as hard as I could (steep hill, high gear, 4x4 engaged) and no issues at all. Machine is definitely snappier, but top speed is not increased, but that is expected, since the top speed is controlled by a controller setting.
I then braved out into the wide world for a run down to the local deli. Machine ran flawlessly and after a round trip of 12+ miles, through some large elevation changes, I came back home with at least 50% charge remaining. Lithium are hard to get an accurate discharge on, but in my case 52.8 volts = 70% charge and 52.4 volts = 40% charge. I returned with 52.7, so less than 70%, but more than 40%,so I'm calling it 50% to be conservative.
This upgrade completely changed the machine and my enjoyment of it. I used ot get serious range anxiety and was afraid to go very far or work all day. Super happy with the results.
Just thought I would share a project I recently completed.
I have an Intimidator EV Classic. It's a great machine, but with the one big drawback of the range. I was lucky to get 9 miles out of it, and if working hard, I might only get 5. The machine weighs 2000 lbs, and is super capable.
One of the challenges that has been standing in the way of switching to Lithium batteries is the large amp draw that a heavy UTV like this can pull. Many golf carts have been upgraded to Lithium, but they generally are a lot smaller, lighter, and have much lower amp draw. 200 Amp controller is fairly normal for a golf cart, and my sxs has a 650 amp controller, pushing a 30 hp motor. That equates to over 500 amp draw, probably closer to 550 with conversion losses etc.
Up until recently, it was normal to replace your golf cart batteries with 12V lithium batteries, and the amp draw would be OK for lighter vehicles. For mine, there was not a solution that would really work.
Big Battery has a solution that works really well. They sell a 48 volt battery, that is capable of a constant 80 Amp discharge rating, and a peak of 180 Amp, for 6 seconds, and is almost a direct drop in for the 6 volt Trojan batteries I had in my sxs (within 1/8 inch in most dimensions). The kit in the link is 4 batteries, which can provide 320 Amps continuous, and 720 for a spike, when hooked in parallel. That should have met my needs , but I would have had to be judicious with the throttle. Upgrading to 8 total batteries gives me all I need. 8 batteries in parallel gives me 640 Amp constant and 1440 for peak. Perfect. As an added bonus, the energy available to me would more than double my range. A side benefit is reducing weight by about 200 lbs due to the lighter batteries.
Total price was ~$5500.
After everything was received, work started.
First step was to remove the Lead Acid batteries. Disconnected all the cables, remove the battery holders, and pull out the batteries. Simple, but those were heavy.
Next I needed to mount the charger and the bus bar, where all batteries connect to. Charger went in on the passenger side, on the rear firewall. This is right next to the stock charger port. I eventually cut the cord for the standard charger, and wired in the new charger.
The bus bar mounted on the driver's side, rear wheel well.
The batteries sit like this: 1 front to back, on the outside, then 3 left to right, stacked next to each other. This is repeated on both sides.
The battery holders needed to be modified slightly, with a little grinding and bending. The 3 batteries are about 3/16" wider than the holder, so I bent the ears a bit. Also, these batteries are connected using a forklift type plugs, on the side, so I had to cut the holders to make room for that, and there is a breaker and display on each battery, again, a little cutting and grinding to make room. The single battery holders just needed to be cut and ground to make room for the connector and breakers.
One of the tricky bits is that the motor is offset towards the driver's side. Through trial and error, I learned I needed to connect the plugs to the batteries before dropping them in. There is also limited space to cleanly wire manage the cables. So protect them, I double or triple loomed the cables. I put 1/4" loom over each cable, then put 3/4" loom over the two cables with loom on them already. Where the cables might rub a sharp area, I added a third loom of 1".
As a side note, one of the great things about working with Lithium batteries, is that they come with circuit breakers, so I could kill the power, and work with wires, without worrying about causing a short, etc.
I dropped in the batteries on the passenger side, and that has plenty of room. I still double loomed those, just to be safe. Also mounted the connector for the charger. There is a stock cable that runs from one battery bank to another. That was used to connect the controller to the negative side of the bus bar. The positive side of the bus bar connects to the stock location for the fuse and relay for the controller.
There are three wires that needed to be extended to the bus bar, two for the stock charger (which I replaced with a 2000 watt inverter) and one other for the ground for the onboard 48 to 12 inverters.
Everything was home run to the bus bar and wire managed.
I then removed the stock charger and dropped in the inverter and connected the wires.
Next I ran the voltmeter to the dash.
Final install (kinda, I loomed and cleaned up after this) of batteries etc
Double checked everything, and viola! It worked as advertised.
I ran the sxs gently at first, just to make sure it all worked, then harder, and finally pushed it as hard as I could (steep hill, high gear, 4x4 engaged) and no issues at all. Machine is definitely snappier, but top speed is not increased, but that is expected, since the top speed is controlled by a controller setting.
I then braved out into the wide world for a run down to the local deli. Machine ran flawlessly and after a round trip of 12+ miles, through some large elevation changes, I came back home with at least 50% charge remaining. Lithium are hard to get an accurate discharge on, but in my case 52.8 volts = 70% charge and 52.4 volts = 40% charge. I returned with 52.7, so less than 70%, but more than 40%,so I'm calling it 50% to be conservative.
This upgrade completely changed the machine and my enjoyment of it. I used ot get serious range anxiety and was afraid to go very far or work all day. Super happy with the results.