JD 2240: Rebuilding my 3PH

   / JD 2240: Rebuilding my 3PH
  • Thread Starter
#21  
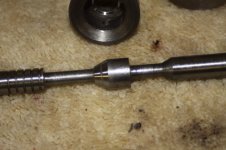
And here I thought that was a broken O-ring. Those type of rings appear to be a PITA since there is nothing to grab onto.

They pop out pretty easy with the pick...as long as I remember to push in the face to give them room to come out.:laughing:

If you look back at that picture again, you will see the notch on the outer edge of the endface which locks the snap ring in so it cannot come out without the endface being depressed.

BTW, I went ahead and ordered the second valve yesterday morning.
 
   / JD 2240: Rebuilding my 3PH #22  
I think it was a good call on ordering the second valve. No sense coming this far to not fix anything questionable.
 
   / JD 2240: Rebuilding my 3PH
  • Thread Starter
#24  
Picked up the new valves tonight after work. What a difference.
Old on the left. New on the right.
 

Attachments

  • 3PH Rebuild_033.jpg
    3PH Rebuild_033.jpg
    203.8 KB · Views: 210
  • 3PH Rebuild_036.jpg
    3PH Rebuild_036.jpg
    176.6 KB · Views: 226
   / JD 2240: Rebuilding my 3PH
  • Thread Starter
#25  
Piston seal looks OK but looks are deceiving, Change it no matter what, any seals you see change them, cut the piston seal off without scoring the sides of the groove, (some guys try prying between the seal and the groove and it scars the side of the groove), you're gonna change it anyways....also grease the rubber energizer ring (you'll see this underneath )before the new teflon outer ring goes on....stretch it gently just enough to get it on......then shrink...

Got the new seal and I see the rubber energizer ring with it. When you say to grease the energizer ring, are you talking about greasing the inside for sliding over the piston? Or greasing between it and the teflon outer ring? Also, what's the reason for using grease rather than hydraulic fluid?
 
   / JD 2240: Rebuilding my 3PH #26  
That is a heck of a groove on the conical portion. Bet that caused some leakage.
 
   / JD 2240: Rebuilding my 3PH
  • Thread Starter
#27  
That is a heck of a groove on the conical portion. Bet that caused some leakage.

The strange part is that that was the pressure valve and the relief valve wasn't nearly as bad. Even so, my issues were with trying to lower the 3PH. It raised great.:confused2:

I think it just clicked in my mind. The leakage could have been part of my problem in conjunction with the missing O-rings.
 
   / JD 2240: Rebuilding my 3PH #28  
Cyril,

The orings may have been left out intentionally.....I've seen it in other equipment where they are built internally in trans housing.....usually orings don't just disappear....they wear out yes but there would be left over pieces in the grooves.....did the parts breakdown show these on thier pics? if so then use them.....usually the precision clearances in the valve spool hold the load and so I would suspect from your description of your complaint that the piston seal or the worn seat on the spool would more than likely be your culprit of erratic performance....

Grease both TFE Seal & energizer before installation....better than oil....

and remember....CLEAN HANDS, TOOLS & BENCH......!!!!!
 
   / JD 2240: Rebuilding my 3PH
  • Thread Starter
#29  
Cyril,

The orings may have been left out intentionally.....I've seen it in other equipment where they are built internally in trans housing.....usually orings don't just disappear....they wear out yes but there would be left over pieces in the grooves.....did the parts breakdown show these on thier pics? if so then use them.....usually the precision clearances in the valve spool hold the load and so I would suspect from your description of your complaint that the piston seal or the worn seat on the spool would more than likely be your culprit of erratic performance....

Grease both TFE Seal & energizer before installation....better than oil....

and remember....CLEAN HANDS, TOOLS & BENCH......!!!!!

Yes the O-rings are shown in the parts breakdown. Also shown in the tech manual exploded view and included in the rebuild kit. I figure they should probably be put in.

I assume whoever was into this machine before left them out for whatever reason. It could have been something as simple as laziness and not wanting to fight them to get the caps back in with them on. Who knows. At any rate, I figure the engineers had a reason for designing them into the system, so I'll put them in.

Thanks for the heads up on using the grease. I'll do that. As for clean hands, tools, and bench...that's always part of reassembly.

It'll get dirtier before cleaner though, I need to start by scraping old gaskets tomorrow. Then...it's cleaning time.:thumbsup:
 
   / JD 2240: Rebuilding my 3PH
  • Thread Starter
#30  
Progress reoprt:

The 3PH has been reassembled and tested. Operates like new! I still need to go through it and do all the adjustments, but I'm happy with the outcome. I played with it for about 15 minutes and there are no signs of leaking so I think the internal work is done.

I installed the new lower body on the left lift link and am waiting for the upper arm for the left lift link. Even with just the lower body installed, I can see quite a difference in how tight the lift arms are becomming. With time I think I will replace the right lift link as well, but that may end up being a TNT when it gets replaced. Time will tell.
 

Tractor & Equipment Auctions

71056 (A49346)
71056 (A49346)
American Sanders EZ-8 Electric Floor Sander (A49461)
American Sanders...
ALL ITEMS NOT PICKED UP IN 30 DAYS WILL BE RESOLD FOR STORAGE!! (A50774)
ALL ITEMS NOT...
19010 (A48082)
19010 (A48082)
4- 6 DRILL COLLARS (A50854)
4- 6 DRILL COLLARS...
2015 FORD F-250XL SUPER DUTY SERVICE TRUCK (A51406)
2015 FORD F-250XL...
 
Top